We know how frustrating it is when your WordPress site looks great but search engines ignore it. Your images sit there, invisible to Google Image Search, missing out on thousands of potential visitors.
Good news: fixing this takes less time than you think.
Image SEO in WordPress means making your photos and graphics findable by search engines. When done right, it brings more traffic to your site without spending a dollar on ads. The core steps include renaming files before upload, writing clear alt text, compressing images to reduce file size, and choosing the right formats like WebP.
This guide walks you through 15 practical steps to optimize images in WordPress. You will learn which plugins help most, how to write alt text that works, and which file formats Google prefers. By the end, your images will load faster and rank higher.
No technical jargon. No complicated setups. Just clear instructions that work.
Why Image SEO Matters for Your WordPress Site
Images affect your site’s performance in three important ways.
First, search engines use images to understand your content. When you optimize alt text and file names, Google can categorize your pages more accurately. This helps your site appear in both regular search results and Google Image Search.
Second, image file size directly impacts page speed. Large, uncompressed images slow down loading times. Slow sites frustrate visitors and hurt your rankings. Optimized images can improve page load times by up to 50%.
Third, properly optimized images create better user experiences. Fast loading visuals keep people on your site longer. Clear, relevant images help visitors understand your message quickly.
Consider this: WordPress powers over 40% of all websites globally. Most site owners upload images without thinking about SEO. That gives you a real advantage when you get this right.
Step 1: Use Descriptive File Names Before Upload
Rename your image files before uploading them to WordPress. This simple step helps search engines understand what your image shows.
How to Create SEO-Friendly File Names
Replace generic names like IMG_1234.jpg with descriptive ones. Include your target keyword naturally.
For example, if you run a bakery and have a photo of chocolate cupcakes, rename the file to chocolate-cupcakes-vanilla-frosting.jpg instead of DSC_0942.jpg.
Follow these rules:
- Use lowercase letters only
- Separate words with hyphens, not underscores
- Include relevant keywords without stuffing
- Keep names under 60 characters
- Be specific and descriptive
What This Looks Like in Practice
Before: IMG_5829.jpg
After: wordpress-dashboard-settings-page.jpg
The improved file name tells Google exactly what the image contains. Search engines read file names when indexing your content. Clear names improve your chances of ranking in Google Image Search.
Make this a habit before every upload. It takes 10 seconds and pays off for years.

Step 2: Write Clear Alt Text for Every Image
Alt text (alternative text) describes your image in words. Screen readers use it to help visually impaired visitors understand your content. Search engines use it to index and rank your images.
Adding Alt Text in WordPress
Click any image in your WordPress media library. You will see an “Alt Text” field in the right sidebar. Fill it in before inserting the image into your post.
Write alt text that describes what the image shows. Include your keyword when it fits naturally, but focus on accuracy first.
Good example: “WordPress media library showing uploaded images with file details”
Bad example: “image” or “photo1” or keyword stuffing like “WordPress WordPress WordPress plugin”
Alt Text Best Practices
Keep alt text between 10 and 125 characters. Make every word count.
Describe the image’s content and context. If the image shows a process, explain what is happening. If it displays data, mention the key insight.
Skip phrases like “image of” or “picture of.” Screen readers already announce it as an image. Just describe what you see.
For decorative images that add no information, leave alt text empty. This tells screen readers to skip them.
WordPress Plugins That Help
Several plugins can make alt text management easier:
- All in One SEO scans for missing alt text
- Yoast SEO flags images without alt tags
- SEOPress provides alt text reminders
These tools help you catch images you might have missed. But they cannot write good alt text for you. That part requires human judgment.
Step 3: Compress Images to Reduce File Size
Large image files slow down your site. Visitors leave if pages take more than three seconds to load. Search engines penalize slow sites in rankings.
Compression reduces file size without destroying visual quality. Your images look the same to visitors but load much faster.
Choose the Right Compression Method
Two types of compression exist: lossy and lossless.
Lossy compression removes some image data to shrink file size significantly. The quality loss is usually invisible to human eyes. This works best for photos and complex images.
Lossless compression reduces file size without removing any data. Images remain pixel-perfect. Use this for logos, screenshots, and graphics with text.
WordPress Image Compression Plugins
Install one of these plugins to compress images automatically:
- ShortPixel offers both lossy and lossless options
- Imagify provides three compression levels
- EWWW Image Optimizer handles bulk compression
- Smush compresses images on upload
Most plugins compress new uploads automatically. They also let you bulk compress existing images in your media library.
Manual Compression Before Upload
Compress images before uploading to WordPress for even better results:
- Use free tools like TinyPNG
- Upload your image file
- Download the compressed version
- Upload to WordPress
Aim for file sizes under 200KB for most images. Hero images and photos can go up to 500KB if necessary. Anything larger needs compression.
If you need help with WordPress speed optimization, our team handles image compression and performance improvements.
Step 4: Select the Best Image Format
Different image formats serve different purposes. Choosing the wrong one wastes file size or sacrifices quality.
Understanding Common Image Formats
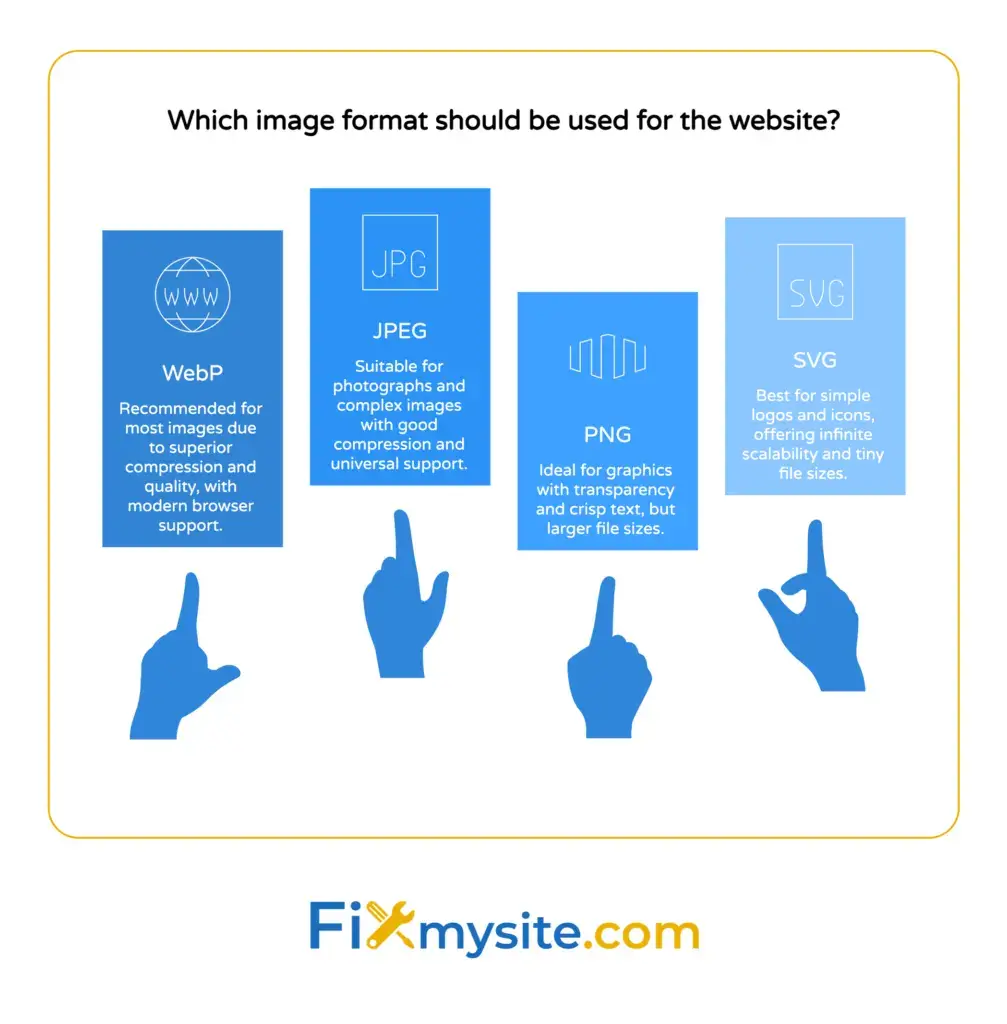
JPEG works best for photographs and complex images with many colors. It uses lossy compression to create small file sizes. Most photos should use JPEG format.
PNG handles graphics, screenshots, and images with transparency. It uses lossless compression, so file sizes run larger than JPEG. Use PNG for logos, icons, and images with text.
WebP provides better compression than both JPEG and PNG. It reduces file sizes by 25 to 35% while maintaining quality. Modern browsers support WebP, making it the best choice for most images.
SVG works perfectly for simple graphics, icons, and logos. These vector files scale to any size without losing quality. They create tiny file sizes for simple shapes.
Converting Images to WebP
WordPress 5.8 and newer versions support WebP uploads natively. Convert your existing images using these methods:
Use a plugin like WebP Converter for Media. It converts your entire media library and serves WebP to compatible browsers.
Convert files manually before upload using Squoosh or CloudConvert.
Most image compression plugins now handle WebP conversion automatically.
When to Use Each Format
| Format | Best For | Compression |
|---|---|---|
| WebP | All images (photos and graphics) | Excellent |
| JPEG | Photographs and complex images | Good |
| PNG | Graphics with transparency or text | Fair |
| SVG | Simple logos and icons | Excellent |
Start using WebP for all new uploads. Keep your original files as backups.
Step 5: Resize Images to Proper Dimensions
Uploading oversized images wastes bandwidth and slows page loading. WordPress creates multiple sizes from each upload, but starting with reasonable dimensions helps.
Ideal Image Dimensions for WordPress
Full-width images should be 1200 to 2000 pixels wide. This covers most desktop screens without excess file size.
Featured images work well at 1200 x 630 pixels. This size displays properly on social media when shared.
Sidebar images need only 300 to 400 pixels wide. Smaller dimensions load faster.
Resizing Before Upload
Resize images before uploading them to WordPress:
- Check where the image will appear on your site
- Determine the maximum display width
- Resize to that width (or slightly larger for retina displays)
- Upload the properly sized version
Free tools for resizing include:
Never upload 5000-pixel-wide images if they display at 800 pixels. The extra data serves no purpose.
Step 6: Enable Lazy Loading for Images
Lazy loading delays image loading until visitors scroll near them. This speeds up initial page load times significantly.
WordPress 5.5 and newer versions include native lazy loading. Images automatically get the loading=”lazy” attribute added to their HTML.
Checking If Lazy Loading Works
Right-click any image on your site and select “Inspect” or “Inspect Element.” Look for this code:
<img src="image.jpg" loading="lazy" alt="description">If you see loading=”lazy”, it is working correctly.
Lazy Loading Plugins
If your WordPress version lacks native lazy loading, install a plugin such as a3 Lazy Load.
Most caching plugins also include lazy loading features. Check your existing plugins before installing another one.
Our complete guide to lazy loading images in WordPress covers advanced configuration options.

Step 7: Add Image Captions When Helpful
Captions provide context for your images. They appear below the image and help visitors understand what they are viewing.
Search engines read captions, giving you another opportunity to include relevant keywords naturally.
When to Use Captions
Add captions when they provide value:
- Screenshots that need explanation
- Before-and-after comparisons
- Charts or graphs showing data
- Photos requiring attribution
Skip captions for decorative images or when the surrounding text already explains the image clearly.
Adding Captions in WordPress
Click an image in the WordPress editor. The block toolbar appears with a caption field below the image. Type your caption there.
Keep captions short and relevant. One or two sentences work best.
Step 8: Use Title Text Strategically
The title attribute creates a tooltip when visitors hover over an image. Most browsers show this text in a small popup.
Search engines give title text less weight than alt text. Focus your energy on alt text first.
When Title Text Helps
Add title text when you want to provide extra information on hover. This works well for:
- Technical diagrams with component names
- Infographics with additional data
- Product images with feature highlights
In WordPress, add title text in the media library under “Title” field. This differs from alt text, which appears in the “Alt Text” field.
Never rely on title text for essential information. Mobile users cannot hover over images.
Step 9: Create and Submit an Image Sitemap
Image sitemaps help search engines discover all your images. They list every image URL on your site in one organized file.
Generating an Image Sitemap in WordPress
SEO plugins handle this automatically:
Yoast SEO includes images in your XML sitemap by default. Go to SEO → General → Features and enable XML sitemaps.
All in One SEO creates image sitemaps automatically when you enable sitemap features.
Rank Math adds images to sitemaps without extra configuration.
Submitting Your Image Sitemap to Google
- Log into Google Search Console
- Select your website property
- Click “Sitemaps” in the left sidebar
- Enter your sitemap URL (usually yoursite.com/sitemap.xml)
- Click “Submit”
Google will crawl your sitemap and index your images. This process takes a few days to several weeks.
Step 10: Add Structured Data for Images
Structured data tells search engines specific details about your images. This helps them understand context and display rich results.
Using Schema Markup for Images
Add ImageObject schema to your images for better search visibility. This markup includes details like:
- Image URL and format
- Image dimensions
- License information
- Creator details
Most SEO plugins handle basic schema markup automatically. For advanced schema, use plugins like:
- Schema & Structured Data for WP
- Rank Math (includes built-in schema options)
Open Graph Tags for Social Sharing
Open Graph tags control how images appear when people share your content on social media. Add these tags to ensure your images display correctly on Facebook, Twitter, and LinkedIn.
SEO plugins like Yoast and All in One SEO add Open Graph tags automatically. Check your plugin settings to verify this feature is enabled.
Step 11: Use Responsive Images with Srcset
Responsive images adapt to different screen sizes. WordPress generates multiple image sizes when you upload files.
The srcset attribute tells browsers which image size to load based on the visitor’s screen. Mobile users get smaller files, desktop users get larger ones.
How WordPress Handles Responsive Images
WordPress 4.4 and newer automatically adds srcset attributes to images. Check your image code by right-clicking an image and selecting “Inspect.”
You should see code like this:
<img srcset="image-300.jpg 300w, image-768.jpg 768w, image-1024.jpg 1024w" sizes="(max-width: 1024px) 100vw, 1024px" src="image.jpg" alt="description">This code provides multiple image sizes. Browsers choose the best size for each screen.
Customizing Image Sizes
WordPress creates several default image sizes. Add custom sizes in your theme’s functions.php file or using a plugin like Simple Image Sizes.
More image sizes give browsers more options but create more files. Balance is important.
Step 12: Optimize Image File Names in Bulk
If you already uploaded hundreds of images with generic names, renaming them manually takes too long. Bulk optimization plugins help.
Bulk Renaming Plugins
Media File Renamer renames files based on image titles or post titles. It handles your entire media library in batches.
Phoenix Media Rename lets you rename files directly from the media library.
Steps for Bulk Renaming
- Back up your site before making bulk changes
- Install your chosen renaming plugin
- Configure naming rules (use post titles or manual patterns)
- Select images to rename
- Process in small batches to avoid timeouts
This process updates file names and all references in your posts and pages automatically.
Step 13: Monitor Image Performance in Google Search Console
Track how your images perform in search results. Google Search Console shows which images appear in Image Search and how often people click them.
Viewing Image Performance Data
- Open Google Search Console
- Select your site property
- Click “Performance” in the left sidebar
- Click the “Search type” dropdown
- Select “Image”
You will see impressions, clicks, and average position for your images in Google Image Search.
Using This Data
Look for images with high impressions but low clicks. These need better alt text or more relevant file names.
Find images that rank well and create similar content around related keywords.
Check which pages drive the most image traffic. Optimize other pages using the same techniques.
Step 14: Consider Using a CDN for Images
A content delivery network (CDN) stores copies of your images on servers around the world. Visitors load images from the server closest to them, reducing loading times.
CDN Benefits for Image SEO
Faster loading speeds improve user experience and SEO rankings. CDNs also reduce the load on your WordPress hosting server.
Popular CDN Options
- Cloudflare offers a free plan with basic CDN features
- Bunny CDN provides affordable pay-as-you-go pricing
Many WordPress hosting providers include CDN services in their plans. Check with your host before signing up for a separate CDN.
Setting Up a CDN
Most CDNs provide WordPress plugins that handle configuration automatically. Install the plugin, enter your API key, and activate the service.
The plugin rewrites your image URLs to point to the CDN servers. No manual file transfers needed.
If you need assistance with small WordPress tasks like CDN setup, we can handle the technical configuration for you.
Step 15: Maintain Image SEO Over Time
Image SEO requires ongoing attention. New images need optimization, and existing ones need monitoring.
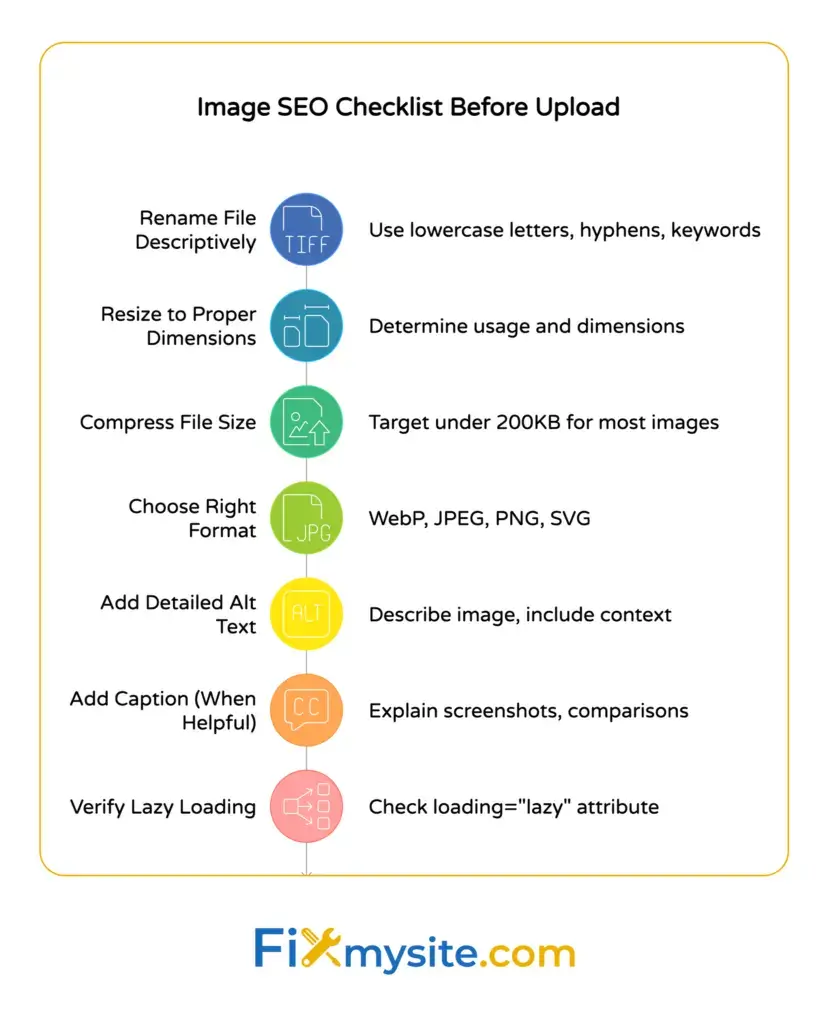
Creating an Image SEO Checklist
Follow this process for every new image upload:
- Rename the file with descriptive keywords
- Resize to appropriate dimensions
- Compress the file size
- Convert to WebP format
- Upload to WordPress
- Add detailed alt text
- Include a caption if helpful
- Verify lazy loading works
Save this checklist where you can reference it easily. Following these steps consistently keeps your image SEO strong.
Regular Maintenance Tasks
Perform these tasks quarterly:
- Audit images for missing alt text
- Check for broken image links
- Review image performance in Search Console
- Update old images to WebP format
- Remove unused images from media library
Set calendar reminders to complete these tasks. Consistent maintenance prevents problems from accumulating.
Our WordPress care plans include regular image optimization and performance monitoring to keep your site running smoothly.
Taking Action on Image SEO
You now have a complete system for optimizing images in WordPress. Start with your most important pages first.
Pick five high-traffic pages today. Optimize the images on those pages using the steps above. Check alt text, compress files, and convert to WebP.
This focused approach creates visible improvements quickly. You will see faster page speeds within hours.
Set up your chosen optimization plugin this week. Configure automatic compression for all future uploads. This prevents new problems while you fix existing ones.
Track your progress in Google Search Console. Watch your image impressions and clicks increase over the next few months.
Image SEO is not complicated. It just requires consistent attention to basic principles. Your visitors will appreciate faster loading times, and search engines will reward you with better rankings.
Need help getting your WordPress images optimized correctly? Our team at Fixmysite handles image optimization, speed improvements, and all the technical details that slow you down.