In this tutorial, I will show you how you can configure WP-Rocket to work with KeyCDN. We will start off by creating a free account with KeyCDN and setting up their service. Then we will look at the configuration settings we use for WP-Rocket.
Do note that this article affiliate link free. We use both WP-Rocket and KeyCDN on our website, and we also recommend the services when our speed optimization service is commissioned.
You can purchase WP-Rocket for $39 USD with a discounted annual renewal fee. While KeyCDN is a pay as you go service (unlike its competitors that charge a recurring monthly fee). For $50 you can buy approximately 1.25TB of traffic.
Why us a CDN?
If you run a website or blog, you will already know that speed matters. Internet users are notoriously impatient. According to a Kissmetrics study, a well-known analytics company, 47% of online shoppers expect a website to load in under 2 seconds and 40% of online shoppers abandon the website’s that take more than 3 seconds to load. We also know that page load time is an important factor in Google’s algorithm that can affect your search engine rankings.
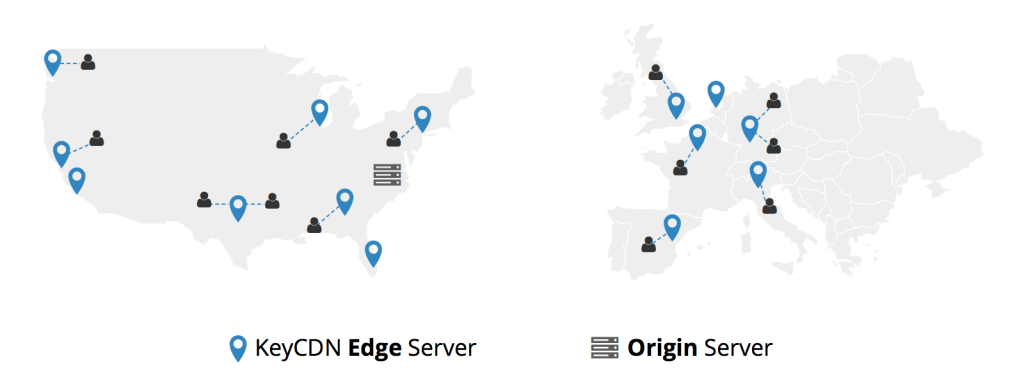
That being said, you may be asking yourself what is a CDN? Without going into much detail, a CDN (Content Delivery Network) is a network of servers that are strategically located across the globe with the purpose of accelerating the delivery of your static web content such as your images, CSS and JS files.
A server on the network is known as a point of presence (PoP). They are the servers used to cache content retrieved from your origin server. An origin server is where your files and database are stored, in our case it’s SiteGround. For you, it could be BlueHost, Godaddy or your local hosting company.
How does that help performance?
In simple words, your site will load faster because your content will be delivered faster to your website’s visitors since there is less distance to travel.
Let’s assume that “Henry” is located in Melbourne and wants to read your photography blog that is hosted in Texas. Think about the journey that must be undertaken for “Henry” to view those images! Wouldn’t it be helpful if there was a local point of presence (PoP) ready to serve a cached copy of your website’s content? Naturally, it would be awesome, and that’s one of the reasons why many websites use a CDN.
The proof is in the pudding, have a look at our website’s Pingdom performance score from Melbourne without KeyCDN:

And the same test, after setting up the CDN:

Setting up KeyCDN
Naturally, you will want to create a free KeyCDN account. Once you have signed up and confirmed your email, navigate to the Zones tab and click the add zone button.

For the zone name, enter a name of your choice. For the zone status, select active. For the Zone Type, select Pull.
In the Pull Zone Settings, enter your website’s URL.
If you have an SSL certificate installed on your website, you will want to select the “Show Advanced Features” checkbox and scroll down to the SSL section where you will have to the option install a free shared SSL for your zone.

Review the settings and when you are pleased with your options, click the Save button. KeyCDN will go ahead and pull your site’s content to their servers. The Process will take a few minutes. When ready the zone will return a status of active.

Now give your new zone a test run! If your logo’s address is:
https://example.com/wp-content/themes/cool-theme/images/logo.png
Then the same file should be hosted under:
https://yourzonename-id.kxcdn.com/wp-content/themes/cool-theme/images/logo.png
Setting up WP-Rocket
Once we have created our CDN Zone, we can login back into our WordPress website and navigate to the WP-Rocket settings.
There is a good chance that you are familiar with WP-Rocket. WP-Rocket is one of the most user-friendly caching plugins for WordPress.
The plugin supports a number of features, such as GZIP compression, CSS, HTML & JS minification, mobile caching, DNS prefetching, CDN configuration and many more. Analysing all the settings available with WP-Rocket is well worth a dedicated blog post. But to make things interesting, I thought I would share my configuration settings with you:


However, for this tutorial, the settings that interest us are in the CDN tab.
Before making any changes to your site’s settings, make sure you have a fully working backup of your site and database. If something goes wrong, you will want to have a restore point!

Seriously, WP-Rocket really makes things easy. All we need to do is select “Enable Content Delivery Network”. Then where it asks us to “Replace the site’s hostname with”, we enter the Zone URL provided to us by KeyCDN and click Save Changes.
Then WP-Rocket will replace all your file URLs (images, CSS and JS) with the newly updated hostname URL.
However, if you have any hardcoded links in your template files, stylesheets or in a custom field you will need to update them manually.
And there you have it! A WordPress website optimized with KeyCDN and WP-Rocket ready to welcome visitors from around the world.
We would love to know your experience! Do you have an international audience? Have you tested your load time from different locations? Share with us your thoughts and questions in the comment section below.