That moment when you realize your WordPress site is broken can send waves of panic through any website owner. Whether you’re facing a white screen of death, discovering your site has been hacked, or dealing with a failed update, having a backup is your safety net. But simply having a backup isn’t enough – you need to know how to properly restore from it.
When your WordPress site goes down, every passing minute feels like an eternity, especially if your business depends on it. Take a deep breath – this guide will walk you through the entire restoration process with clear, step-by-step instructions for various backup types and situations.
If you’re facing a critical WordPress emergency and need professional assistance with your restoration, our WordPress support specialists can handle the entire process for you, minimizing downtime and ensuring your site returns exactly as it should be.
Before You Begin: Essential Preparation Steps
Before diving into any restoration process, it’s crucial to properly prepare. This minimizes the risk of further damage and helps ensure a smoother recovery.
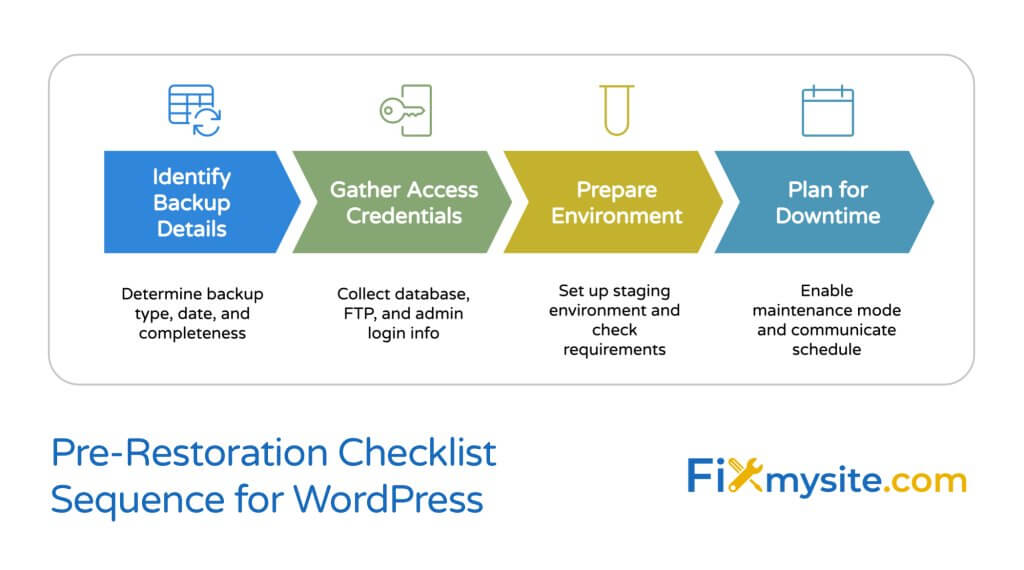
What are the most important steps before attempting a WordPress restoration?
- Identify your backup type: Determine whether you have a full site backup, database-only backup, or files-only backup
- Gather necessary credentials: Database details, FTP/SFTP login information, hosting control panel access, WordPress admin login
- Create a staging environment (if possible): This allows you to test the restoration before affecting your live site
- Back up your current site: Even if it’s broken, create a backup of its current state as a precaution
- Check server requirements: Ensure your hosting environment meets the requirements for your backup version
Taking these preliminary steps can save you significant headaches later. Many restoration failures happen because people rush into the process without proper preparation. A thorough WordPress recovery preparation checklist significantly increases your chances of a successful restoration.
Understanding WordPress Backup Components
A complete WordPress backup consists of two critical components: your database and your files. Understanding what each contains will help you choose the right restoration method.
Database Backup
Your WordPress database contains all your dynamic content and settings:
- Posts, pages, and comments
- Users and roles
- WordPress settings
- Plugin and theme settings
- Widget configurations
- Custom fields and metadata
File Backup
Your WordPress files contain everything else:
- WordPress core files
- Themes and plugins
- Uploaded media (images, videos, etc.)
- Custom code
- Configuration files (like wp-config.php)
It’s important to note that some backup solutions don’t capture everything. Manual methods (e.g., FTP/cPanel) require deleting existing files and reinstalling WordPress, which risks data loss if backups are incomplete or corrupted. (Source: WPBeginner)
Additionally, some plugins like Jetpack exclude WordPress core files in their backups, making full restoration impossible without additional steps. This is why understanding what your backup contains is essential before beginning the restoration process. (Source: BlogVault)
| Backup Type | What’s Included | What’s Missing | Best For |
|---|---|---|---|
| Full Site Backup | Database + All Files | Nothing (ideally) | Complete site restoration |
| Database-Only | Content, settings, users | Themes, plugins, media files | Content recovery while keeping current theme/plugins |
| Files-Only | Themes, plugins, media, code | Content, settings, users | Theme/plugin recovery while keeping current content |

Method 1: Restoring WordPress Using Backup Plugins
Restoration using a dedicated backup plugin is generally the easiest and safest approach. These plugins automate most of the complex tasks involved in restoration.
Over 1.5 million professionals use Duplicator for WordPress backups and migrations, making plugin-based restoration one of the most popular approaches. (Source: WPBeginner)
UpdraftPlus Restoration
UpdraftPlus is one of the most popular free backup plugins. Here’s how to restore with it:
- Install and activate UpdraftPlus if it’s not already active
- Go to Settings → UpdraftPlus Backups
- Click the “Restore” button
- Select the backup set you wish to restore
- Choose which components to restore (database, plugins, themes, uploads, etc.)
- Click “Restore” and follow the prompts
- Wait for the restoration to complete (don’t close your browser)
BlogVault Restoration
BlogVault guarantees 100% restore success rates, even for large sites where cPanel or other plugins often fail. This makes it particularly valuable for business-critical websites. (Source: BlogVault)
- Log in to your BlogVault dashboard
- Select the site you want to restore
- Click on “Restore” in the site management dashboard
- Choose the backup version you want to restore from
- Select either “Complete Restore” or choose specific components
- Confirm the restoration
All-in-One WP Migration Restoration
- Install and activate the All-in-One WP Migration plugin
- Go to All-in-One WP Migration → Backups
- Find your backup file and click “Restore”
- Confirm the restoration when prompted
- Wait for the process to complete and log back in
Pro Tip: When troubleshooting a non-working WordPress site, plugin-based restoration methods typically offer the highest success rates for non-technical users. However, they require that your WordPress installation is at least partially functional to begin with.
Method 2: Manual WordPress Restoration
When your site is completely down or your backup doesn’t come from a plugin, you may need to restore manually. This method requires more technical knowledge but offers greater control.
Database Restoration via phpMyAdmin
- Access phpMyAdmin through your hosting control panel
- Select your database from the left sidebar
- Check if it contains tables. If so, consider backing it up before proceeding
- If you want to start fresh, select all tables and drop them
- Click the “Import” tab at the top
- Click “Choose File” and select your database backup file (.sql)
- Leave other settings at their defaults unless you have specific requirements
- Click “Go” to begin the import
- Wait for the process to complete (this may take several minutes for larger databases)
Database Connection Errors?
If you encounter database connection issues during restoration, our guide on fixing the “Error establishing database connection” problem provides detailed troubleshooting steps to get your site back online.
File Restoration via FTP/SFTP
Manual file restoration carries significant risks if not done carefully. Manual methods require deleting existing files and reinstalling WordPress, which can lead to data loss if backups are incomplete or corrupted. (Source: ManageWP)
- Connect to your server using an FTP client like FileZilla
- Navigate to your WordPress root directory (usually public_html or www)
- If starting fresh, download a current copy of your site as backup
- If replacing everything, delete the existing files (but keep wp-config.php if you’re not replacing it)
- Upload your backup files to the server
- Ensure file permissions are set correctly:
- Folders: 755
- Files: 644
- wp-config.php: 600
- Update the wp-config.php file if your database details have changed
If you need more advanced guidance on fixing WordPress database issues after restoration, our database error recovery guide offers 7 quick fixes for common problems.
Method 3: Restoration via Web Host Tools
Many web hosts provide their own backup and restoration tools, which can sometimes be the simplest option, especially for managed WordPress hosting.
cPanel Backup Restoration
- Log in to your cPanel account
- Navigate to the “Backup” or “Backup Wizard” section
- Select “Restore” and choose the type of backup you want to restore
- Upload your backup file or select from available backups
- Follow the on-screen instructions to complete the restoration
Managed WordPress Host Restoration
Hosts like WP Engine, Kinsta, and SiteGround offer one-click restoration from their dashboards:
- WP Engine: Use the “Backup Points” feature in your User Portal
- Kinsta: Access the “Backups” tab in your MyKinsta dashboard
- SiteGround: Use the “Restore” feature in Site Tools → Backups
These managed solutions typically offer the highest reliability and simplest interfaces, though they may lack some of the granular control of manual methods.
Post-Restoration Checklist
After restoring your WordPress site, it’s essential to verify everything is working correctly before considering the process complete.
What should you check after restoring your WordPress site?
- Check the frontend: Verify all pages load correctly with proper styling
- Test admin functionality: Ensure you can log in and access all admin areas
- Verify content: Check that posts, pages, and media are present and display correctly
- Test forms and e-commerce: Verify contact forms, checkout processes, and other interactive elements
- Check plugins and themes: Ensure all active plugins and themes function properly
- Update permalinks: Go to Settings → Permalinks and click “Save Changes” to refresh rewrite rules
- Clear caches: Purge any caching at the plugin, server, and CDN levels
- Review security: Change passwords and API keys, especially if restoring after a hack
- Check website speed: Run performance tests to ensure optimal loading times
If you notice your site is loading slowly after restoration, your database might need optimization. Our guide on WordPress database optimization provides 5 stress-free steps to boost your site speed.
Common Restoration Challenges and Solutions
Even with careful preparation, you might encounter challenges during the restoration process. Here are solutions to common issues:
| Challenge | Possible Causes | Solution |
|---|---|---|
| White Screen After Restore | PHP errors, plugin conflicts, memory limits | Enable WP_DEBUG, disable all plugins, increase PHP memory limit |
| Missing Images/Media | Incomplete file backup, incorrect file paths | Check uploads folder, update file paths in database, restore media separately |
| Database Connection Errors | Incorrect credentials, corrupted tables | Verify wp-config.php details, repair database, check database user permissions |
| Plugin/Theme Conflicts | Version incompatibilities, broken code | Update all plugins/themes, disable and reactivate one by one to identify conflicts |
If you’re experiencing the dreaded white screen of death after restoration, what causes the WordPress white screen and how can you fix it quickly? Our emergency recovery guide provides comprehensive solutions.

Best Practices for Future Backup Strategy
The best way to make restoration easier is to implement a robust backup strategy from the start. Experts recommend following the 3-2-1 backup strategy: maintain 3 copies of your data (1 primary + 2 backups), store them in 2 different formats (e.g., cloud + local), with 1 copy kept offsite. (Source: BlogVault)
Backup Schedule Recommendations
- E-commerce sites: Daily database backups, weekly full backups (WooCommerce sites may need real-time backups every 5 minutes to avoid order data loss)
- Blogs and content sites: 2-3 database backups per week, weekly full backups
- Portfolio/brochure sites: Weekly database backups, monthly full backups
Backup Storage Recommendations
Never store backups only on your web server. Use multiple storage locations:
- Cloud storage (Google Drive, Dropbox, Amazon S3)
- Local computer or external drive
- Email (for smaller backups)
- Dedicated backup service
Peace of Mind with Managed Backups
Discover how our WordPress Care Plans can protect your website with automated backups, security monitoring, and emergency support when you need it most.
When to Seek Professional Help
While many WordPress restoration scenarios can be handled independently, some situations warrant professional assistance. Consider reaching out to experts if:
- Your backup is incomplete or corrupted
- You’ve tried multiple restoration methods without success
- Your site was hacked and you need security expertise
- You’re migrating to a different host simultaneously
- Your site has custom code or complex integrations
- You run an e-commerce site with ongoing transactions
- You lack technical confidence and the site is business-critical
If your site was compromised before restoring a backup, proper recovery is critical. With over 90,000 WordPress sites hacked every day, it’s important to address vulnerabilities to prevent further damage.
Conclusion
Restoring a WordPress site from backup doesn’t have to be overwhelming. By understanding the components of your backup, choosing the right restoration method, and following the steps carefully, you can bring your site back online with minimal stress.
Remember that prevention is always better than cure – implement a robust backup strategy that follows the 3-2-1 rule, schedule regular backups appropriate to your site’s update frequency, and test your restoration process periodically to ensure it works when you need it.
If you ever find yourself stuck during the restoration process or simply want the peace of mind that comes with professional assistance, our WordPress support specialists are ready to help you get your site back up and running quickly and correctly.