Updating WordPress safely means backing up everything first, testing in a staging environment, and following a structured sequence: core first, then plugins, then themes. Your biggest risk isn’t the update itself, it’s skipping the safety steps that protect you when something breaks.
We know how nerve-wracking updates can be. One wrong click and your site could display errors to customers.
That anxiety is real, but updates are non-negotiable. More than 13,000 WordPress sites are hacked every day, and most breaches happen because of outdated software.
This guide walks you through every step. You’ll learn the safest methods, from one-click dashboard updates to manual FTP updates for advanced users.
By the end, you’ll have a repeatable process that keeps your site secure without the stress. You’ll know exactly when to update, how to test changes, and what to do if something goes wrong.
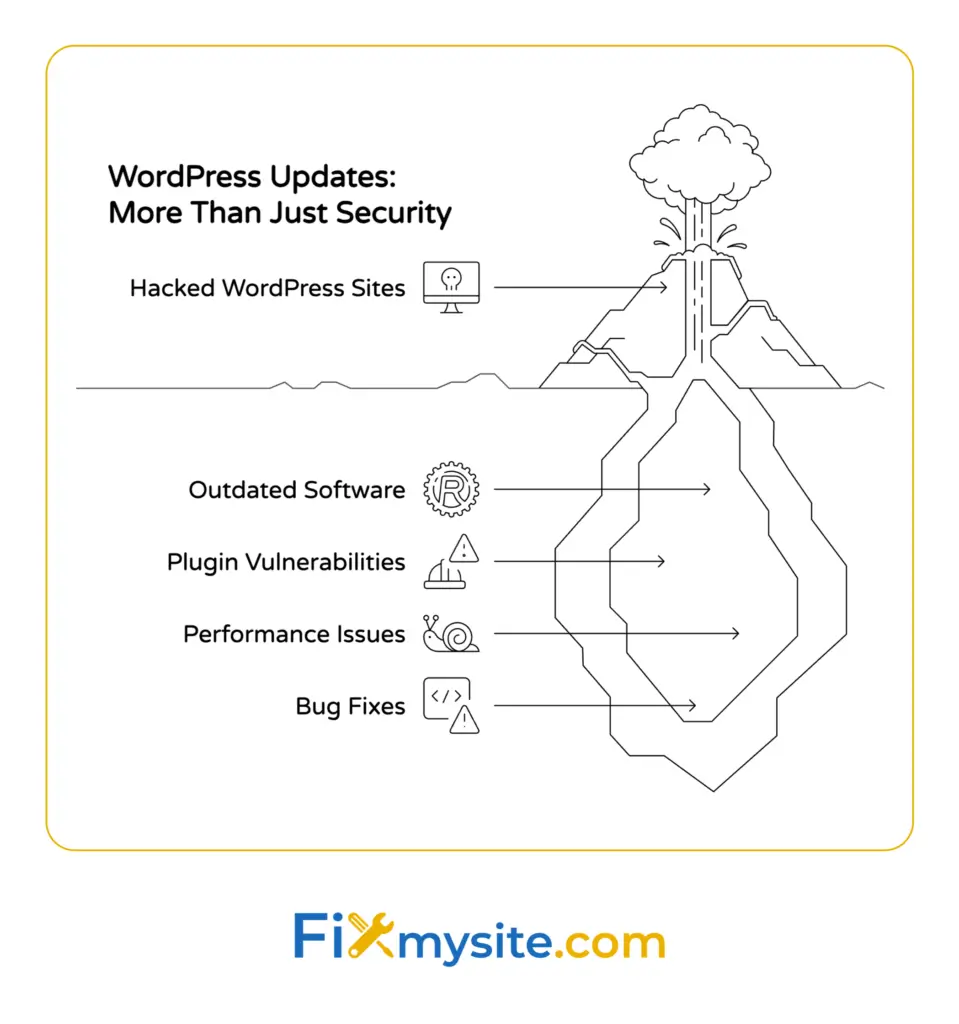
Why WordPress Updates Matter More Than You Think
Security vulnerabilities multiply fast when you delay updates.
52% of WordPress vulnerabilities are caused by out-of-date plugins. Hackers scan constantly for sites running old versions with known weaknesses.
Updates patch those holes. Every WordPress core release includes security fixes for newly discovered threats. Plugin developers do the same.
Take the Post SMTP plugin as an example. CVE-2025-11833 in the Post SMTP plugin affected over 400,000 websites, allowing attackers to take over accounts completely.
Sites that updated immediately stayed safe. Sites that waited became targets.
Performance improvements come with updates too. WordPress core updates often include speed optimizations and database improvements. Your site runs faster, loads quicker, and handles traffic better.
Bug fixes matter just as much. That contact form that stops working randomly? That weird layout glitch on mobile? Updates fix these issues constantly.
Now that you understand why updates matter, let’s talk about preparing properly before you click anything.
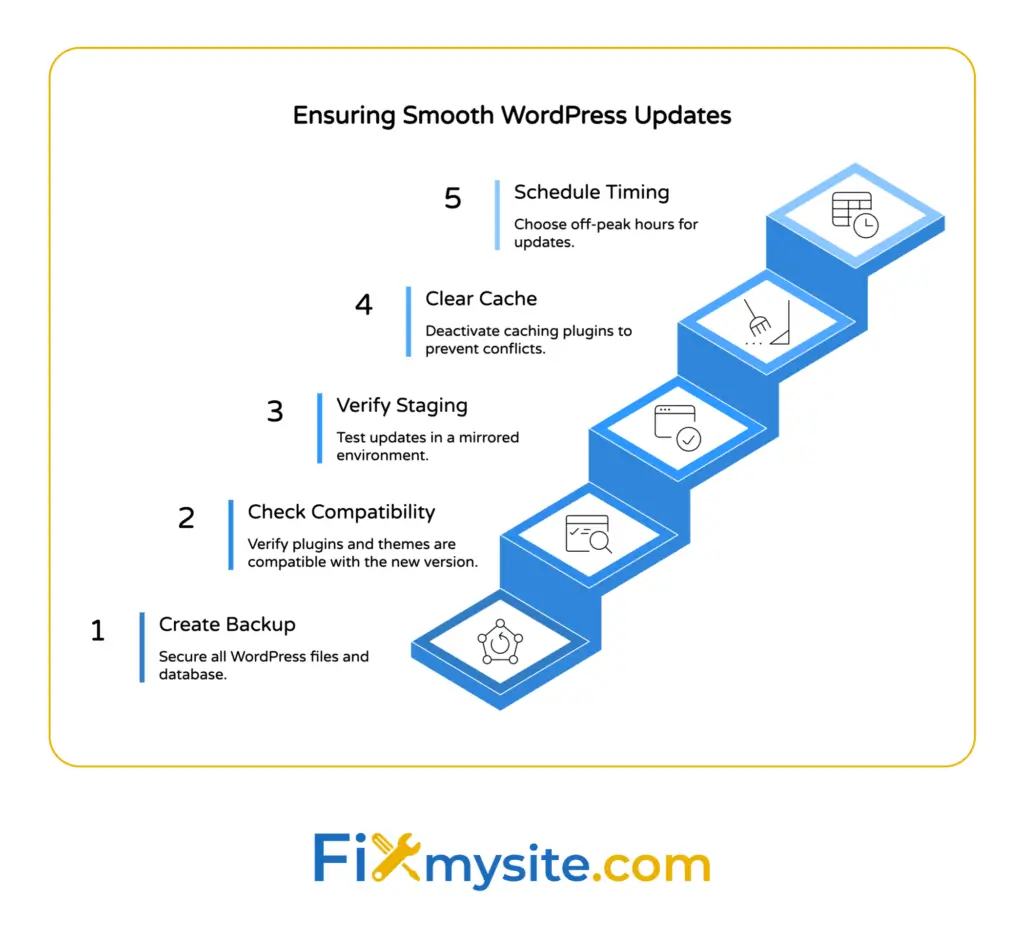
Pre-Update Checklist: Essential Preparation Steps
Never update without preparing first. This checklist prevents 90% of update disasters.
Create a Complete Backup
Your backup is your safety net. If an update breaks something, you can restore your site instantly.
A complete backup includes three elements:
- All WordPress files (core files, plugins, themes, uploads)
- Your complete database (posts, pages, settings, user data)
- Configuration files (wp-config.php, .htaccess)
Use a backup plugin like UpdraftPlus or BlogVault for automated backups. These tools save everything to cloud storage automatically.
Your hosting provider might offer backups too. Check your hosting control panel for backup options. Download a copy to your computer as extra insurance.
Test your backup by downloading it. A backup you can’t restore is worthless.
Check Plugin and Theme Compatibility
Incompatible plugins cause most update problems. Check compatibility before updating anything.
Visit each plugin’s page in the WordPress repository. Look for the “tested up to” version number. It should match or exceed your WordPress version.
Plugins not updated in over a year are risky. They probably won’t work with the latest WordPress core.
Premium themes and plugins usually list compatibility in their changelogs. Check the developer’s website for compatibility information.
Verify Your Staging Environment
Staging environments let you test updates safely. You update the staging site first, check everything works, then update your live site.
Many hosting providers include staging environments. Check with your host about setting one up. If your host doesn’t offer staging, consider setting up WordPress hosting with staging for safer update testing.
Your staging site should mirror your live site exactly. Same plugins, same theme, same content structure.
Clear Your Cache Before Updating
Caching plugins can interfere with updates. Deactivate caching temporarily before major updates.
Popular caching plugins include WP Rocket, W3 Total Cache, and WP Super Cache. Deactivate these before updating.
If you use server-level caching through your host, contact support to clear it before updating.
Schedule Updates During Low-Traffic Periods
Update when fewest visitors are on your site. Check your analytics for low-traffic hours.
Most sites see lowest traffic between 2 AM and 6 AM in their timezone. Late evenings work well too.
Avoid updating during peak business hours, major sales periods, or right before important events.
With preparation complete, you’re ready to update WordPress safely using the dashboard method.

Method 1: Update WordPress Core via Dashboard (Easiest Method)
The WordPress dashboard provides the simplest update method. Most site owners use this approach.
Access the Updates Screen
Log into your WordPress admin area. Navigate to Dashboard > Updates.
The Updates screen shows available updates for WordPress core, plugins, and themes. You’ll see version numbers and update notifications here.
WordPress displays a notification badge in your admin menu when updates are available. This badge appears next to the Dashboard menu item.
Review Available Updates
Check which version you’re updating to. Read the version release notes to understand what’s changing.
Major version updates (like 6.4 to 6.5) include significant changes. Minor updates (like 6.4.1 to 6.4.2) are usually security patches.
Security updates should be applied immediately. Feature updates can wait until you’ve tested them on staging.
Click the Update Button
Click “Update Now” for WordPress core. The update process begins immediately.
WordPress enters maintenance mode automatically. Visitors see a brief “site under maintenance” message during the update.
The update takes 30 seconds to 2 minutes typically. Don’t close your browser during this time.
Verify the Update Completed Successfully
After updating, WordPress shows a success message with the new version number.
Visit your site’s front end. Check that pages load correctly. Test key functionality like contact forms, shopping carts, or membership areas.
Log back into your dashboard. Verify the version number in the footer shows the updated version.
If anything looks broken, you can troubleshoot WordPress errors or restore from your backup.
Dashboard updates work great for most sites. But sometimes you need more control, which brings us to manual updates.
Method 2: Manual WordPress Update via FTP
Manual FTP updates give you complete control. Use this method when the dashboard update fails or you want more precision.
Download the Latest WordPress Version
Visit WordPress.org/download and download the latest WordPress package as a ZIP file.
Extract the ZIP file on your computer. You’ll see a folder named “wordpress” containing all the core files.
Keep this folder open. You’ll upload these files to your server shortly.
Connect to Your Site via FTP
Use an FTP client like FileZilla or Cyberduck to connect to your server.
You need your FTP credentials: hostname, username, password, and port number. Your hosting provider sent these when you signed up.
Connect to your server and navigate to your WordPress installation directory. This is usually named “public_html” or “www.”
Upload WordPress Core Files
From the extracted wordpress folder on your computer, select these folders to upload:
- wp-admin (entire folder)
- wp-includes (entire folder)
- All files in the root directory except wp-config.php
Overwrite existing files when prompted. Your FTP client will ask about replacing files.
Never upload or replace wp-config.php. This file contains your database connection details. Replacing it breaks your site.
Never replace the wp-content folder. This folder contains your themes, plugins, and uploads. Overwriting it deletes everything.
Update Your Database
After uploading files, visit your site. WordPress may prompt you to update your database.
Click “Update WordPress Database” if prompted. This updates your database structure to match the new WordPress version.
The database update takes a few seconds. Don’t interrupt this process.
Manual updates require more technical skill but provide greater reliability. For detailed instructions, see our guide on manually updating WordPress.
Next, let’s look at automating this entire process.
Method 3: Enable Automatic WordPress Updates
Automatic updates keep your site current without manual intervention. WordPress installs security updates automatically by default.
Configure Automatic Minor Updates
WordPress automatically installs minor security releases. These are updates like 6.4.1 to 6.4.2.
Minor updates include only security patches and bug fixes. They rarely cause compatibility issues.
This feature is enabled by default. Don’t disable it unless you have a specific reason.
Enable Automatic Major Updates
Major updates (like 6.4 to 6.5) aren’t automatic by default. You can enable them if you want.
Add this code to your wp-config.php file to enable automatic major updates:
define( 'WP_AUTO_UPDATE_CORE', true );Place this code above the line that says “That’s all, stop editing!” in wp-config.php.
Major automatic updates are riskier. They can break compatibility with older plugins or themes.
Set Individual Plugin Auto-Updates
WordPress lets you enable automatic updates for individual plugins. Navigate to Plugins > Installed Plugins in your dashboard.
Look for “Enable auto-updates” links next to each plugin. Click this to enable automatic updates for that plugin.
A blue icon indicates auto-updates are enabled. You can disable them anytime by clicking “Disable auto-updates.”
Enable auto-updates for well-maintained plugins from trusted developers. Security plugins and spam protection plugins are good candidates.
Avoid auto-updates for plugins that frequently change features or require configuration adjustments.
Monitor Automatic Update Notifications
WordPress emails you after automatic updates complete. These emails confirm successful updates and list what changed.
Check your site after receiving these emails. Verify everything still works correctly.
If an automatic update causes problems, you’ll need to restore from backup and update manually.
Automatic updates work well for maintaining security. But plugins and themes need attention too, which we’ll cover next.

How to Update WordPress Plugins and Themes Safely
Plugins and themes need updates just like WordPress core. Outdated plugins are the biggest security risk.
Update Plugins in Groups
Don’t update all plugins at once. Update in small groups of 3-5 plugins.
This approach helps identify which plugin causes problems if something breaks. If you update 20 plugins simultaneously and your site breaks, you won’t know which one caused the issue.
Start with security-related plugins first. Update backup plugins, security plugins, and anti-spam plugins before others.
Test your site after each group. Check front-end functionality, admin functionality, and any specialized features.
Check for Plugin Conflicts
Sometimes plugins conflict with each other after updates. Signs of conflict include error messages, broken features, or white screens.
If problems appear after updating, deactivate the recently updated plugins one at a time. Identify which plugin causes the problem.
For detailed troubleshooting, see our guide on WordPress plugin conflicts.
Contact the plugin developer if you identify a problem plugin. They may have a fix or workaround.
Update Themes Carefully
Theme updates can change your site’s appearance or functionality. Always test theme updates on staging first.
Child themes protect your customizations. If you’ve customized your theme’s code, create a child theme first. Child themes prevent updates from overwriting your changes.
Before updating your theme, document any custom CSS or template modifications. You may need to reapply these after updating.
For complete theme update guidance, check our step-by-step guide to updating WordPress themes safely.
Remove Unused Plugins and Themes
Inactive plugins still pose security risks. Hackers can exploit vulnerabilities in deactivated plugins.
Delete any plugins you’re not using. Go to Plugins > Installed Plugins, deactivate the plugin, then click “Delete.”
Keep only one unused theme besides your active theme. WordPress needs a fallback theme in case your active theme breaks.
Delete all other unused themes. They create unnecessary security vulnerabilities and clutter your dashboard.
With plugins and themes updated, let’s talk about the safest place to test updates.
Testing Updates on a Staging Site
Staging environments eliminate update anxiety. You test everything before touching your live site.
Set Up Your Staging Environment
A staging site is a complete copy of your live site on a separate URL. You can break things without affecting visitors.
Many hosts provide one-click staging environments. Check your hosting control panel for “staging” or “development” options.
Popular staging solutions include:
- WP Engine (built-in staging)
- Kinsta (one-click staging)
- SiteGround (staging tool)
- WP Staging (plugin option)
Your staging site should mirror your production site exactly. Same plugins, same versions, same content structure.
Run Updates on Staging First
Log into your staging site’s admin area. Update WordPress core, plugins, and themes just like you would on your live site.
Test everything after updating. Check these critical areas:
- Homepage loads correctly
- All pages display properly
- Contact forms submit successfully
- E-commerce checkout processes completely
- User login and registration work
- Admin dashboard functions normally
Spend at least 15 minutes testing. Click through your entire site. Try to break things.
Test on mobile devices too. Some issues only appear on phones or tablets.
Document Any Issues Found
Keep notes about problems you discover. Write down which plugins cause conflicts, which features break, and any error messages.
Fix these issues on staging before updating your live site. Contact plugin developers, adjust settings, or find alternative plugins.
Once staging runs perfectly for 24 hours, you’re ready to update your live site.
Push Changes to Production
Some hosts let you push staging changes to production automatically. This copies your tested updates to your live site instantly.
If your host doesn’t offer automatic pushing, manually repeat the update process on your live site. You’ve already confirmed the updates work, so there’s minimal risk.
Test your live site again after updating. Verify everything works as expected.
Staging sites are the professional approach to WordPress updates. Even if an update breaks something on staging, your live site stays safe.
Post-Update Verification and Testing
Updating isn’t complete until you verify everything works. This final check prevents nasty surprises.
Check Site Functionality
Visit your site’s front end immediately after updating. Look for obvious problems like broken layouts or missing images.
Test your most important pages first:
- Homepage – Does it load? Do all elements display correctly?
- Contact page – Does the form submit?
- Product pages – Do add-to-cart buttons work?
- Blog posts – Do images and videos display?
- Account pages – Can users log in?
Test your site’s critical functionality. If you run a store, place a test order. If you have a membership site, test login and access.
Review Error Logs
WordPress logs errors in the background. Check your error logs for problems even if everything looks fine.
Access error logs through your hosting control panel. Look for PHP errors, database errors, or plugin conflicts.
Many hosts provide error log viewers in cPanel or similar control panels. Check with your host about accessing logs.
Address any errors you find immediately. Even small errors can indicate bigger problems.
Test Performance Metrics
Updates sometimes affect site speed. Run a speed test before and after updating.
Use tools like GTmetrix or Google PageSpeed Insights to measure performance.
Your site should load as fast or faster after updating. If speed decreased significantly, investigate which update caused the slowdown.
For comprehensive speed improvements, consider our WordPress speed optimization service.
Clear All Caches
Clear every cache layer after updating. Cached files can cause display issues or show outdated content.
Clear these cache types:
- Plugin cache (WP Rocket, W3 Total Cache, etc.)
- Server cache (contact your host if needed)
- CDN cache (Cloudflare, KeyCDN, etc.)
- Browser cache (hard refresh with Ctrl+F5)
Visit your site in an incognito window to see the uncached version.
With testing complete, you’re confident your updates succeeded. But what if something goes wrong?
Troubleshooting Common WordPress Update Issues
Updates occasionally cause problems. Don’t panic. Most issues have quick fixes.
White Screen of Death
A completely white screen means a PHP error occurred. This happens when a plugin or theme conflicts with the update.
Access your site via FTP. Navigate to wp-content/plugins and rename the plugins folder to “plugins_old.”
This deactivates all plugins. If your site loads now, a plugin caused the problem.
Rename the folder back to “plugins.” Then rename individual plugin folders to identify the culprit.
If your site remains broken, you may need emergency WordPress repair service to fix critical errors quickly.
Maintenance Mode Stuck
Sometimes WordPress stays in maintenance mode after updating. You see “Briefly unavailable for scheduled maintenance” permanently.
WordPress creates a .maintenance file during updates. If the update fails, this file doesn’t get deleted.
Connect via FTP and delete the .maintenance file from your WordPress root directory. Your site returns immediately.
For detailed instructions, see our guide on fixing the scheduled maintenance error.
Theme Display Issues
If your theme looks broken after updating, several causes are possible. Custom CSS might have been overwritten, or the theme’s structure changed.
Check if you’re using a child theme. If not, your customizations were lost during the theme update.
Restore your theme from backup if it’s completely broken. Then recreate customizations in a child theme before updating again.
Theme disasters need immediate attention. Our WordPress theme emergency recovery guide helps fix broken themes fast.
Database Update Required
After some updates, WordPress displays “Database update required.” This message appears when WordPress core changes its database structure.
Click “Update WordPress Database” when prompted. The process takes seconds.
Backup your database before updating it. This protects against corruption during the database update process.
Plugin Compatibility Errors
Error messages mentioning specific plugins indicate compatibility problems. The plugin doesn’t work with your WordPress version.
Check the plugin developer’s website for an update. Install the updated version if available.
If no update exists, deactivate the plugin temporarily. Contact the developer about compatibility.
Find alternative plugins if the developer has abandoned the plugin. Abandoned plugins never receive security updates and pose ongoing risks.
Failed Update Attempt
Sometimes the automatic update fails partway through. You see error messages about failed file downloads or write permissions.
Try updating again. Temporary server issues cause many failed updates.
If updates repeatedly fail, check file permissions. WordPress needs write access to update files. Contact your host about permission issues.
Manual FTP updates bypass permission problems. Use the manual update method if automatic updates consistently fail.
Most update problems resolve quickly with these solutions. If you’re stuck, professional help is available.
Quick Answers to Common Update Questions
Should you auto update WordPress plugins?
Enable automatic updates for plugins, especially security updates. Outdated plugins are a primary cause of WordPress security breaches. However, test plugin updates in a staging environment first if you have custom modifications, as some updates may affect site functionality.
What to update first, WordPress or plugins?
Update WordPress core first, then update all plugins and themes immediately afterward. WordPress core updates often include security patches that plugins depend on, making the core update the priority in your update sequence.
How to update WordPress and plugins?
Update WordPress by navigating to Dashboard > Updates and clicking update buttons for core, themes, and plugins. Enable automatic updates for minor security releases in your WordPress settings, manually check for updates weekly, and use quality plugins from the official repository that receive regular updates.
Keep Your WordPress Site Updated Without the Stress
You now have everything needed to update WordPress safely. Start with backups, test on staging, and follow the step-by-step process we covered.
Regular updates protect your site from the 13,000+ daily WordPress hacking attempts. Security matters more than convenience.
Your first action: Schedule weekly update checks. Set a calendar reminder for the same day and time each week. Check for available updates and apply them following this guide’s process.
Enable automatic updates for minor security releases today. This simple step protects against critical vulnerabilities without requiring your attention.
Updates don’t have to be stressful. With proper preparation and systematic testing, you’ll update confidently knowing your site stays secure.
If updates feel overwhelming or you’ve encountered problems, we’re here to help. Our team handles WordPress updates daily, ensuring sites stay current without downtime. Get expert WordPress support for worry-free maintenance.
For ongoing protection, consider WordPress care plans that include automatic updates, security monitoring, and performance optimization. We’ll handle the technical work while you focus on your business.
Your site’s security starts with your next update. Don’t wait.