Setting up caching in WordPress reduces your site’s load times by storing static versions of your pages and serving them instantly to visitors. You’ll install a caching plugin, activate page caching, configure browser caching, and optionally add object caching for database queries. The entire setup takes 15-30 minutes and delivers immediate speed improvements.
Your visitors shouldn’t have to wait. When someone clicks on your site, every extra second matters.
A 1-second delay in page load time can reduce conversions by 7%. That’s real business impact, and it’s completely avoidable.
We’ve helped countless WordPress site owners tackle this exact challenge. The good news? You don’t need to be a developer to fix it.
This guide walks you through each caching setup step with clarity and patience. We’ll start with the basics, move through plugin installation, and help you configure each caching type correctly.
By the end, you’ll have a faster WordPress site. Your visitors will experience quicker load times, and your server will handle traffic more efficiently.
What WordPress Caching Actually Does
Think of caching as your site’s memory system. Without it, WordPress rebuilds every page from scratch for each visitor.
That means your server runs database queries, processes PHP code, and generates HTML every single time. It’s exhausting for your server and slow for your visitors.
Caching can dramatically reduce server load and improve page load times by storing ready-to-serve versions of your content.
Here’s what happens when caching is enabled:
- Your server creates a static HTML version of each page once
- That version gets stored in memory or on disk
- Future visitors receive the pre-built version instantly
- Your database and PHP processor rest between actual updates
The result? Pages load faster, your server handles more traffic, and visitors stick around longer.

Why Every WordPress Site Needs Caching
Speed isn’t just about user experience anymore. It directly affects your search rankings, conversion rates, and bounce rates.
Google considers page speed as a ranking factor. Slower sites get pushed down in search results, which means fewer visitors find you.
Beyond SEO, there’s the human element. People abandon slow websites within seconds. They don’t wait around, especially on mobile devices.
The Real-World Impact on Your Site
Without caching, every page request triggers the same expensive processes. Your hosting resources get consumed quickly, especially during traffic spikes.
With caching enabled, your WordPress site can handle 5-10 times more concurrent visitors. Your hosting costs stay manageable, and your site remains responsive during busy periods.
For e-commerce sites using WooCommerce, this becomes even more critical. Cart pages and checkout flows need to load instantly, or customers abandon their purchases.
Understanding the Different Types of WordPress Caching
WordPress caching isn’t a single solution. It’s a layered system where different caching types work together.
Each caching layer handles different parts of your site’s content delivery. Understanding these layers helps you configure them effectively.
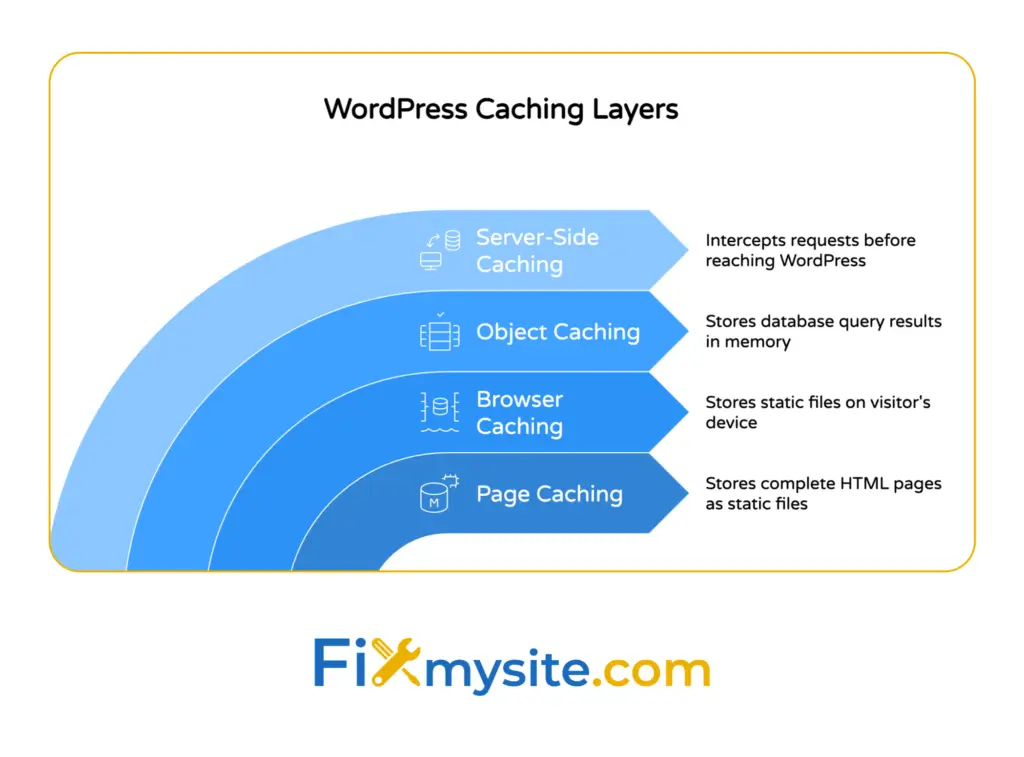
The four main caching types are page caching, browser caching, object caching, and server caching. Each addresses a specific performance bottleneck.
How These Caching Layers Work Together
Page caching stores complete HTML pages. Browser caching saves static files locally on visitor devices. Object caching keeps database query results in memory.
Server caching happens at the hosting level before WordPress even processes requests. When configured properly, these layers create a fast content delivery system.
You don’t need to implement all caching types immediately. Start with page caching, add browser caching next, then explore object caching for database-heavy sites.
Page Caching: Your First Priority
Page caching stores the full HTML output of your WordPress pages. It’s the most impactful caching type you can enable.
When a visitor requests a page, the caching plugin checks if a cached version exists. If it does, that version gets served instantly without running WordPress at all.
This single change can reduce page load times from 3-4 seconds to under 1 second. That’s the kind of improvement your visitors actually notice.
Which Pages Get Cached
Most caching plugins cache public pages like your homepage, blog posts, and product pages. They automatically exclude dynamic pages where content changes for each visitor.
Cart pages, checkout pages, and account dashboards typically stay uncached. The plugin knows these pages need fresh data for each user.
You can also exclude specific pages manually if needed. Some sites exclude pages with forms or real-time content updates.
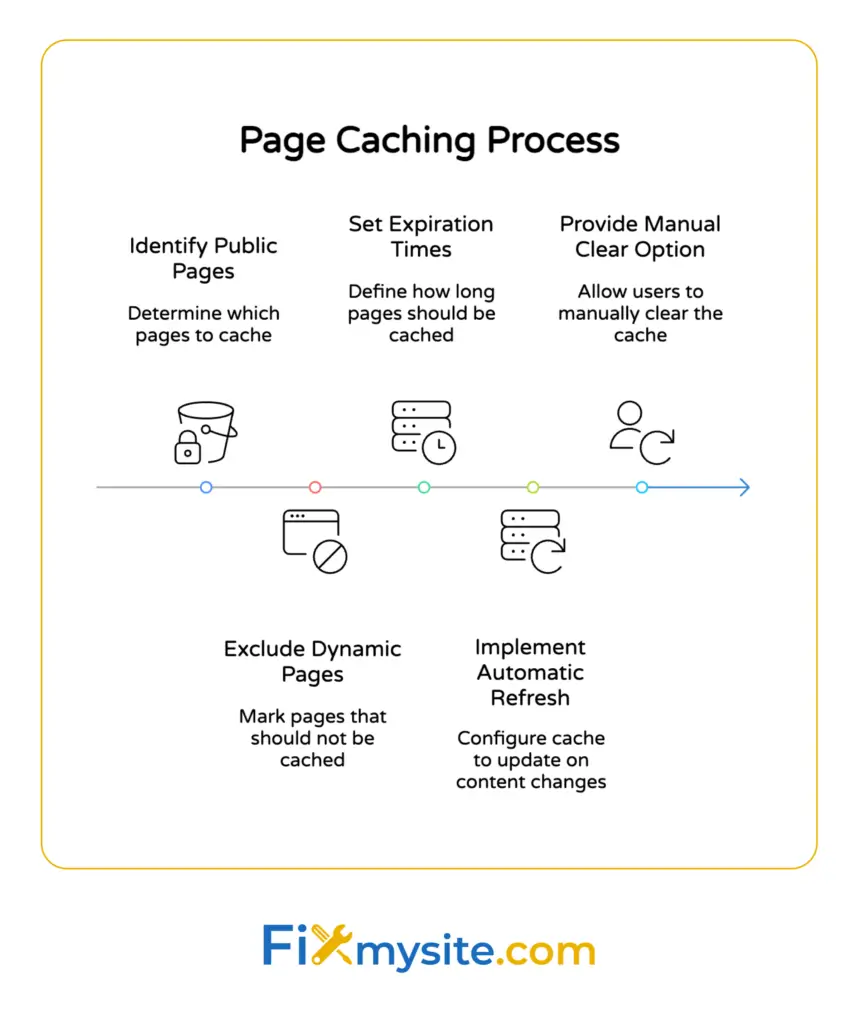
Cache Expiration and Refresh
Cached pages don’t stay forever. They expire based on rules you set, typically 12-24 hours for most content.
When you publish a new post or update existing content, good caching plugins automatically clear the affected cached pages. Your visitors always see current content.
You can also manually clear your entire cache anytime. This becomes useful after major site changes or theme updates.
Browser Caching: Making Return Visits Lightning Fast
Browser caching tells visitor browsers to store static files locally. These files include images, CSS stylesheets, JavaScript files, and fonts.
The first time someone visits your site, their browser downloads all these files. On subsequent visits, the browser loads them from local storage instead.
This dramatically speeds up return visits. Your server sends less data, and pages render faster for anyone who’s visited before.
Setting Browser Cache Expiration Times
You control how long browsers store these files through expiration headers. Images and fonts can safely cache for months or even a year.
CSS and JavaScript files need shorter expiration times if you update them frequently. Most sites use 7-30 days for these file types.
When you make changes to these files, you can append version numbers to force browsers to download fresh copies. Your caching plugin usually handles this automatically.
What Browser Caching Doesn’t Cache
Browser caching only affects static files. It doesn’t cache your HTML pages, which is why you need page caching too.
Dynamic content like personalized messages or shopping cart data stays fresh. Only the unchanging assets get cached locally.
Object Caching: Speeding Up Database-Heavy Sites
Object caching stores the results of database queries in memory. This helps sites with complex queries or heavy database usage.
WordPress runs database queries constantly to fetch posts, comments, user data, and settings. Without object caching, it repeats identical queries unnecessarily.
With object caching enabled, query results get stored in systems like Redis or Memcached. Subsequent identical queries pull from memory instead of hitting the database.
When Object Caching Makes the Biggest Difference
Sites with thousands of posts benefit significantly from object caching. E-commerce sites with large product catalogs see noticeable improvements.
Membership sites with complex user permissions also gain from reduced database queries. If your site feels sluggish despite page caching, object caching might be the missing piece.
Implementation requires server support for Redis or Memcached. Not all shared hosting plans include this, though most VPS and dedicated servers do.

Server-Side Caching: The Foundation Layer
Server-side caching happens at your hosting level, before requests even reach WordPress. Technologies like NGINX FastCGI cache or Varnish operate here.
Server-level caching and CDN integration can further boost performance beyond plugin-based solutions.
Some managed WordPress hosts enable server caching automatically. Others require manual configuration or specific hosting plans.
How Server Caching Differs from Plugin Caching
Plugin caching works within WordPress. Server caching intercepts requests before they reach WordPress entirely.
This makes server caching faster than plugin-based solutions. However, it requires more technical knowledge to configure correctly.
Many WordPress site owners start with plugin caching and add server caching later for additional performance gains. The two approaches work together effectively.
Step 1: Choose Your Caching Plugin
Your caching plugin choice shapes your entire setup process. Different plugins offer varying features, complexity levels, and performance characteristics.
The three most popular WordPress caching plugins are WP Rocket, W3 Total Cache, and WP Super Cache. Each serves different needs and skill levels.
WP Rocket: The Premium User-Friendly Option
WP Rocket is known for its user-friendly setup and complete features, making it ideal for non-technical users.
It costs $59/year for a single site but includes page caching, browser caching, cache preloading, and database optimization. The settings are clearly labeled and explained.
Most users enable recommended settings and achieve excellent results immediately. The plugin handles complex configurations automatically.
W3 Total Cache: The Power User’s Choice
W3 Total Cache is free and incredibly powerful. It offers granular control over every caching aspect.
The downside? Its interface overwhelms beginners with dozens of configuration options. You need to understand caching concepts to use it effectively.
Advanced users appreciate the flexibility. You can configure page caching, browser caching, object caching, database caching, and CDN integration separately.
WP Super Cache: The Simple Free Solution
WP Super Cache offers straightforward page caching without overwhelming options. It’s free and maintained by Automattic.
The plugin provides three caching modes: simple, expert, and WP-Cache caching. Most users stick with the recommended simple mode.
It lacks some advanced features like cache preloading or database optimization, but it handles page caching reliably for most WordPress sites.
Step 2: Install and Activate Your Caching Plugin
Now that you’ve chosen a caching plugin, it’s time to install it. This process takes just a few minutes.
Log into your WordPress dashboard and go to Plugins → Add New. Search for your chosen caching plugin by name.
Click “Install Now” next to the correct plugin. After installation completes, click “Activate” to enable it.
What Happens During Activation
When you activate a caching plugin, it creates necessary directories in your WordPress installation. It also adds configuration files to control caching behavior.
Some plugins display a setup wizard after activation. Follow the wizard if provided, as it configures basic settings automatically.
Don’t worry if your site looks the same immediately. Caching works behind the scenes without visible changes to your site’s appearance.
Step 3: Configure Page Caching Settings
Page caching configuration varies by plugin, but the core concepts remain consistent. You’re telling WordPress which pages to cache and for how long.
For WP Rocket users, page caching enables automatically upon activation. The plugin uses smart defaults that work for most sites.
W3 Total Cache requires manual page caching activation. Navigate to Performance → General Settings, find Page Cache, and enable it. Save your settings.
Setting Cache Expiration Times
Most plugins cache pages for 12-24 hours by default. This balances freshness with performance benefits.
If you update content frequently, consider shorter expiration times like 6-8 hours. If your content rarely changes, extend it to 48 hours or more.
The plugin automatically clears cached pages when you publish or update posts. Manual expiration times only matter for unchanged content.
Excluding Pages from Caching
E-commerce sites need to exclude cart, checkout, and account pages from caching. Most plugins exclude these automatically.
You might also exclude pages with forms, real-time data, or personalized content. Each plugin provides URL patterns or page IDs for exclusions.
Test your site thoroughly after enabling page caching. Make sure dynamic features still work correctly on excluded pages.
Step 4: Enable Browser Caching
Browser caching requires adding expiration headers to your static files. Caching plugins handle this automatically when you enable the feature.
In WP Rocket, browser caching enables by default. The plugin sets appropriate expiration times for different file types automatically.
W3 Total Cache users go to Performance → Browser Cache and enable it. The default settings work well for most sites.
Verifying Browser Caching Works
You can verify browser caching using browser developer tools. Open DevTools, go to the Network tab, and reload your page.
Look at static file requests for cache-related headers. You should see “Cache-Control” or “Expires” headers with appropriate time values.
Online tools like GTmetrix also check browser caching configuration. They’ll flag missing or incorrect headers in their reports.
Step 5: Consider Object Caching for Database Performance
Object caching requires server support for Redis or Memcached. Check with your hosting provider to confirm availability.
If supported, install an object caching plugin like Redis Object Cache or W3 Total Cache’s object caching module.
For Redis Object Cache, install the plugin, then click “Enable Object Cache” on the plugin’s settings page. The plugin handles configuration automatically.
When to Skip Object Caching
Small sites with limited content don’t need object caching immediately. Page caching and browser caching deliver sufficient performance improvements.
Focus on object caching if your site has thousands of posts, complex queries, or high traffic levels. The performance gains justify the additional configuration.
If you’re unsure whether you need it, start without object caching. You can always add it later if needed.
Step 6: Test Your Site Speed and Performance
After enabling caching, test your site’s performance to verify improvements. Use tools like Google PageSpeed Insights or GTmetrix.
Run a speed test before configuring caching to establish a baseline. Then run another test after caching setup to compare results.
You should see improvements in load times, Time to First Byte (TTFB), and overall performance scores. If you don’t, something might be misconfigured.
What to Look for in Performance Reports
Check your Largest Contentful Paint (LCP) score. Caching should reduce it significantly, ideally below 2.5 seconds.
Your TTFB should drop below 600ms with proper caching. Higher values suggest server issues or caching configuration problems.
Review caching-specific recommendations in the reports. Tools like GTmetrix identify missing cache headers or expiration issues.
Real-World Testing
Visit your site from different devices and browsers. Pages should load noticeably faster after caching setup.
Test your site’s dynamic features. Make sure forms submit correctly, shopping carts work, and user-specific content displays properly.
If anything breaks, check your caching exclusion rules. You might need to exclude additional pages from caching.
Common Caching Issues and How to Fix Them
Even with proper setup, caching can occasionally cause problems. Don’t worry, most issues have simple solutions.
The most common issue is seeing outdated content after making updates. This happens when cached pages haven’t refreshed yet.
Solution: Clear your cache manually from the plugin settings. Most caching plugins add a “Clear Cache” button to your WordPress admin bar.
When Dynamic Content Shows Incorrectly
If personalized content appears the same for all users, those pages need caching exclusions. Cart totals, user names, or account details should never cache.
Add the affected page URLs to your caching plugin’s exclusion list. Save settings and clear your cache completely.
Test the pages in an incognito browser window to verify the fix. Dynamic content should now update correctly for each visitor.
Plugin Conflicts and Caching Problems
Some plugins conflict with caching, especially security or optimization plugins that modify output. If you experience errors after enabling caching, temporarily deactivate other plugins.
Reactivate plugins one by one to identify the conflict. Many caching plugins offer compatibility modes for popular plugins.
Check your caching plugin’s documentation for known conflicts. The developer usually provides configuration guidance for common plugin combinations.
Maintaining Your WordPress Caching Setup
Caching isn’t a set-it-and-forget-it solution. Regular maintenance ensures optimal performance over time.
Clear your cache after major updates to WordPress, your theme, or plugins. This prevents conflicts between cached and updated code.
Monitor your cache size periodically. Some caching configurations can consume significant disk space over time.
When to Clear Your Cache
Clear cache after publishing important content updates. This ensures visitors see your latest changes immediately.
After theme changes or customization work, clear the cache completely. Cached CSS and JavaScript files might not reflect your updates otherwise.
If visitors report seeing old content or broken features, clearing cache should be your first troubleshooting step.
Optimizing Cache Performance Over Time
Review your caching plugin settings every few months. Your site’s needs change as traffic grows or content expands.
Consider adjusting cache expiration times based on your update frequency. More frequent updates benefit from shorter cache lifespans.
If you’ve added object caching or server caching, monitor their performance impact. Sometimes simpler configurations perform better than complex setups.
Additional Performance Enhancements Beyond Caching
Caching significantly improves WordPress performance, but it’s one part of a complete optimization strategy.
Image optimization reduces file sizes without quality loss. Use plugins like ShortPixel or Imagify to compress images automatically.
Content Delivery Networks (CDNs) serve your static files from servers closer to your visitors. Services like Cloudflare offer free CDN plans for WordPress sites.
Database Optimization
Your WordPress database accumulates unnecessary data over time. Post revisions, spam comments, and transient options slow queries.
Plugins like WP-Optimize clean database tables safely. Run optimization monthly to maintain database efficiency.
Combined with object caching, database optimization keeps your site responsive as content grows. For more detailed guidance, check our WordPress database optimization guide.
Minification and Compression
Minification removes unnecessary characters from CSS and JavaScript files. This reduces file sizes without affecting functionality.
GZIP compression further reduces file transfer sizes between server and browser. Most caching plugins include both features.
Enable these features carefully and test thoroughly. Aggressive minification occasionally breaks JavaScript functionality on some themes.
Quick Answers to Common Caching Questions
How do I create a cache in WordPress?
Install a caching plugin such as WP Rocket, W3 Total Cache, or WP Super Cache from your WordPress dashboard. Activate the plugin and enable page caching in the settings. For advanced setups with object caching, ensure your server supports Redis or Memcached, then activate the appropriate plugin module.
Does WordPress have built-in caching?
WordPress has basic in-memory object caching for individual page requests, but this cache doesn’t persist across multiple requests. For meaningful performance improvements, you need plugins or server-level caching solutions like Redis, Memcached, or NGINX FastCGI cache.
What is the best caching approach for WordPress?
The best caching strategy combines multiple layers: start with a quality caching plugin for page caching, enable browser caching for static files, add object caching with Redis for database-heavy sites, and consider server-level caching through your hosting provider. This layered approach delivers optimal speed and scalability.
Your Next Steps to a Faster WordPress Site
You now understand how WordPress caching works and how to implement it effectively. The performance improvements are waiting for you.
Start by choosing a caching plugin that matches your technical comfort level. Install it today and enable page caching first.
Test your site speed before and after configuration. You’ll see immediate load time improvements that make the effort worthwhile.
After page caching is working well, add browser caching. Then explore object caching if your site needs that extra performance boost.
Take it one step at a time. You don’t need to implement everything simultaneously.
If you run into issues or need help with WordPress speed optimization, we’re here to support you. Our team specializes in making WordPress sites faster and more reliable.
Your visitors deserve a fast website. Start implementing caching today and give them the experience they expect.