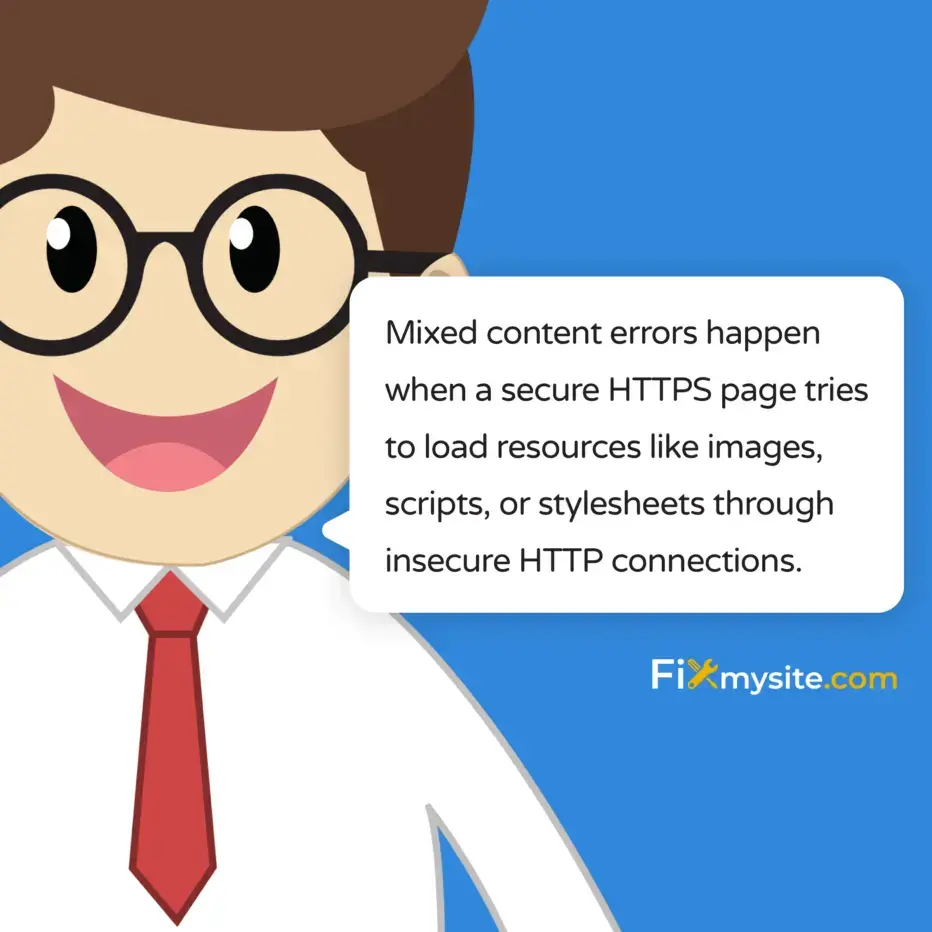
Mixed content errors happen when a secure HTTPS page tries to load resources like images, scripts, or stylesheets through insecure HTTP connections. Your browser blocks these requests to protect visitors from security risks. The result? Broken images, missing styles, nonfunctional features, and that dreaded broken padlock icon that tells visitors your site is not fully secure.
We know how frustrating it is to move your site to HTTPS only to discover mixed content warnings everywhere. You did the right thing getting an SSL certificate installed. Now your browser is just doing its job by protecting your visitors.
Take a deep breath. This guide will walk you through exactly what mixed content is, why it happens, how to find every instance on your WordPress site, and how to fix it permanently. You will learn to use Chrome DevTools to detect problems, update your database safely, and verify everything works correctly.
What Is a Mixed Content Error?
A mixed content error occurs when your secure HTTPS website tries to load resources over an insecure HTTP connection. Your site has proper encryption, but some elements are still being requested without it.
Think of it like having a secure building with locked doors but leaving a window open. The main entrance is protected, but there is still an access point that is not secure.
Your browser sees this security gap and takes action. Modern browsers like Chrome, Firefox, and Safari block insecure resources on secure pages. This protection keeps your visitors safe from potential threats.
How Mixed Content Appears in Your Browser
The most obvious sign is a broken padlock icon in your address bar. Instead of showing a secure connection, you will see a warning symbol or an information icon.
Open your browser console and you will see specific warnings. Chrome DevTools shows messages like “Mixed Content: The page was loaded over HTTPS, but requested an insecure resource.” Each warning identifies exactly which resource is causing the problem.
Some resources get blocked completely. Others load with a warning. The difference depends on what type of mixed content your browser detects.
The Security Risks of Mixed Content
Mixed content creates real security vulnerabilities. When resources load over HTTP, anyone between your server and your visitor can intercept that connection. They could modify the content, inject malicious code, or steal sensitive information.
Mozilla advises using secure content to protect data integrity and confidentiality across all web resources. Every insecure request creates a potential entry point for attacks.
Search engines notice these security issues too. SEO is negatively impacted by mixed content since search engines prioritize secure sites in their rankings. Your hard work on content and optimization gets undermined by these technical security problems.
Why Browsers Block Mixed Content
Browsers block mixed content to protect your visitors from man in the middle attacks. When someone visits your HTTPS site, they expect everything to be encrypted and secure. Loading even one resource over HTTP breaks that security promise.
The padlock icon in your address bar represents a trust indicator. Visitors use it to verify your site is safe before entering personal information or making purchases. Mixed content warnings destroy that trust instantly.
Different browsers handle mixed content slightly differently, but all modern browsers enforce strict security policies. Chrome, Firefox, Safari, and Edge all block insecure content by default on secure pages.
How Browser Security Policies Work
Browsers classify resources into two categories based on risk level. This classification determines whether content gets blocked completely or just triggers a warning.
The browser checks every resource request as your page loads. It compares the main page protocol (HTTPS) against each resource protocol (HTTP or HTTPS). Any mismatch triggers the mixed content detection system.
Modern browsers have become increasingly strict about mixed content. What used to generate warnings now gets blocked automatically. This trend will continue as web security standards evolve.
Types of Mixed Content
Not all mixed content poses the same level of risk. Browsers categorize insecure resources into two main types based on the potential security threat.
Understanding these categories helps you prioritize fixes and understand why some resources are blocked while others just show warnings.
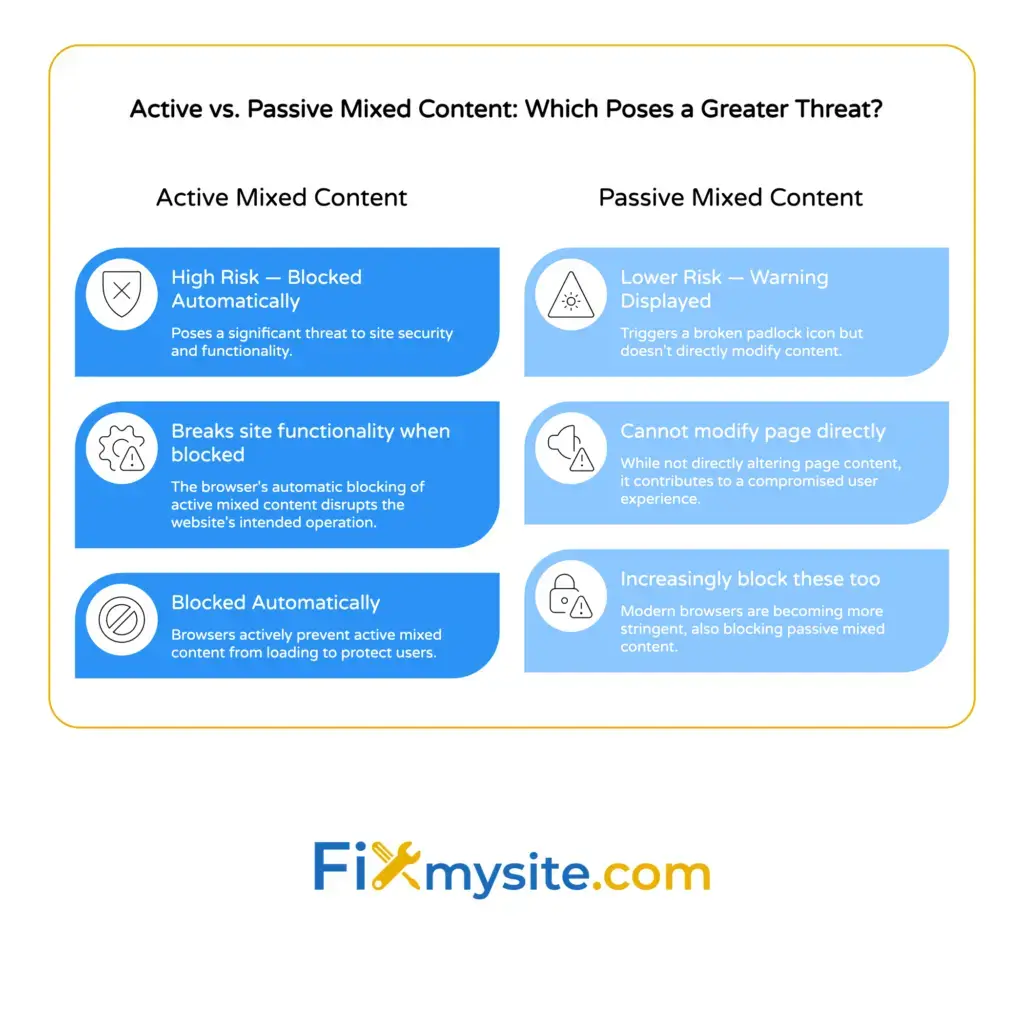
Active Mixed Content
Active mixed content includes resources that can modify your page or interact with other content. This category covers scripts, stylesheets, iframes, and XMLHttpRequest objects. Browsers block these automatically because they pose the highest security risk.
When a script loads over HTTP, an attacker could modify that script to steal data, redirect visitors, or inject malicious code. The potential damage is severe, so browsers refuse to load these resources at all.
Your site functionality breaks when active content gets blocked. Features stop working, layouts appear broken, and interactive elements fail. These are the mixed content errors you need to fix immediately.
Passive Mixed Content
Passive mixed content includes resources that cannot modify the page directly. Images, video, and audio files fall into this category. These resources display warnings but often still load in older browsers.
The security risk is lower but still present. An attacker could swap an image to display misleading information or track visitors through modified media files. Modern browsers increasingly block passive content too.
Even if passive content loads, you still get the broken padlock icon. Your site appears insecure to visitors, damaging trust and potentially affecting conversions.

How Browsers Upgrade Content Automatically
Some modern browsers attempt to upgrade mixed content automatically. When they detect an HTTP resource request, they try loading it over HTTPS first. If the secure version exists, the resource loads without errors.
This automatic upgrading helps reduce mixed content errors, but it is not foolproof. If the HTTPS version does not exist, the request fails and the resource does not load at all.
You should not rely on browser upgrades. Fix mixed content at the source by ensuring all your resources use HTTPS from the start.
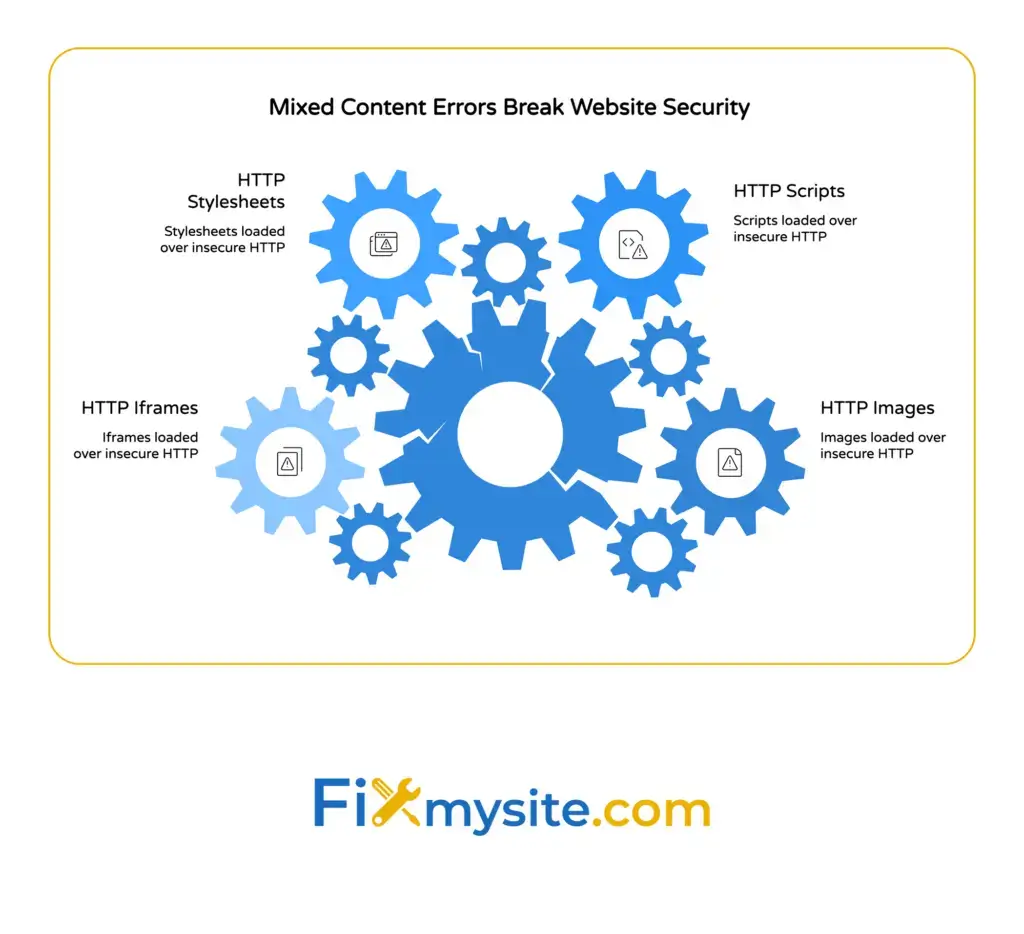
Common Causes of Mixed Content Errors on WordPress Sites
Mixed content errors usually appear after migrating from HTTP to HTTPS. Your old content still references the HTTP versions of resources, creating security warnings across your site.
We see these issues constantly when helping people with secure connection problems. The good news is that most causes follow predictable patterns.
Hardcoded URLs in Database Content
Many mixed content errors are caused by outdated embed codes or insecure image sources stored directly in your WordPress database. Every time you add an image or link in the WordPress editor, the full URL gets saved in your post content.
If you created content before installing your SSL certificate, those URLs still point to HTTP versions. Your posts, pages, and custom post types all contain these old references.
This is the most common source of mixed content on WordPress sites. The database holds thousands of HTTP references that need updating to HTTPS.
Theme and Plugin Files
Some themes and plugins hardcode HTTP URLs directly in their PHP files. These URLs do not get stored in the database, so database search and replace tools miss them completely.
WordPress security experts recommend updating core files regularly to prevent mixed content errors and other security issues. The same applies to themes and plugins.
Check your theme’s functions.php file, template files, and any custom code for hardcoded HTTP URLs. Look in plugin files too, especially older plugins that have not been updated recently.
External Resources and Third Party Services
External resources from content delivery networks, analytics services, social media widgets, and advertising networks can cause mixed content. You do not control these resources directly, making them tricker to fix.
Content delivery networks like Cloudflare provide HTTPS to ensure secure connections for all resources. Make sure any CDN or external service you use supports HTTPS.
Check embed codes from YouTube, Google Maps, social media platforms, and other third party services. Most modern services provide HTTPS versions, but you might be using outdated embed codes from years ago.
WordPress Settings and Configuration
Your WordPress site URL settings might still reference HTTP. Check Settings, General in your WordPress admin panel. Both WordPress Address (URL) and Site Address (URL) should use HTTPS.
The wp-config.php file can also contain URL definitions. Look for WP_HOME and WP_SITEURL constants and make sure they specify HTTPS.
These configuration settings affect how WordPress generates URLs throughout your site. If they are set to HTTP, you will have mixed content problems everywhere.
How to Detect Mixed Content on Your WordPress Site
You need to find every mixed content issue before you can fix them. Some errors are obvious, showing broken images or missing styles. Others hide in page sections you rarely visit.
Systematic detection ensures you catch everything. Use browser tools, online scanners, and manual inspection to build a complete picture of your mixed content problems.
Using Chrome DevTools Console
Chrome DevTools provides the most detailed mixed content information. Open any page on your site, right-click, and select Inspect. Click the Console tab to see all security warnings.
Mixed content warnings appear in yellow or red. Each warning shows the insecure resource URL and where it was requested from. The console tells you exactly what needs fixing.
Check multiple pages, not just your homepage. Mixed content errors often appear on specific post types, category pages, or sections of your site that use different templates.
The Network tab shows all resource requests too. Filter by “mixed-content” to see blocked and warned resources. This view helps you understand which resources loaded and which got blocked.
Checking Browser Security Indicators
The padlock icon in your address bar provides quick visual feedback. Click it to see detailed security information about the current page.
A secure page shows a locked padlock. A page with mixed content shows a warning icon or information symbol. Some browsers display a “Not Secure” message when active content is blocked.
This quick check helps you identify problem pages during normal browsing. Test your site in different browsers since they display warnings differently.
Using Online Mixed Content Scanners
Online tools crawl your entire site looking for mixed content. They check pages you might forget to test manually and generate detailed reports.
Tools like Why No Padlock and JitBit SSL Check scan your site and list every insecure resource. These scanners save time by automating the detection process across hundreds of pages.
Run a full site scan before starting fixes. The report shows exactly how many issues you need to resolve and where they are located.
Manual Page Inspection
View the source code of your pages to spot HTTP URLs manually. Press Ctrl+U (Windows) or Cmd+Option+U (Mac) to see the raw HTML.
Search for “http://” in the source code. This finds most mixed content issues quickly. Look especially in image src attributes, script src attributes, and link href attributes.
Check your site’s header and footer templates. Mixed content in these areas affects every page on your site.

How to Fix Mixed Content Errors Step by Step
Fixing mixed content requires updating every HTTP reference to HTTPS. The process is straightforward but requires careful execution to avoid breaking your site.
Do not worry about making changes. We will guide you through each step with clear instructions and safety precautions. Many site owners handle these fixes themselves after reading this guide.
Step 1: Back Up Your WordPress Site
Create a complete backup before making any changes. Back up your database, files, uploads, themes, and plugins. Store the backup somewhere safe, not just on your web server.
If something goes wrong during the fix process, you can restore your site to this working state. This backup gives you confidence to make necessary changes without fear.
Use a WordPress backup plugin or your hosting control panel backup feature. Verify the backup completed successfully before moving to the next step.
Step 2: Update WordPress Site URL Settings
Log into your WordPress admin panel and go to Settings, then General. Change both WordPress Address (URL) and Site Address (URL) from HTTP to HTTPS.
Click Save Changes at the bottom of the page. You might get logged out and need to log back in using the new HTTPS URL.
This change updates how WordPress generates URLs going forward. It does not fix existing content, but it prevents new mixed content issues.
Step 3: Search and Replace Database URLs
Your database contains thousands of HTTP URLs in post content, page content, custom fields, and widget areas. You need to replace all these HTTP references with HTTPS versions.
The Better Search Replace plugin makes this process safe and easy. Install and activate it from your WordPress plugins page.
Go to Tools, then Better Search Replace. In the “Search for” field, enter your old HTTP URL (like http://yoursite.com). In the “Replace with” field, enter your new HTTPS URL (like https://yoursite.com).
Select all database tables to search. Check the “Run as dry run” box first. This shows you what would change without actually changing anything.
Review the dry run results. If everything looks correct, uncheck the dry run option and run the search and replace for real. This updates all your database content to use HTTPS.
Step 4: Fix Theme and Plugin Files
Some HTTP URLs are hardcoded in PHP files. These do not get updated by database search and replace. You need to find and fix them manually.
Use your hosting file manager or FTP to access your site files. Search your theme folder (wp-content/themes/your-theme) for any HTTP URLs.
Look especially in functions.php, header.php, and footer.php. Replace any HTTP URLs you find with HTTPS or use relative URLs instead.
Check plugin files too if you know specific plugins are causing mixed content. Sometimes updating plugins to their latest versions fixes hardcoded HTTP URLs automatically.
Step 5: Update External Resource URLs
Find any embed codes or external resources still using HTTP. Common sources include Google Fonts, social media widgets, analytics scripts, and advertising code.
Most external services support HTTPS now. Change the protocol in embed codes from http:// to https:// or use protocol relative URLs that start with //.
Check your theme customizer settings, widget areas, and any custom HTML blocks. These areas often contain embed codes that need updating.
Step 6: Force HTTPS Across Your Entire Site
Add redirect rules to force all traffic to use HTTPS. This ensures visitors always access the secure version of your site, even if they type the HTTP address.
The Really Simple SSL plugin handles this automatically. Install and activate it, then follow the plugin’s setup wizard. It configures your site to use HTTPS everywhere.
Alternatively, add redirect rules to your .htaccess file manually. This technical approach gives you more control but requires editing server configuration files.
Step 7: Clear All Caches
Clear your WordPress cache, server cache, CDN cache, and browser cache. Old cached versions might still contain HTTP references even after you fix everything.
If you use a caching plugin like WP Super Cache or W3 Total Cache, clear the cache through the plugin settings. Clear your CDN cache through your CDN control panel.
Clear your browser cache or use an incognito window to test your site. This ensures you are seeing the current version with all your fixes applied.
Verifying Your Fixes and Preventing Future Mixed Content
After fixing mixed content errors, verify everything works correctly. Test your entire site systematically to catch any issues you might have missed.
Prevention is just as important as fixing existing problems. Set up your WordPress site to automatically use HTTPS for all new content and resources.
Testing Your Site for Remaining Issues
Open your site in Chrome and check the padlock icon. It should show as fully secure without warnings. Click the padlock to see detailed security information.
Open Chrome DevTools console on several different pages. Look for any remaining mixed content warnings. Test your homepage, blog posts, pages, and any custom post types.
Run an online SSL checker again to scan your entire site. Compare the results to your initial scan. You should see zero mixed content errors.
Test your site in different browsers too. Chrome, Firefox, Safari, and Edge all handle mixed content slightly differently. Make sure everything works everywhere.
Monitoring for New Mixed Content Issues
Mixed content can reappear when you install new plugins, change themes, or add content from external sources. Stay vigilant about maintaining your site’s security.
Check your browser console occasionally when adding new content. This catches mixed content issues immediately before they spread across your site.
Set up regular SSL checks using monitoring services. These services alert you when mixed content appears, allowing you to fix problems quickly. Security monitoring is an essential part of WordPress maintenance that protects your site long term.
Best Practices for WordPress HTTPS
Always use HTTPS URLs when adding new content. When inserting images, make sure the media library URL uses HTTPS. When adding embed codes, verify they use HTTPS protocols.
Use relative URLs instead of absolute URLs when possible. Relative URLs like /images/photo.jpg work with both HTTP and HTTPS automatically. This prevents future protocol mismatches.
Keep your WordPress core, themes, and plugins updated. Updates often include security fixes and HTTPS compatibility improvements. Regular updates prevent common WordPress errors including mixed content issues.
SSL certificates are crucial for establishing a secure site connection and preventing mixed content errors. Make sure your certificate stays valid and renew it before expiration.
When to Get Professional Help
Most mixed content fixes are straightforward, but some situations require expert assistance. Complex custom code, large databases, or persistent errors might need professional troubleshooting.
If you are not comfortable editing database content or theme files, getting help is the smart choice. One mistake could break your site or cause data loss.
Our team fixes mixed content errors and other secure connection problems quickly and safely. We handle the technical work while you focus on running your business.
If your fixes are not working or you keep finding new mixed content issues, professional support can identify the root cause. Sometimes the solution involves server configuration, CDN settings, or complex theme customizations.
Take Action on Mixed Content Today
Mixed content errors damage your site’s security, trust, and search rankings. Now you know exactly what causes these errors and how to fix them permanently.
Start by checking your site with Chrome DevTools console. See exactly which resources are loading over HTTP. Make a list of the problem areas so you can fix them systematically.
Back up your site before making changes. Update your WordPress URL settings first, then run a database search and replace to fix existing content. Check your theme and plugin files for hardcoded URLs.
Test thoroughly after applying fixes. Check the padlock icon, review the browser console, and run a full site SSL scan. Make sure every page loads securely without warnings.
Need help getting your WordPress site fully secure? We are here to support you through this process. Get expert WordPress help for mixed content errors, security issues, and any other technical challenges. We will fix the problems quickly so you can focus on growing your business with confidence.