

Don’t panic – here’s your step-by-step roadmap to get your WordPress site back online in minutes. Whether you’re facing a white screen of death, database connection errors, or any other WordPress malfunction, these proven solutions will help you restore your site quickly and safely.
As WordPress specialists who’ve handled thousands of site recoveries, we know that every minute of downtime can impact your business. That’s why we’ve compiled these seven most effective solutions that address 90% of common WordPress issues. These fixes are arranged in order of both effectiveness and simplicity, so you can try the quickest solutions first before moving on to more complex approaches.
Before diving into the solutions, remember this golden rule: always backup your site before making any changes. If you don’t have a recent backup and can’t create one now, take screenshots of your current settings and make notes of any changes you implement. This way, you can always retrace your steps if needed. For a complete pre-fix checklist, check out our comprehensive WordPress maintenance checklist.
Each solution in this guide comes from our extensive experience in resolving WordPress fatal errors and site failures. We’ll explain not just what to do, but why each solution works, helping you understand your WordPress site better. Whether you’re a business owner, blogger, or website administrator, these solutions are designed to be clear and actionable, regardless of your technical expertise.

Let’s start with the most common and easily fixable issues first. If one solution doesn’t work, simply move on to the next – we’ll guide you through each step of the recovery process.
1. Identify and Research Your Error Message
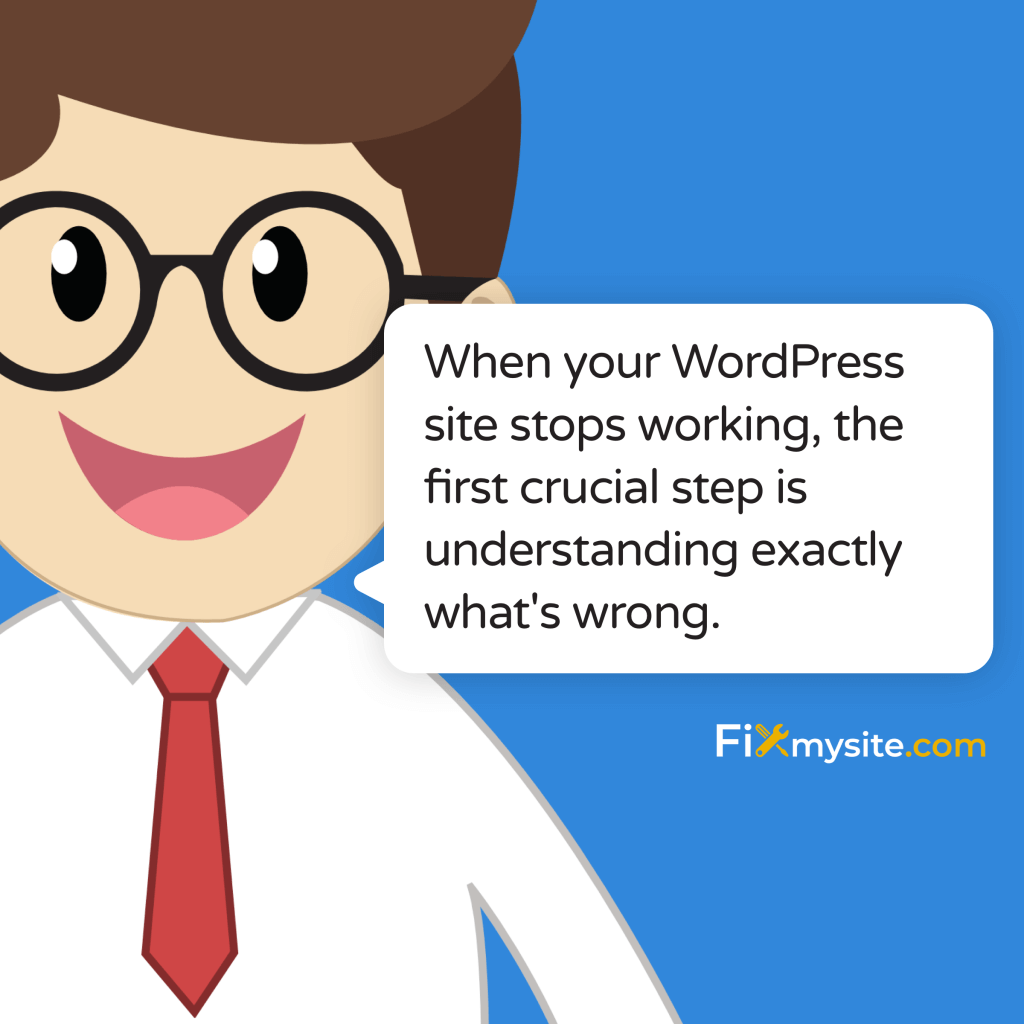
When your WordPress site stops working, the first crucial step is understanding exactly what’s wrong. Different error messages point to specific problems, and identifying them correctly can significantly reduce your troubleshooting time. Most WordPress errors fall into distinct categories, each requiring a specific approach to resolve.
The error message you’re seeing is essentially your WordPress site’s way of communicating what’s wrong. While some errors might appear cryptic, they often contain valuable information that can lead you directly to the solution. Let’s break down the most common error messages and their meanings.
Common WordPress Errors and Their Meanings
Understanding common WordPress errors helps you quickly identify the root cause of your site’s problems. Here are the most frequent issues you might encounter, along with their typical causes:
The “Error Establishing a Database Connection” message typically indicates that WordPress can’t communicate with your site’s database. This often occurs due to incorrect database credentials or server issues. For a detailed solution to this specific problem, visit our guide on fixing database connection errors.
The White Screen of Death (WSOD) appears as a blank page with no error message. This usually stems from PHP memory limits being exceeded or plugin conflicts. While intimidating, this error is often resolvable through simple steps we’ll cover in later sections.
Internal Server Errors (500) typically indicate a problem with your server configuration or corrupted WordPress files. These can be caused by plugin conflicts, theme issues, or server-side problems.
Effective Error Research Methods
Once you’ve identified your specific error, the next step is conducting effective research to find the right solution.
Here’s how to research WordPress errors efficiently:
Start by checking your WordPress error logs, which provide detailed information about what went wrong and when. You can find these logs in your hosting control panel or by enabling WordPress’s built-in debugging feature. For guidance on interpreting complex errors, refer to our comprehensive guide on resolving WordPress fatal errors.
When researching your error message, use exact quotes from the error in your search queries. This helps you find more relevant solutions. Pay particular attention to responses from official WordPress documentation and reputable WordPress development sources.
Document everything you find and any steps you take. This creates a troubleshooting trail that can be invaluable if you need to retrace your steps or if you encounter similar issues in the future. Keep track of:
- The exact error message you’re seeing
- When the error first appeared
- Any recent changes made to your site
- Solutions you’ve already attempted
Remember that while researching solutions is important, avoid making multiple changes simultaneously. This can complicate the troubleshooting process and potentially create new problems. Instead, test one solution at a time and document the results before moving on to the next approach.
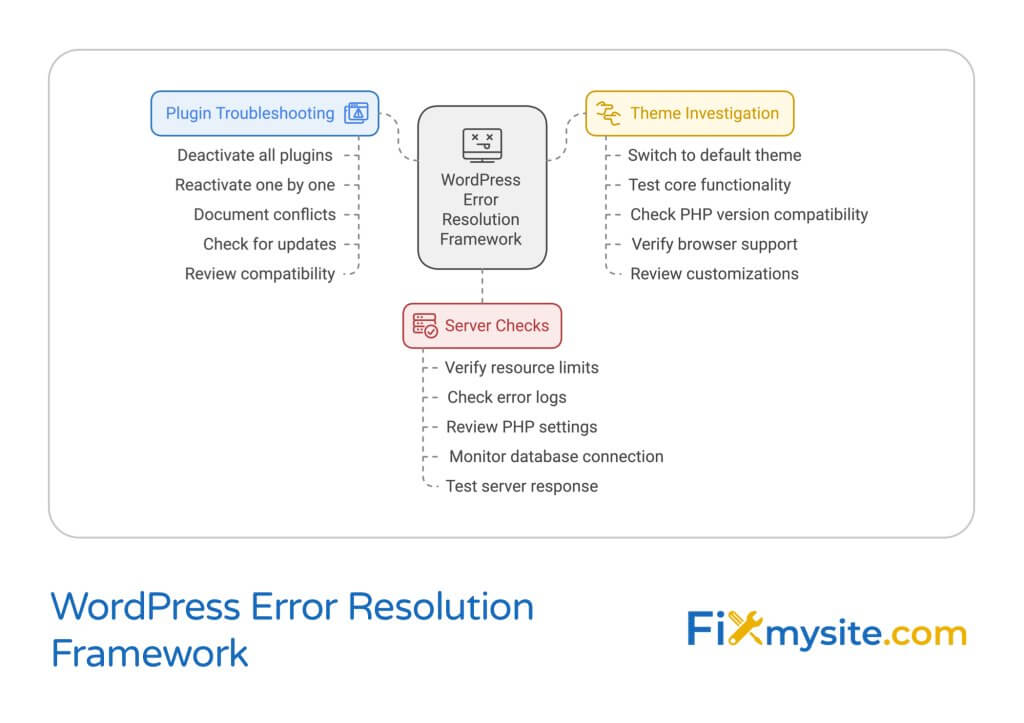
2. Resolving Plugin-Related Problems
Plugin conflicts are among the most common causes of WordPress site failures. While plugins enhance your site’s functionality, they can also introduce compatibility issues or conflicts that bring your site down. Understanding how to safely manage and troubleshoot plugin problems is crucial for maintaining a healthy WordPress site.
Before making any changes to your plugins, ensure you have access to your WordPress admin area. If you can’t access the admin panel, you’ll need to use FTP or your hosting control panel to manage plugins. This approach requires extra caution, but we’ll guide you through both methods.
Safe Plugin Deactivation Process
When dealing with plugin-related issues, the key is to follow a systematic deactivation process that won’t cause additional problems. Here’s how to safely deactivate your plugins to identify the source of the issue:
If you have admin access, start by creating a list of all your active plugins. This documentation will help you restore your site to its original state once you’ve identified the problematic plugin. For sites experiencing performance issues, check our guide on fixing slow WordPress sites, as plugin optimization plays a crucial role in site speed.
When you can’t access your admin panel, you’ll need to use FTP or file manager access through your hosting control panel. Navigate to the wp-content/plugins directory and rename the entire plugins folder to “plugins_old”. This effectively deactivates all plugins at once. If your site recovers, you’ve confirmed that a plugin is causing the issue.
Plugin Conflict Resolution
Once you’ve determined that plugins are causing your site’s problems, it’s time to identify and resolve the specific conflict. This process requires patience and attention to detail to prevent further issues.
Start by reactivating plugins one at a time, waiting at least 30 seconds between each activation to observe any changes in your site’s behavior. This methodical approach helps isolate the problematic plugin. Pay special attention to recently updated plugins or those installed just before your site stopped working.
If you discover a problematic plugin, don’t immediately delete it. First, check:
- The plugin’s compatibility with your WordPress version
- Recent plugin updates that might have introduced bugs
- Conflicts with your theme or other plugins
Sometimes, what appears to be a plugin conflict might actually be a security issue. For comprehensive security scanning and malware detection, review our guide on WordPress malware removal plugins.
After identifying the problematic plugin, you have several options. You can contact the plugin developer for support, look for alternative plugins with similar functionality, or, if the plugin is crucial to your site, consider hiring a WordPress developer to resolve the conflict. Remember to check the plugin’s support forums for known issues and potential solutions before making any decisions.
When reactivating plugins, maintain a testing environment or staging site if possible. This allows you to safely test plugin combinations without risking your live site’s functionality. If you must test on your live site, do so during low-traffic periods to minimize potential disruption to your visitors.
3. Theme-Based Troubleshooting
Theme-related issues can manifest in various ways, from broken layouts to complete site failures. Understanding how to properly diagnose and resolve theme problems is essential for maintaining your WordPress site’s functionality and appearance. Let’s explore the most effective approaches to theme troubleshooting.
Theme problems often occur after updates, customization attempts, or conflicts with plugins. Identifying these issues early can prevent more serious complications and extended downtime. If you’re experiencing mobile-specific theme issues, you might want to review our guide on fixing mobile usability issues in WordPress.
Switching to Default Theme
The most reliable way to determine if your current theme is causing problems is to switch to a default WordPress theme. This process acts as a controlled test to isolate theme-specific issues from other potential problems.
If you have admin access, switching themes is straightforward through the WordPress dashboard. However, if you can’t access your admin area, you’ll need to use FTP or your hosting file manager to rename your current theme’s folder, which will force WordPress to revert to a default theme.
Here’s how to safely test with a default theme:
- Back up your current theme’s settings and customizations
- Install a default WordPress theme (like Twenty Twenty-Three)
- Temporarily activate the default theme
- Test your site’s core functionality
If your site works correctly with a default theme, you’ve confirmed that your original theme is causing the problem. This information is valuable for the next troubleshooting steps and can save considerable time in the resolution process.
Theme Compatibility Checks
Once you’ve identified a theme-related issue, it’s crucial to perform comprehensive compatibility checks. Theme problems often stem from conflicts with WordPress core features, plugins, or server configurations. If you’re experiencing JavaScript-related theme issues, consult our guide on fixing JavaScript problems in WordPress.
Start by checking these common compatibility points:
| Compatibility Factor | What to Check |
| WordPress Version | Ensure your theme supports your current WordPress version |
| PHP Version | Verify theme compatibility with your server’s PHP version |
| Browser Support | Test across different browsers and devices |
When dealing with theme customizations, always maintain a backup of your original theme files. Custom code modifications can often lead to conflicts or errors, particularly after theme updates. If you’ve made custom modifications, review them carefully and consider implementing them through a child theme instead.
Remember that theme issues can sometimes appear to be theme-specific but actually stem from server configuration problems. Common server-related issues that affect themes include:
Memory limits that are too low for your theme’s requirements, PHP version incompatibilities, and server caching conflicts. Working with your hosting provider to optimize these settings can often resolve persistent theme issues.
4. Cache Clearing Solutions
Caching issues frequently cause WordPress sites to display outdated content or behave unexpectedly. While caching is essential for site performance, it can sometimes prevent your site from displaying recent changes or cause functionality problems. Understanding how to properly manage different types of caching can quickly resolve many common WordPress issues.
Before diving into specific solutions, it’s important to understand that caching occurs at multiple levels: browser, server, and WordPress itself. Each layer requires a different approach for effective cache clearing. For a comprehensive overview of caching plugins and their configuration, check out our guide on WordPress cache plugins.
Browser Cache Management
Browser caching is often the first layer of caching you should address when troubleshooting WordPress issues. Your browser stores various elements of your website to improve loading times, but this cached data can sometimes prevent you from seeing recent changes to your site.
Here’s how to effectively clear your browser cache across different scenarios:
| Browser | Cache Clearing Method |
| Chrome | Press Ctrl+Shift+Delete (Windows) or Command+Shift+Delete (Mac) |
| Firefox | Press Ctrl+Shift+Delete (Windows) or Command+Shift+Delete (Mac) |
| Safari | Press Command+Option+E |
For development or troubleshooting purposes, use your browser’s incognito or private browsing mode to view your site without cached data. This provides a clean slate for testing changes and can help identify cache-related issues more quickly.
WordPress Cache Solutions
WordPress caching occurs at both the plugin level and the server level. Managing these caching layers effectively is crucial for maintaining site performance while avoiding cache-related problems. If you’re using CDN services, you might want to review our guide on configuring WP Rocket with KeyCDN for optimal caching setup.
When dealing with WordPress caching issues, follow these systematic steps:
First, identify all active caching mechanisms on your site. This includes:
- WordPress caching plugins
- Server-level caching (often provided by hosts)
- CDN caching
- Object caching (if implemented)
Next, clear each cache layer methodically. Start with plugin-level caching by accessing your caching plugin’s dashboard and using the clear cache option. Many hosting providers also offer cache clearing through their control panels – make sure to clear these as well.
If you’re experiencing persistent caching issues, consider temporarily disabling caching plugins to isolate the problem. Remember to re-enable them once you’ve resolved the issue, as caching is crucial for site performance. When re-enabling caching, start with basic settings and gradually optimize them to prevent new issues from arising.
For sites using multiple caching layers, maintain a clear order of operations for cache clearing. Generally, clear server-level caches first, followed by WordPress caching plugins, and finally CDN caches. This systematic approach helps ensure all cached data is properly cleared and prevents cached errors from persisting.

5. WordPress Core Updates and Maintenance
WordPress core updates and proper maintenance are crucial for your site’s security and functionality. When your site stops working after an update, or if you’re experiencing issues related to outdated components, understanding how to manage WordPress versions and updates becomes essential. For a detailed guide on manual updates, visit our comprehensive tutorial on how to manually update WordPress.
Before diving into update procedures, it’s important to understand that update-related issues often occur due to compatibility problems between WordPress core, themes, and plugins. A systematic approach to updates can prevent most of these issues while resolving existing ones.
Safe Update Procedures
Following safe update procedures is crucial for maintaining your site’s stability. Many WordPress issues arise from updates gone wrong, but you can prevent these problems by following a structured approach.
Here’s a systematic approach to safe WordPress updates:
| Update Step | Critical Actions |
| Pre-Update Preparation | Create complete backup, check compatibility |
| Update Execution | Update one component at a time, test after each |
| Post-Update Verification | Check functionality, review error logs |
When performing updates, always start with a complete backup of your site. This includes your database, all WordPress files, and any custom modifications. If something goes wrong, you’ll have a reliable restoration point.
Version Management Best Practices
Proper version management helps prevent compatibility issues and makes troubleshooting easier when problems occur. Understanding how different WordPress versions interact with your themes and plugins is key to maintaining a stable site.
Follow these version management guidelines to maintain site stability:
- Keep detailed records of all version changes
- Test updates on a staging site first
- Monitor compatibility requirements
- Maintain backup points before major version changes
If you’re experiencing issues after an update, don’t immediately roll back to a previous version. First, check your error logs for specific problems and verify that all your plugins and themes are compatible with the new WordPress version. Sometimes, simply updating plugins or themes to their latest versions can resolve post-update issues.
When dealing with a failed update, work methodically through these steps:
First, check your PHP error logs for specific error messages that might indicate the source of the problem. Next, verify that your server meets the minimum requirements for the new WordPress version. Finally, test your site’s core functionality to identify any specific features that might be affected by the update.
Remember that WordPress version management isn’t just about updates – it’s about maintaining a stable, secure environment for your site. Regular maintenance tasks, including database optimization and file cleanup, should be part of your version management strategy.
6. Server-Related Solutions
Server-related issues can be among the most challenging WordPress problems to diagnose and fix. These problems often manifest as slow loading times, database connection errors, or complete site outages. Understanding how to identify and resolve server-related issues is crucial for maintaining a healthy WordPress site.
Many server issues stem from resource limitations, configuration problems, or hosting-related challenges. If you’re experiencing database connectivity issues, you might want to review our detailed guide on fixing database connection errors.
Common Hosting Issues
Hosting-related problems can significantly impact your WordPress site’s performance and availability. Understanding these issues and knowing how to address them can help you maintain optimal site functionality. For performance-related hosting issues, check our guide on fixing slow WordPress sites.
Here are the most common hosting-related issues and their solutions:
| Issue Type | Common Symptoms | Primary Solutions |
| Resource Limits | 503 errors, slow loading | Upgrade hosting plan, optimize resources |
| Server Configuration | 500 errors, PHP errors | Adjust PHP settings, update configurations |
| Database Issues | Connection errors, slow queries | Optimize database, check credentials |
When dealing with hosting issues, start by checking your hosting control panel for any alerts or notifications about resource usage or server status. Many hosting providers offer built-in tools for monitoring server health and resource consumption.
PHP Memory Management
PHP memory limits are a common source of WordPress issues, particularly when running resource-intensive plugins or handling large amounts of content. Understanding how to properly manage PHP memory can prevent many common WordPress errors.
To effectively manage PHP memory in WordPress:
- Monitor your current PHP memory usage
- Identify memory-intensive processes
- Adjust PHP memory limits appropriately
- Optimize code and processes to reduce memory consumption
If you need to increase your PHP memory limit, you can do so through your wp-config.php file or by contacting your hosting provider. However, remember that constantly hitting memory limits might indicate a need for optimization rather than just increasing the limit.
When troubleshooting server-related issues, maintain clear communication with your hosting provider. They can often provide valuable insights into server status, resource usage, and potential configuration improvements. Some hosting providers also offer WordPress-specific optimization services that can help resolve persistent server issues.
Remember to check your server’s error logs when troubleshooting issues. These logs often contain detailed information about PHP errors, resource limitations, and other server-related problems that might be affecting your WordPress site. Most hosting control panels provide access to these logs, or you can request them from your hosting provider.
7. WordPress Core Files and Configuration
Issues with WordPress core files and configuration settings can cause significant problems with your site’s functionality. Whether these issues arise from corrupted files, incorrect permissions, or misconfigured settings, knowing how to properly manage WordPress core files is essential for maintaining site stability.
Before making any changes to core files, ensure you have a complete backup of your site. For guidance on safely handling WordPress files, refer to our guide on manually updating WordPress, which covers proper file management techniques.
Core File Restoration
When WordPress core files become corrupted or modified, restoring them to their original state can often resolve site issues. This process requires careful attention to detail to avoid causing additional problems.
Follow these steps for safe core file restoration:
| Restoration Step | Critical Considerations |
| File Backup | Create complete backup of existing files |
| Permission Check | Verify correct file permissions |
| File Replacement | Replace only necessary core files |
When replacing core files, pay special attention to the wp-admin and wp-includes directories. These contain essential WordPress system files that should never be modified directly. If you suspect file corruption due to malware, consult our guide on WordPress malware removal plugins.
Managing .htaccess Files
The .htaccess file is crucial for WordPress URL structure and server configuration. Incorrect .htaccess settings can cause various issues, from broken permalinks to complete site inaccessibility.
Here’s how to properly manage your .htaccess file:
- Always backup your current .htaccess file before making changes
- Use proper syntax for server configurations
- Verify changes in a staging environment when possible
- Monitor site behavior after any modifications
If you need to reset your .htaccess file to its default state, first rename the existing file (don’t delete it in case you need to revert changes). Then, in your WordPress admin panel, go to Settings > Permalinks and click “Save Changes” to generate a new .htaccess file with default WordPress rules.
When troubleshooting .htaccess issues, remember that different hosting environments may require specific configurations. Always consult your hosting provider’s documentation for recommended .htaccess settings, especially for security and performance optimizations.
File permissions play a crucial role in WordPress security and functionality. Incorrect permissions can lead to various issues, from upload problems to security vulnerabilities. Here are the recommended permission settings for WordPress files:
Directories should typically be set to 755, while files should be set to 644. However, some hosting environments may require different permissions. Always consult your hosting provider’s recommendations before making permission changes.

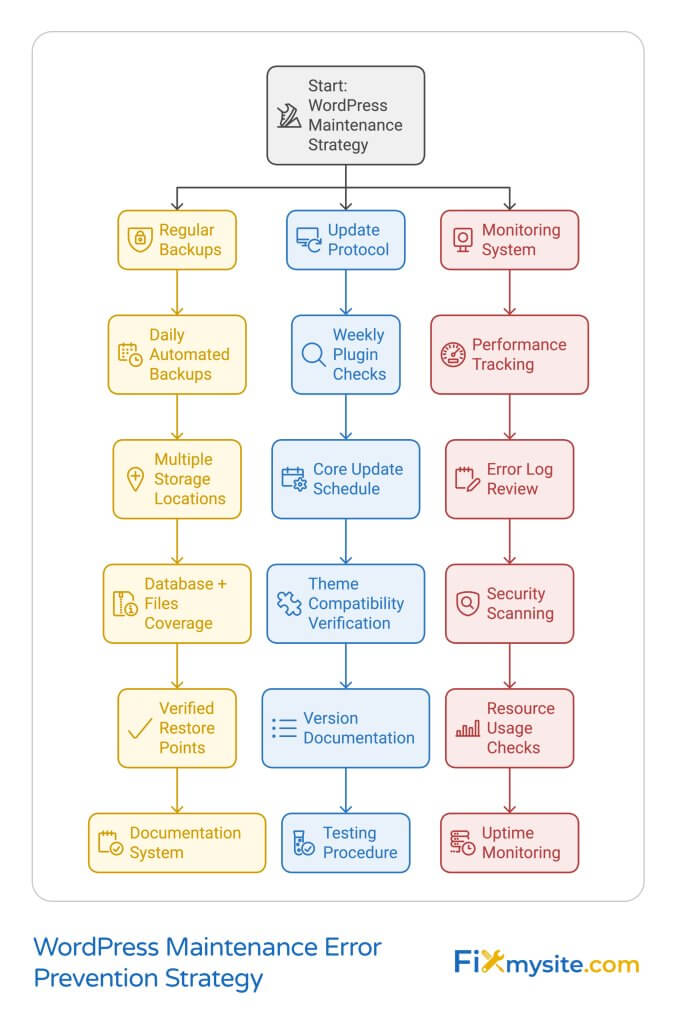
Preventing Future WordPress Issues
While knowing how to fix WordPress problems is essential, preventing issues before they occur is even more valuable. Implementing a proactive maintenance strategy can significantly reduce the likelihood of your site experiencing downtime or technical problems.
Here are essential preventive measures to keep your WordPress site running smoothly:
| Maintenance Area | Recommended Actions | Frequency |
| Backups | Automated full-site backups | Daily |
| Updates | Core, plugin, and theme updates | Weekly |
| Security Scans | Malware and vulnerability checks | Weekly |
| Performance Checks | Speed and resource monitoring | Monthly |
Regular maintenance not only prevents issues but also helps identify potential problems before they affect your site’s functionality.
Frequently Asked Questions
How do I know if my WordPress site is actually down?
Use external monitoring tools to verify if your site is down for everyone or just you. Check from different devices and networks, and use online status checker tools to confirm the issue’s scope.
What should I do first when my WordPress site stops working?
Start by identifying any specific error messages and checking your site’s error logs. Clear your browser cache and verify if the issue persists in incognito mode before making any significant changes.
Can I fix WordPress issues without technical knowledge?
Many common WordPress issues can be resolved using the steps outlined in this guide. However, for complex problems or if you’re uncomfortable making technical changes, it’s best to consult with a WordPress professional.
How long do these fixes typically take?
Simple issues like cache clearing or plugin deactivation can be resolved in minutes. More complex problems involving core files or server configurations might take longer and may require professional assistance.
When should I contact my hosting provider?
Contact your hosting provider if you experience server-related issues, database connection errors, or if your site’s performance problems persist after trying the solutions in this guide.
How can I prevent my WordPress site from breaking?
Implement regular maintenance routines, keep all components updated, maintain regular backups, and monitor your site’s performance. Consider using a WordPress maintenance service for professional care.
Need expert help with your WordPress site? Our team of WordPress specialists can diagnose and fix your site issues quickly and safely. Visit our support page for immediate assistance.