A single missed step during WordPress migration can lead to hours of downtime and lost revenue. Here’s your fail-proof migration checklist. Website migrations can take anywhere from 1 to 9 hours manually, but with proper preparation and the right tools, you can reduce this to just 30 minutes (Source: InstaWP).
This guide will walk you through every critical step to ensure your WordPress migration succeeds the first time.
Whether you’re moving to a new hosting provider, transferring a client’s website, or upgrading your server environment, this checklist covers all essential aspects of WordPress migration. We’ll focus on preventing common pitfalls that often lead to extended downtime, data loss, or performance issues.
1. Pre-Migration Essentials: Setting Yourself Up for Success
Before touching any files or databases, proper preparation can prevent up to 95% of common migration issues. Let’s break down the essential pre-migration steps that ensure a smooth transfer process.
Complete Backup and Update Strategy
Creating comprehensive backups isn’t just a precaution—it’s your safety net for the entire migration process. Start by implementing a multi-layer backup strategy that covers all crucial website components.
Your backup process should include three main components: database files, WordPress core files, and media content. While many users focus solely on database backups, your media library often contains irreplaceable content that needs protection. Consider using plugins like BackupBuddy or UpdraftPlus to help you automate backups continually.
Database Backup Best Practices:
Export your database using phpMyAdmin or a reliable backup plugin. Ensure your backup file isn’t corrupted by testing it in a staging environment before proceeding. Store multiple copies in different locations—cloud storage, local drives, and your hosting provider’s backup system.
File System Backup Requirements:
Download a complete copy of your wp-content folder, which contains themes, plugins, and uploads. Don’t forget to backup your wp-config.php file separately, as it contains crucial database connection details and security keys.
Technical Requirements and Compatibility
Meeting technical requirements is crucial for a successful migration. Your new hosting environment must support WordPress’s latest requirements (Source: Pagely), including:
Modern WordPress installations require specific server configurations to function optimally. Your new hosting environment should provide:
| Requirement | Minimum Version |
| PHP Version | 7.4 or higher |
| MySQL Version | 5.6 or MariaDB 10.1+ |
| Memory Limit | 128MB minimum |
Before proceeding with migration, verify these requirements with your new hosting provider. Many migration failures occur due to incompatible server configurations, particularly when moving from newer to older server environments.
Data Cleanup and Optimization
Reducing your website’s data footprint before migration can significantly speed up the transfer process and minimize potential errors. Start by implementing these optimization techniques:
Begin with database optimization by removing unnecessary post revisions, spam comments, and transient options. This cleanup process not only speeds up your migration but also improves your website’s performance. Consider using caching plugins to manage your site’s performance during and after migration.
Focus on cleaning up your media library next. Remove duplicate images, unused theme files, and deactivate plugins you no longer need. This preparation step not only streamlines your migration but also ensures your new installation starts with optimized performance.
2. Preparing Your New Environment
A properly configured new environment is crucial for migration success. Many WordPress migrations fail not during the transfer process but due to incompatible or poorly configured destination servers. Let’s ensure your new environment is optimally prepared for the incoming website.
Hosting Environment Configuration
Your new hosting environment needs specific configurations to ensure optimal WordPress performance. Start by verifying that your hosting provider has configured the server with the recommended PHP settings and database optimizations.
Server configuration extends beyond basic requirements. Ensure your new hosting environment includes these critical elements:
| Configuration Element | Recommended Setting |
| PHP Memory Limit | 256MB or higher |
| Max Execution Time | 300 seconds |
| Post Max Size | 64MB minimum |
| Upload Max Filesize | 64MB minimum |
These settings significantly impact your website’s performance and migration success rate. Work with your hosting provider to adjust these values if they don’t meet the recommended specifications. For detailed guidance on optimizing your WordPress performance, visit our guide on fixing slow WordPress sites.
WordPress Installation and Initial Setup
Installing WordPress on your new server requires careful attention to detail. While many hosting providers offer one-click installations, a manual installation gives you more control over the configuration process.
Begin by creating a fresh database for your WordPress installation. Ensure the database name, username, and password are different from your current site to avoid conflicts during migration. Document these credentials carefully—you’ll need them during the migration process.
When installing WordPress, consider these critical factors:
Database Character Set and Collation: Use utf8mb4 character set and utf8mb4_unicode_ci collation to ensure proper handling of special characters and emojis. This prevents potential content encoding issues after migration.
Table Prefix: Change the default ‘wp_’ table prefix to enhance security. Document the new prefix as you’ll need it when configuring the migrated database. This simple step helps protect against common SQL injection attacks.
Plugin and Theme Management
Proper plugin and theme management is crucial for a successful migration. Start by auditing your current plugins and themes to determine which ones are essential for your site’s functionality. This audit helps prevent compatibility issues and reduces the risk of security vulnerabilities.
Begin with a security scan of your current plugins using reliable security tools. We recommend checking our guide on WordPress malware removal plugins to ensure your new installation starts with a clean slate.
Create a detailed plugin migration strategy:
Essential Plugins: Identify and list plugins crucial for your site’s core functionality. These should be installed first on the new server. Test each plugin individually before proceeding with the full migration.
Performance Impact: Evaluate each plugin’s performance impact. Consider replacing resource-heavy plugins with lighter alternatives during the migration process. This approach helps maintain optimal site performance from day one on the new server.
Remember that DNS propagation can take up to 48 hours, so plan your plugin and theme setup accordingly. Use this time to thoroughly test each component in your staging environment.
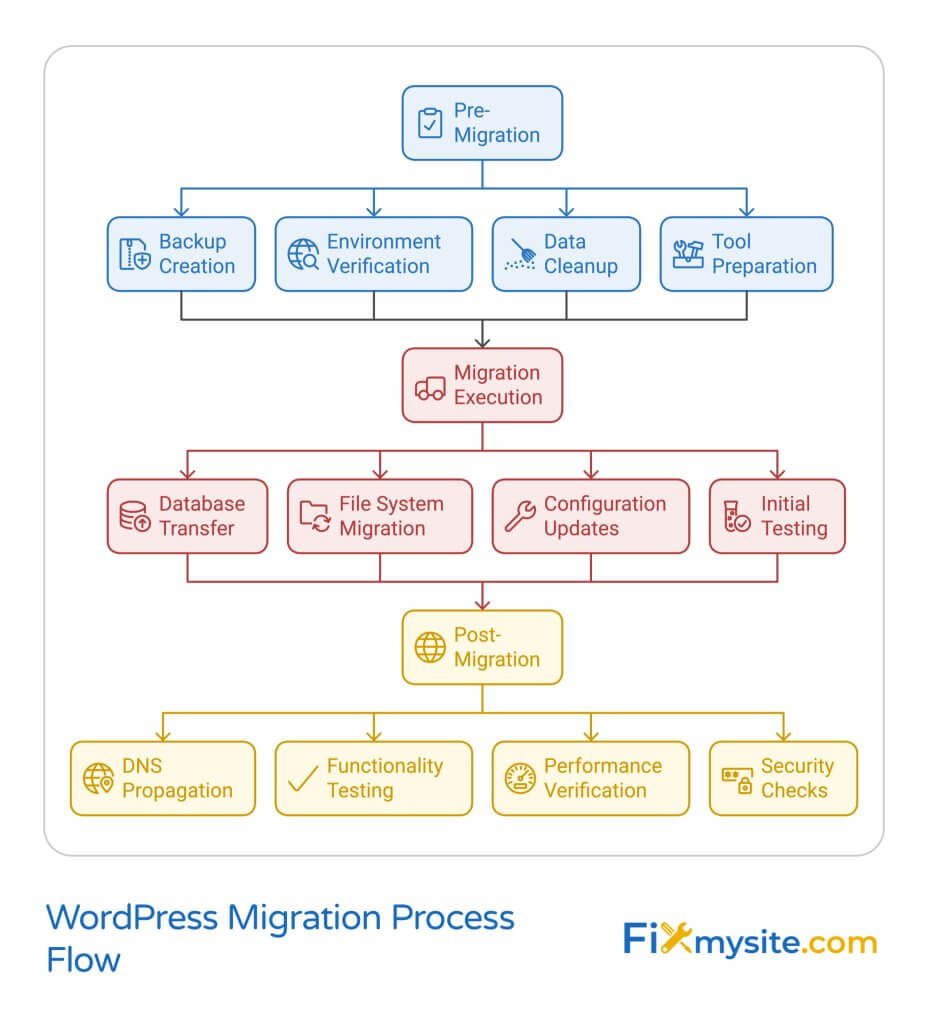
3. The Migration Process: Step-by-Step
The actual migration process requires careful execution to minimize downtime and prevent data loss. While manual migrations can take up to 9 hours, using the right tools and processes can reduce this to just 30 minutes (Source: InstaWP). Let’s break down each crucial step of the transfer process.
Database Migration Techniques
Database migration forms the core of your WordPress transfer process. This step requires particular attention as it contains all your posts, pages, comments, and settings. Start by implementing a systematic approach to database transfer.
Before beginning the database migration, optimize your tables to ensure efficient transfer. Use your current hosting panel’s database tools or phpMyAdmin to perform this optimization. This step can significantly reduce transfer time and prevent timeout issues during migration.
Database Export Process:
When exporting your database, pay special attention to table selection. While it might be tempting to perform a complete database export, some tables might contain temporary data or caching information that you don’t need to transfer. Focus on essential tables containing:
| Table Type | Content |
| Core Content | Posts, pages, comments, users |
| Settings | Options, metadata, permalinks |
| Relationships | Categories, tags, custom taxonomies |
For detailed guidance on performing zero-downtime migrations, check our guide on how to migrate your WordPress site with no downtime.
File Transfer and Media Management
Efficient file transfer is crucial for maintaining your site’s visual integrity and functionality. Start with organizing your media files and theme assets before beginning the transfer process.
Create a systematic approach to file transfer:
Media Library Organization: Begin by organizing your media library into logical folders. This organization helps maintain structure during transfer and makes it easier to verify successful migration. Consider implementing a media library management system if you haven’t already.
Theme and Plugin Files: Transfer these files with special attention to custom modifications. If you’ve made any changes to theme files or plugin configurations, document these changes before transfer to ensure they’re properly implemented in the new environment.
Site Configuration and Settings
Proper configuration during migration ensures your site functions correctly in its new environment. Start by reviewing and documenting all current site settings, including permalinks, reading settings, and discussion configurations.
Focus on these critical configuration areas:
WordPress Address (URL) Settings: Carefully update your site URL and home URL settings in the new database. These settings are crucial for proper site functionality. Consider using search and replace tools specifically designed for WordPress databases to update all internal links.
Permalink Structure: Recreate your permalink structure exactly as it was in the original site. This step is crucial for maintaining SEO rankings and preventing 404 errors. Don’t forget to update your WordPress sitemap after migration to ensure search engines can properly index your content.
Remember to maintain a detailed log of all changes made during the configuration process. This documentation proves invaluable if you need to troubleshoot issues or perform future migrations.
4. Testing and Verification
Thorough testing after migration is crucial for ensuring your website functions correctly in its new environment. This phase often reveals issues that weren’t immediately apparent during the transfer process. Let’s implement a comprehensive testing strategy to verify every aspect of your migrated site.
Functionality Testing Protocol
Begin your testing process with a systematic approach to functionality verification. Create a testing environment that mirrors your production setup to ensure accurate results. This step is crucial for maintaining site integrity and user experience.
Start with these core functionality checks:
Forms and Interactive Elements: Test all contact forms, comment systems, and interactive features. Pay special attention to form submissions and ensure they’re reaching the correct email addresses. If you’re experiencing issues with interactive elements, consult our guide on fixing JavaScript problems in WordPress.
E-commerce Functionality: For sites with online stores, verify the entire purchase process:
| Test Component | Verification Points |
| Product Pages | Images, prices, variations |
| Shopping Cart | Add/remove items, quantity updates |
| Checkout Process | Payment gateways, order confirmation |
| Customer Accounts | Login, registration, order history |
Performance and Security Verification
Performance testing ensures your migrated site maintains or improves upon its previous speed and reliability. Begin with comprehensive performance measurements to establish a baseline for comparison.
Focus on these critical performance areas:
Page Load Times: Test page load speeds across different types of content. Compare these results with your pre-migration benchmarks to ensure performance hasn’t degraded. Pay particular attention to image-heavy pages and dynamic content.
Mobile Responsiveness: Verify that your site functions correctly across different devices and screen sizes. Test both landscape and portrait orientations on various mobile devices. If you encounter preview issues, reference our guide on WordPress preview not working solutions.
DNS Configuration and Going Live
The final stage of migration involves configuring DNS settings and managing the transition to your new server. Remember that DNS propagation can take up to 48 hours (Source: WP Web Infotech), so plan your transition accordingly.
Follow these steps for a smooth DNS transition:
Pre-DNS Change Verification: Before updating DNS records, perform a final backup of both your old and new sites. This precaution ensures you can restore either version if necessary during the transition period.
DNS Record Management: Update your DNS records with precision. Pay particular attention to:
– A Records: Point these to your new server’s IP address – CNAME Records: Update any subdomains or additional services – MX Records: Ensure email services continue functioning – TXT Records: Transfer any verification records for third-party services
During the DNS propagation period, monitor both old and new servers to ensure continuous service. Use multiple DNS checking tools from different geographical locations to track propagation progress. This approach helps you understand when the majority of your users are accessing the new server.
5. Post-Migration Tasks
The success of a WordPress migration extends beyond the initial transfer. Proper post-migration optimization and monitoring ensure long-term stability and performance. Let’s explore the essential tasks that secure your website’s future success.
SEO and Analytics Setup
Maintaining your site’s search engine rankings and tracking capabilities is crucial after migration. Begin with a comprehensive SEO audit to ensure all essential elements transferred correctly and are functioning as intended.
Focus on these critical SEO elements:
| SEO Component | Verification Tasks |
| Meta Data | Title tags, meta descriptions, heading structure |
| URL Structure | Permalink settings, custom URLs, redirects |
| Indexing | robots.txt, XML sitemap, search console settings |
| Analytics | Tracking codes, goal configuration, event tracking |
Analytics Continuity: Verify that all analytics tracking codes are properly implemented on the new site. Check that data is being collected correctly and that historical data remains accessible. This verification ensures no gaps in your website’s performance monitoring.
Monitoring and Maintenance
Establish a robust monitoring system to track your website’s performance and security post-migration. Set up monitoring for these crucial areas:
Performance Monitoring: Implement tools to track server response times, page load speeds, and resource usage. Regular monitoring helps identify and address performance issues before they impact user experience.
Security Monitoring: Configure security scanning and monitoring tools to protect your newly migrated site. This includes:
- File integrity monitoring
- Login attempt tracking
- Malware scanning
- Security log analysis
Regular maintenance tasks should include checking for plugin updates, theme compatibility, and database optimization. Consider automating these tasks where possible to ensure consistency.
Final Cleanup and Verification
Complete your migration process with thorough cleanup and final verification steps. This phase ensures optimal performance and removes any temporary migration-related files or settings.
Image and Media Optimization: Review and optimize all media files to ensure they’re properly transferred and optimized for performance. Consider implementing image optimization plugins to maintain optimal loading speeds.
Perform these final cleanup tasks:
- Remove temporary migration files and folders
- Delete backup files from public directories
- Clean up any temporary databases or tables
- Verify and update backup schedules for the new environment
- Document all changes and new configurations
Documentation and Training: Create comprehensive documentation of your new setup, including:
- Server configurations
- Updated login credentials
- New security measures
- Modified functionality
- Maintenance procedures
This documentation proves invaluable for future maintenance and troubleshooting needs. Share relevant information with team members or clients who manage the website, ensuring they understand any changes in functionality or administration procedures.
Your New WordPress Migration Checklist
WordPress Migration Checklist
1. Pre-Migration Essentials
- Check Compatibility
- Verify PHP (7.4+), MySQL (5.6+ or MariaDB 10.1+), and memory limit (128MB+).
- Ensure your new hosting environment supports WordPress requirements.
- Clean Up and Optimize
- Remove spam comments, unused plugins, and post revisions.
- Optimize the database using a plugin like WP-Optimize.
2. Preparing the New Environment
- Set Up Hosting
- Verify server settings: PHP Memory Limit (256MB+), Max Execution Time (300s), Post Max Size (64MB+), and Upload Max Filesize (64MB+).
- Ensure the server is pre-configured for WordPress.
- Install WordPress
- Use a fresh database with utf8mb4 character set and utf8mb4_unicode_ci collation.
- Customize the table prefix for security (e.g., use a non-default prefix).
- Audit Plugins and Themes
- List essential plugins and themes for reinstallation.
- Perform security scans on current plugins.
3. Migration Process
- Export and Transfer Database
- Use phpMyAdmin or a plugin to export essential tables (posts, pages, users, options).
- Avoid unnecessary tables (e.g., caching or transient data).
- Migrate Files
- Transfer wp-content (themes, plugins, uploads) and wp-config.php.
- Ensure custom modifications are documented and transferred.
- Update Site Configuration
- Update WordPress Address (URL) and Home URL in the database.
- Recreate permalink settings and update internal links.
4. Testing and Verification
- Test Site Functionality
- Verify forms, interactive features, and e-commerce processes.
- Check menus, widgets, and site search functionality.
- Check Performance
- Test page load speeds using tools like GTmetrix.
- Verify mobile responsiveness across devices.
- Update DNS
- Modify A, CNAME, and MX records for the new hosting environment.
- Monitor DNS propagation (up to 48 hours).
5. Post-Migration Tasks
- Verify SEO and Analytics
- Ensure title tags, meta descriptions, and structured data are intact.
- Reinstall tracking codes for Google Analytics or other tools.
- Monitor Performance and Security
- Set up performance monitoring tools like Pingdom.
- Implement malware scanning and file integrity monitoring.
- Final Cleanup
- Remove temporary migration files and backups from public directories.
- Document new server settings, credentials, and configurations.
Frequently Asked Questions
Let’s address the most common questions about WordPress migration to help you navigate potential challenges and make informed decisions.
How long does a typical WordPress migration take?
Migration time varies significantly based on your site’s size and complexity. Manual migrations can take 1-9 hours, while using professional tools and services can reduce this to 5-30 minutes (Source: InstaWP). Factors affecting migration time include:
- Website size and complexity
- Database size
- Media library volume
- Server response times
- Migration method used
What are the most common migration errors?
Common migration errors typically involve database connectivity, file permissions, or PHP configuration issues. Key problems include:
- Database connection errors
- White screen of death
- Missing images and media files
- Broken links and permalinks
- Plugin compatibility issues
Most of these issues can be prevented by following our comprehensive checklist and properly preparing both environments before migration.
Do I need to take my site offline during migration?
Not necessarily. With proper planning and execution, you can perform a migration with minimal to no downtime. Consider using WordPress cache plugins to maintain site accessibility during the transfer process.
Can I migrate WordPress between different hosting providers?
Yes, WordPress can be migrated between any hosting providers that meet the minimum technical requirements. However, the process may vary depending on the specific hosts involved and their provided tools.
What should I do if my migration fails?
If your migration fails, follow these steps:
- Don’t panic – your backup provides a safety net
- Review error logs for specific issues
- Verify database and file permissions
- Check server requirements compatibility
- Consider consulting professional migration services
How can I minimize downtime during migration?
To minimize downtime:
- Use staging environments for initial testing
- Implement proper caching strategies
- Pre-configure the new environment completely
- Schedule migration during low-traffic periods
- Have a rollback plan ready
Should I use a migration plugin or manual transfer?
The choice between plugins and manual transfer depends on your technical expertise and site complexity. Migration plugins offer convenience but may have limitations with large sites. Manual transfers provide more control but require technical knowledge.
What’s the difference between staging and live migration?
Staging migration involves testing the process in a controlled environment before performing the actual live migration. This approach helps identify and resolve potential issues without affecting your live site.
Conclusion
Successful WordPress migration requires careful planning, execution, and verification. By following this comprehensive checklist, you can avoid common pitfalls and ensure a smooth transition to your new environment. Remember that proper preparation and testing are crucial for minimizing downtime and maintaining site functionality.
While this guide provides a detailed roadmap for WordPress migration, some situations may require professional expertise. If you encounter challenges or prefer expert assistance, our team specializes in seamless WordPress migrations. Contact our WordPress migration experts for personalized support and guidance.
Keep this checklist handy for future migrations, and remember to regularly update your documentation as your website evolves. Successful migration is not just about moving files—it’s about ensuring your website continues to serve your audience effectively in its new environment.