


Two-factor authentication (2FA) on WordPress requires two separate forms of verification to log in: your password plus a second proof of identity, typically a time-sensitive code from an authenticator app, SMS, or email. Enabling 2FA means that even if your password is stolen, an attacker cannot access your WordPress dashboard without that second factor. Microsoft’s security research found that MFA blocks more than 99.9% of account compromise attacks. That number alone should settle the debate.
We know security tasks can feel daunting, especially if you’re not a developer. Take a breath. This guide walks you through every step clearly, from choosing a plugin to saving your backup codes. You’ll be protected by the time you reach the end.
What Is Two-Factor Authentication for WordPress?
Two-factor authentication is a login security method that requires two distinct proofs before granting access to your WordPress site, combining something you know (your password) with something you have (a device or code).

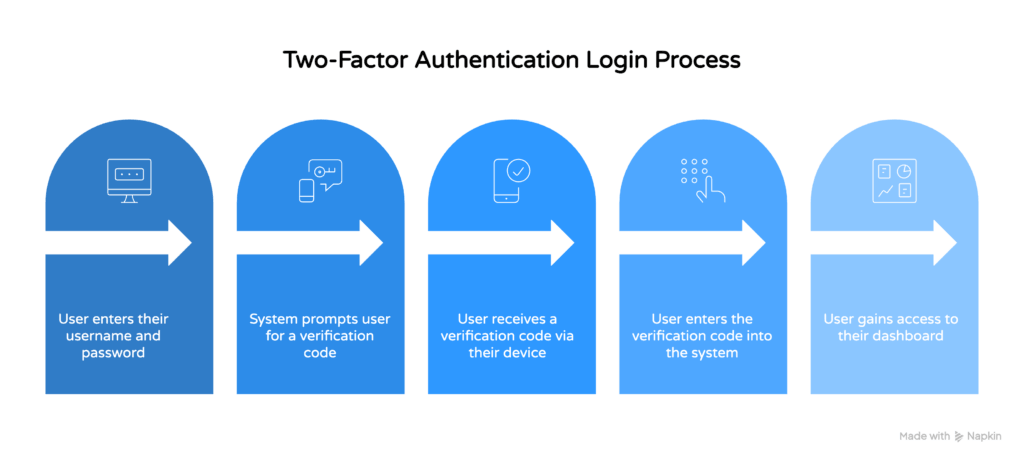
Your password is the first factor. It’s something only you should know. The second factor is something physical you hold, usually your phone. When you log in to WordPress, you enter your username and password as normal, then provide a verification code generated by an authenticator app, sent via SMS, or delivered by email. Both must be correct to reach your dashboard.
This matters because passwords alone fail constantly. Brute force attacks hammer WordPress login pages with thousands of guesses per minute. Phishing tricks users into handing over credentials willingly. Verizon’s 2025 Data Breach Investigations Report found stolen credentials appeared in 22% of all breaches that year. A second factor stops those stolen credentials from being useful.
The most common 2FA method uses TOTP, which stands for Time-Based One-Time Password. An authenticator app like Google Authenticator or Authy generates a fresh 6-digit verification code every 30 seconds. Even if someone captures your code, it expires almost immediately. That’s the point.
Why You Need 2FA on Your WordPress Site
WordPress powers approximately 43.4% of all websites on the internet, according to WordPress.com’s April 2025 market share report, which makes it the most targeted CMS on the planet.
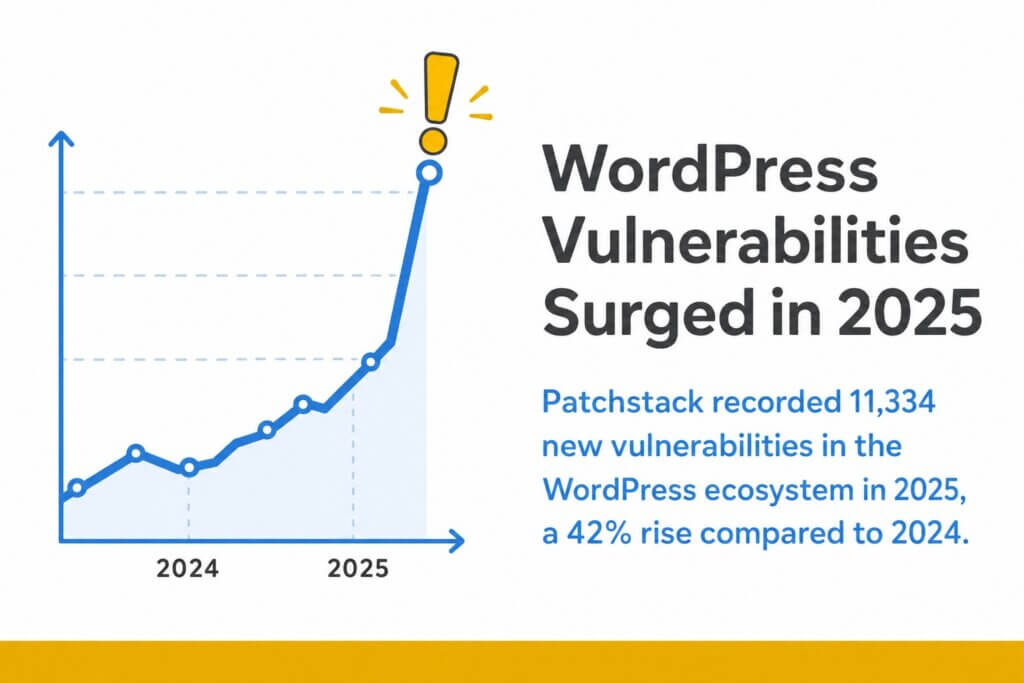
That popularity is a double-edged situation. More sites mean more attackers probing wp-login.php around the clock. Patchstack’s State of WordPress Security report recorded 11,334 new vulnerabilities discovered in the WordPress ecosystem in 2025, a 42% rise compared to 2024. More attack surface, more risk.

Brute force attacks target weak or reused passwords. If your password is compromised through a data breach somewhere else, attackers will try it on your WordPress login page. Without 2FA, that’s game over.
Two-factor authentication is one of the most practical defenses available. It doesn’t require any technical background to set up, it costs nothing with free plugins, and it works immediately after activation. If your site holds customer data, payment information, or anything a business depends on, enabling 2FA is not optional. It’s the baseline. For a fuller picture of where WordPress security stands today, the data-driven WordPress security analysis on this site covers the broader threat environment in detail.
Best WordPress Two-Factor Authentication Plugins
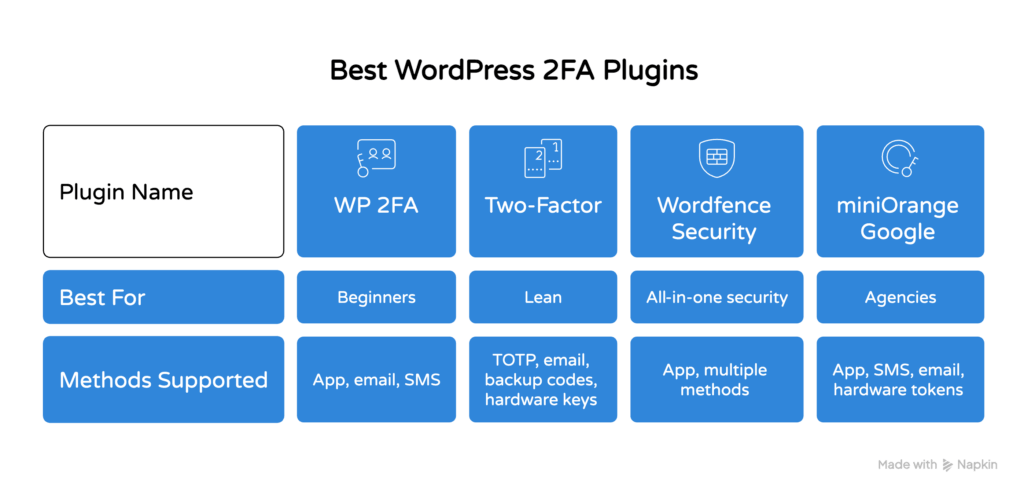
The four most widely used WordPress 2FA plugins are WP 2FA, Two-Factor, Wordfence Login Security, and miniOrange Google Authenticator, each with different strengths depending on your setup.

Here’s a quick breakdown of each option:
- WP 2FA — The most beginner-friendly option. It includes a setup wizard, supports authenticator apps, email, and SMS, and lets you enforce 2FA for specific user roles. The free version handles most small sites comfortably.
- Two-Factor — A lean, no-frills plugin maintained by WordPress core contributors. It supports TOTP authenticator apps, email codes, backup codes, and hardware security keys. No marketing fluff, just solid functionality.
- Wordfence Security — A full security plugin that includes 2FA as part of its broader firewall and malware scanning package. Good choice if you want one plugin covering multiple layers. Pairs well with a complete WordPress security checklist.
- miniOrange Google Authenticator — Supports a wide range of authentication methods including authenticator apps, SMS, email, and hardware tokens. More configuration options than most, which is useful for agencies managing multiple sites.
WP 2FA is the easiest starting point for most WordPress site owners. The steps below use it as the example, but the process is nearly identical across all these plugins.


How to Enable Two-Factor Authentication in WordPress (Step-by-Step)
Enabling two-factor authentication in WordPress takes under ten minutes using a plugin, and you do not need to touch any code.
Follow these steps to get 2FA active on your site:
- Log in to your WordPress admin dashboard. Go to your site’s wp-login.php page and sign in with your username and password as normal.
- Go to Plugins, then Add New. Search for “WP 2FA” in the plugin directory.
- Install and activate the plugin. Click Install Now, then Activate once it appears.
- Run the setup wizard. WP 2FA launches a guided wizard automatically after activation. Follow the prompts to choose your preferred authentication method.
- Choose your primary 2FA method. Select either an authenticator app (recommended), email, or SMS.
- Complete the method-specific setup. For an authenticator app, scan the QR code shown on screen. For email or SMS, verify your address or phone number with a test code.
- Save your backup codes. The wizard will generate backup codes. Download or print them and store them somewhere safe. Do not skip this step.
- Test your login. Log out, then log back in. You should now see a prompt for your verification code after entering your password.
That’s the full process. Eight steps, no code required.
Setting Up 2FA with an Authenticator App
Using an authenticator app is the most secure and reliable method for WordPress two-factor authentication, because it generates verification codes locally on your device without relying on a phone network or email server.
Google Authenticator and Authy are the two most popular choices. Google Authenticator is simple and free. Authy adds cloud backup for your accounts, which makes switching to a new phone much easier. Both work the same way during WordPress setup.
Install and Link Your Authenticator App
Start by installing Google Authenticator or Authy on your smartphone. Both are free from the App Store and Google Play.
Once the app is installed:
- Open the WP 2FA plugin settings in your WordPress dashboard and select “Authenticator App” as your method.
- A QR code appears on screen. Open your authenticator app and tap the “+” or “Add Account” option.
- Choose “Scan QR Code” and point your camera at the code on your screen. The app links to your WordPress site automatically.
- Your authenticator app now shows a 6-digit verification code that refreshes every 30 seconds.
- Enter that code into the WordPress confirmation field to complete the link.
Test That It Works
Log out of WordPress completely. Enter your username and password on the login page. A second screen appears asking for your verification code. Open your authenticator app, enter the current 6-digit code, and you’re in.
If the code is rejected, check that your phone’s time is set to automatic. TOTP codes are time-sensitive, so a clock that’s even a few minutes off will break the sync.
Setting Up 2FA via Email or SMS
Email and SMS authentication are simpler to configure than an authenticator app, and they work well for users who don’t want to install additional software on their phone.
The trade-off is real, though. Email-based 2FA depends on your email account being secure. SMS authentication depends on your phone receiving a signal. Neither is as robust as a locally generated TOTP code, but both are far better than a password alone.
Email Authentication Setup
- In the WP 2FA wizard, choose “Email” as your authentication method.
- Confirm the email address where codes should be sent. This defaults to the address on your WordPress user account.
- Click the button to send a test code. Check your inbox and enter the code to verify it arrived.
- Save your settings. From now on, each login sends a verification code to that email address.
SMS Authentication Setup
SMS 2FA requires a third-party SMS provider. WP 2FA integrates with services like Twilio. You’ll need a Twilio account and a small amount of credit for sending text messages.
- In WP 2FA settings, select “SMS” as your method.
- Connect your Twilio account using the API credentials from your Twilio dashboard.
- Enter your phone number, including your country code.
- Request a test SMS. Enter the one-time PIN you receive to confirm it’s working.
SMS works reliably for most users. The one situation where it fails is poor signal. If you travel often or have spotty reception, an authenticator app is a safer primary method.

How to Enforce 2FA for All WordPress Users and Roles
Enforcing two-factor authentication across your WordPress site means requiring 2FA for specific user roles, not just your own account, which closes the security gap created when other users skip the setup.
An administrator account with 2FA means nothing if an editor account with a weak password gets compromised. One open door is enough. This matters especially on sites with multiple contributors or WooCommerce stores where staff have login access.
Role-Based Enforcement in WP 2FA
- Go to WP 2FA settings in your WordPress dashboard and find the “Policies” or “Enforcement” section.
- Select which user roles must use 2FA. Options include Administrator, Editor, Author, Contributor, and Subscriber.
- Set a grace period. This gives existing users a set number of days to configure their 2FA before they’re locked out. Seven days is a reasonable starting point.
- Save the policy. Users in the required roles will see a prompt to set up 2FA the next time they log in.
At minimum, enforce 2FA for administrators and editors. Those roles have the most access and the most damage potential if compromised. Subscriber-level enforcement is optional unless your site has a membership or e-commerce component.
For broader site security beyond 2FA, choosing the right security plugins for your WordPress website can add firewall protection, malware scanning, and login monitoring on top of what 2FA provides. You can find guidance on that in our guide to the best WordPress security plugins.
Backup Codes and What to Do If You Get Locked Out
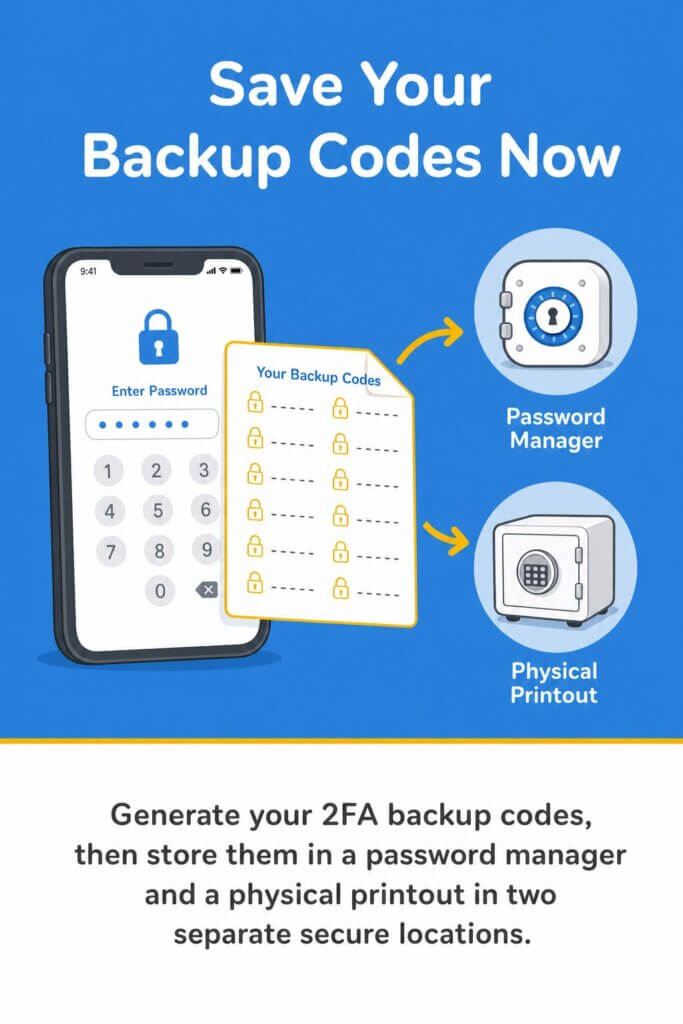
WordPress 2FA backup codes are single-use emergency codes that let you log in without your authenticator app or phone, and generating them before you need them is the most important step in the entire 2FA setup process.
Most people generate backup codes, save them nowhere, and then panic when they lose their phone. Don’t be that person. Treat backup codes like a spare key. Keep them somewhere you can actually find them when things go wrong.
Generating and Storing Backup Codes
- During the WP 2FA setup wizard, the plugin displays a set of backup codes. These are typically 8-12 codes, each usable once.
- Download the codes as a text file, or write them down on paper.
- Store them in at least two places: a password manager like 1Password or Bitwarden, and a physical printout kept somewhere secure.
- Never store backup codes in the same place as your password.

What to Do If You’re Locked Out
If you lose access to your authenticator app and have no backup codes, you still have options.
- Use a backup code if you saved them. Enter any unused backup code in the 2FA field during login.
- Ask another administrator to log in and disable 2FA on your account through the WordPress Users menu.
- Disable the 2FA plugin via FTP or your hosting file manager. Rename the plugin folder (for example, rename
wp-2fatowp-2fa-disabled) insidewp-content/plugins/. This deactivates the plugin and removes the 2FA requirement, letting you log in with just your password. - Use phpMyAdmin to deactivate the plugin directly in your WordPress database if FTP access isn’t available.
Getting locked out is stressful. If you’re stuck, our guide to regaining WordPress admin access covers the recovery steps in full, including what to do when the database is your only option.
Two-factor authentication is one of the fastest, most effective steps you can take to protect your WordPress site. A few minutes of setup today prevents a very bad day later. If you want ongoing protection that goes beyond 2FA, including regular security monitoring, updates, and backups, our WordPress security checklist covers the full picture. And if you’d rather have someone else handle the technical side, our WordPress support team is here to help.