

When your DNS changes aren’t showing up, it’s frustrating. You’ve updated your records, but visitors still see the old site.
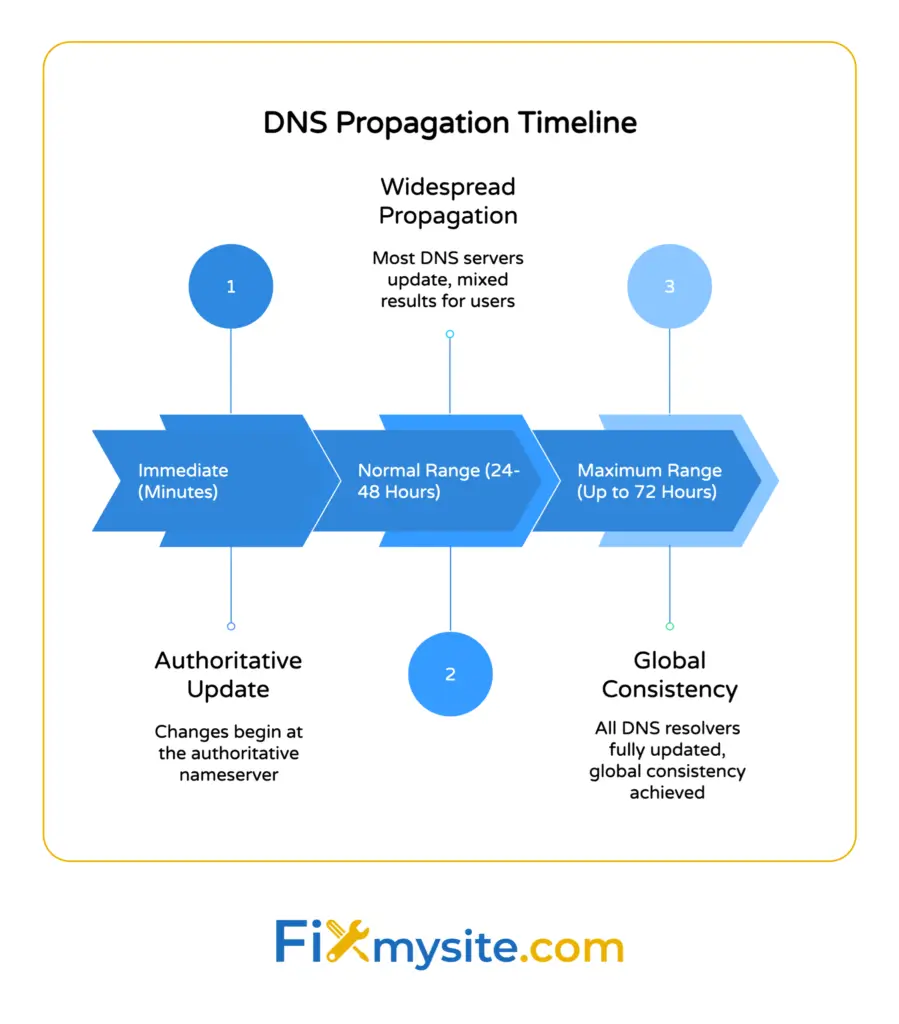
This happens because DNS propagation typically takes up to 48 hours, though changes may appear in minutes depending on cache settings.
Don’t panic. Most DNS propagation issues stem from predictable causes you can fix.
We’ll walk through practical troubleshooting steps that address cached DNS information, incorrect nameserver settings, and verification tools. You’ll learn how to check propagation status globally and speed up the process when possible.
By the end, you’ll know exactly how to diagnose DNS problems and get your changes working properly across all servers worldwide.
What is DNS Propagation?
DNS propagation is the period when DNS record changes spread across the internet. Think of it as a global update process.
When you change DNS records like A records, CNAME records, or MX records, those changes start at your authoritative nameserver. From there, they need to reach thousands of DNS servers worldwide.
The problem? DNS information is cached everywhere. Your ISP caches it. Your local device caches it. Recursive resolvers cache it.
Each cache has its own expiration time based on TTL settings. Until those caches expire and refresh, different users see different versions of your DNS records.
This creates a temporary inconsistency period. Some visitors reach your new IP address. Others still connect to the old one.
In rare cases, full propagation may take up to 72 hours for all DNS resolvers to update completely.

How DNS Resolution Works
Understanding DNS lookup helps you troubleshoot propagation issues. The process involves multiple server types working together.
The DNS Query Flow
When someone types your domain name, their device doesn’t know the IP address. It needs to look it up.
First, the query goes to a recursive resolver, usually operated by their ISP. This server does the heavy lifting.
If the resolver has cached information, it returns that immediately. If not, it starts a chain of queries.
The resolver contacts a root nameserver first. There are 13 root server clusters globally that direct traffic to the right place.
The root server points to the TLD nameserver for your domain extension. The TLD server then directs the query to your authoritative nameserver.
Your authoritative nameserver finally provides the actual DNS records. The recursive resolver caches this answer and sends it back to the user.
Why Caching Complicates Propagation
Every step in this chain caches DNS information. That’s by design, it reduces query load and speeds up lookups.
But cached information becomes a problem when you update DNS records. The recursive resolver won’t check for updates until its cache expires.
Different DNS servers have different cache refresh intervals. Your local device might cache for hours. Your ISP might cache for days.
This explains why propagation isn’t instant. You’re waiting for thousands of independent caches to expire naturally.
Common DNS Propagation Problems
Most DNS issues fall into predictable patterns. Knowing these helps you fix problems faster.

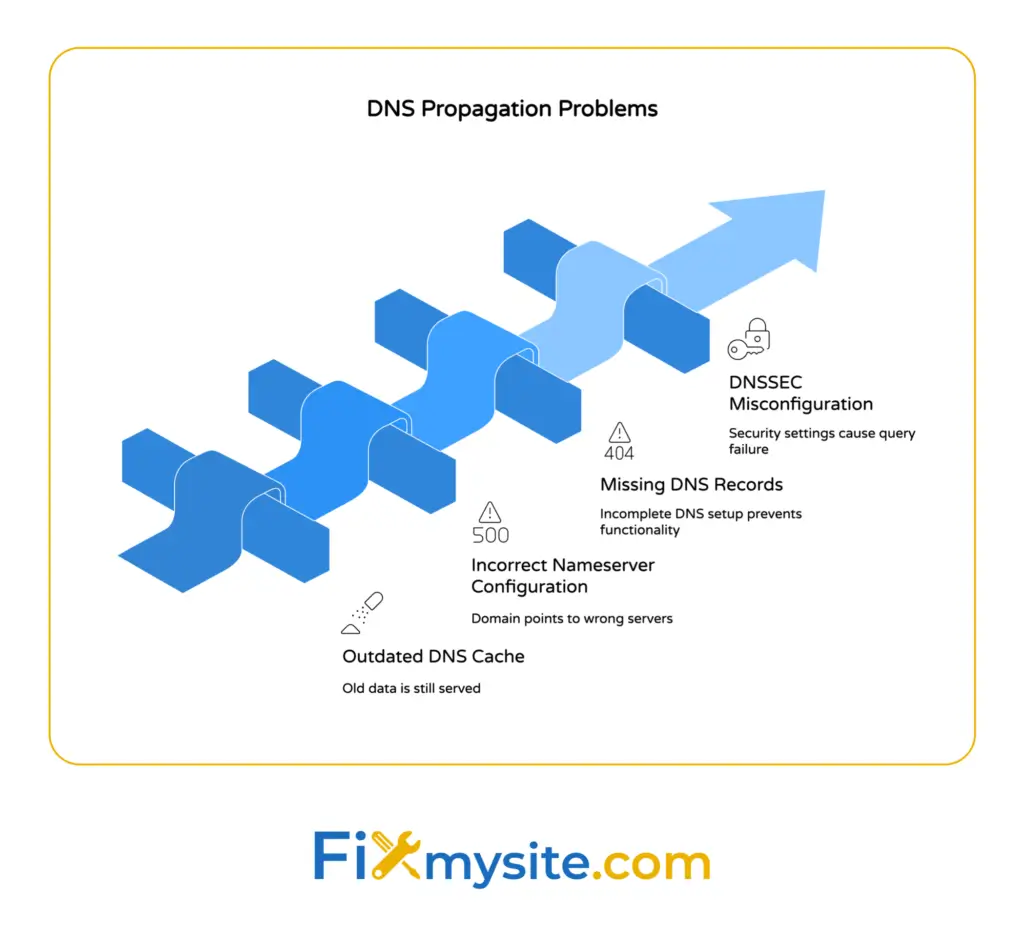
Outdated DNS Cache
Outdated DNS cache on local devices or browsers causes users to see old or incorrect site data.
Your computer stores DNS lookups to speed up browsing. But when you change DNS records, this cache works against you.
The same happens at your router and ISP level. Multiple cache layers create multiple points of failure.
Incorrect Nameserver Configuration
Sometimes DNS doesn’t propagate because your domain points to the wrong nameservers. This is surprisingly common after migrations or hosting changes.
Double-check that your domain is pointing to the correct nameservers and that all required DNS records are present in your registrar’s control panel.
If your nameservers are wrong, no amount of waiting will fix DNS propagation. The world is asking the wrong servers for information.
Missing or Incorrect DNS Records
Another common issue is incomplete DNS setup. You might have added an A record but forgotten the MX record for email.
For troubleshooting email delivery issues, ensure that MX records are correctly set and have propagated, as missing records will prevent email receipt.
DNSSEC Misconfiguration
DNSSEC adds security to DNS lookups, but it also adds complexity. If using advanced features like DNSSEC, ensure they are properly configured, as misconfiguration can prevent DNS resolution entirely.
When DNSSEC settings don’t match between your registrar and hosting provider, DNS queries fail completely. This looks like propagation issues but is actually a configuration error.


How to Check DNS Propagation Status
You need verification tools to see if DNS changes are working. Guessing wastes time.
Use DNS Propagation Checker Tools
Use a DNS propagation checker tool to verify if DNS changes have propagated globally. These tools query multiple servers worldwide simultaneously.
Popular options include WhatsMyDNS, DNS Checker, and DNS Watch.
Enter your domain name and select the record type. The tool shows results from DNS servers in different countries and regions.
Look for consistency. If most servers show your new records, propagation is nearly complete. If results are mixed, you’re still in the propagation period.
Command-Line DNS Lookup
Perform a DNS lookup using command-line tools like dig (on macOS/Linux) or nslookup (on Windows) to check current DNS records from authoritative servers.
On Mac or Linux, open Terminal and type:
dig yourdomain.comOn Windows, open Command Prompt and type:
nslookup yourdomain.comThese commands show what DNS records your system currently sees. Compare the IP address to your expected new value.
You can also query specific DNS servers directly. To check Google’s public DNS:
dig @8.8.8.8 yourdomain.comThis bypasses your ISP’s DNS cache and shows Google’s current information.
What the Results Mean
When checking propagation, you’re looking for the new IP address or record value to appear consistently across multiple locations.
After making DNS changes, it is recommended to use third-party tools like DNS Checker to confirm new records are visible from multiple global locations.
Partial propagation shows mixed results. Some servers return the old value, others return the new one.
Complete propagation shows consistent results everywhere. All tested servers return your new DNS information.
Step-by-Step Troubleshooting Process
When DNS changes aren’t working, follow this systematic approach. Start simple and work toward more complex solutions.
Step 1: Flush Your Local DNS Cache
Your computer might be showing cached information that’s already updated everywhere else.
Flush the DNS cache on your operating system and browser to ensure your device isn’t using outdated DNS information.
On Windows, open Command Prompt as administrator and run:
ipconfig /flushdnsOn macOS, open Terminal and run:
sudo dscacheutil -flushcache; sudo killall -HUP mDNSResponderOn Linux, the command varies by distribution, but often:
sudo systemd-resolve --flush-cachesAfter flushing, try accessing your site again. If it works now, the problem was just local cache.
Step 2: Clear Browser DNS Cache
Browsers maintain their own DNS cache separate from the operating system. Chrome especially caches aggressively.
In Chrome, type this in the address bar:
chrome://net-internals/#dnsClick “Clear host cache” and reload your site.
In Firefox, the cache usually clears when you restart the browser. For immediate clearing, you can disable and re-enable network settings.
Step 3: Check Your Nameserver Settings
Log into your domain registrar account. Find the nameserver settings, sometimes called DNS servers or name servers.
Verify these match what your hosting provider gave you. Even one typo breaks DNS completely.
Common nameserver formats look like:
- ns1.yourhost.com and ns2.yourhost.com
- dns1.provider.com and dns2.provider.com
- Custom nameservers pointing to your own DNS service
If nameservers are wrong, update them immediately. Nameserver changes themselves require propagation time, typically 24 to 48 hours.
Step 4: Verify Your DNS Records
Log into your DNS management panel. This might be at your hosting provider or domain registrar.
Check that all necessary records exist and have correct values. For a basic website, you need at minimum:
- A record pointing your domain to your server IP address
- A record or CNAME for www subdomain
- MX records if you’re handling email
Compare the IP address in your A record to your actual server IP. One digit wrong makes the entire record useless.
For email issues specifically, verify MX records point to the correct mail server and have proper priority values.
Step 5: Try Alternative DNS Servers
Restart your router or change your DNS settings to use a public resolver such as Google (8.8.8.8) or Cloudflare (1.1.1.1) if you suspect your ISP’s DNS servers are slow to update.
Your ISP’s DNS servers might be slower to update than public alternatives. Switching temporarily helps you determine if the issue is ISP-specific.
To change DNS servers on Windows:
- Open Network Settings and find your network adapter
- Click Properties, then Internet Protocol Version 4
- Select “Use the following DNS server addresses”
- Enter 8.8.8.8 for preferred and 8.8.4.4 for alternate
On macOS, go to System Preferences, Network, Advanced, DNS tab, and add the DNS servers there.
If your site works with Google DNS but not your ISP’s DNS, the propagation is incomplete but progressing.
Step 6: Check for DNSSEC Issues
If you enabled DNSSEC, verify the configuration matches between your registrar and DNS provider.
DNSSEC requires DS records at your registrar that match the DNSKEY records at your DNS provider. Mismatches cause validation failures.
Check DNSSEC status using online validators like Verisign’s DNSSEC Analyzer.
If DNSSEC shows errors, temporarily disable it at your registrar while you troubleshoot. You can re-enable it after confirming DNS works properly.
Step 7: Contact Your Hosting Provider
If you’ve completed all steps and DNS still isn’t working after 72 hours, something’s seriously wrong.
Contact your hosting provider’s support team. Provide them with:
- Your domain name
- The DNS changes you made and when
- Results from propagation checker tools
- Screenshots of your nameserver and DNS record settings
They can check server-side issues you can’t see, like problems with their authoritative nameservers or network connectivity.

Understanding TTL Settings
TTL (Time to Live) controls how long DNS information stays cached. It’s measured in seconds.
A TTL of 3600 means DNS servers cache your records for one hour. A TTL of 86400 means 24 hours.
Higher TTL values reduce DNS query load but slow propagation. Lower TTL values speed propagation but increase server queries.
How TTL Affects Propagation Speed
DNS propagation delays can sometimes be reduced by lowering the TTL value before making changes, as some providers update their records more frequently.
The strategy: Lower your TTL to 300 (5 minutes) a day or two before planned DNS changes. Wait for the old TTL to expire worldwide.
Then make your DNS changes. With the low TTL, caches expire quickly and refresh with your new information.
After propagation completes, raise TTL back to normal values like 3600 or 14400.
Typical TTL Values
| TTL Value (seconds) | Time Period | Best Use Case |
|---|---|---|
| 300 | 5 minutes | During active DNS changes |
| 3600 | 1 hour | Balanced performance and flexibility |
| 14400 | 4 hours | Stable sites with rare changes |
| 86400 | 24 hours | Maximum caching, very stable sites |
Changing TTL Settings
Log into your DNS management panel. Find your existing DNS records.
Most DNS management interfaces show TTL as a separate field for each record. Some use a dropdown menu, others allow manual entry.
Change the TTL value and save. This change itself requires propagation based on the old TTL.
If your old TTL was 86400 (24 hours), wait 24 hours after lowering it before making other DNS changes. This ensures the new low TTL has propagated everywhere.
DNS Record Types and Common Issues
Different DNS record types serve different purposes. Each has specific troubleshooting considerations.
A Records
A records map domain names to IPv4 addresses. They’re the most common record type.
Common A record issues include typos in the IP address or having multiple conflicting A records for the same hostname.
Check that your A record shows the correct IPv4 address. It should be four numbers separated by periods, like 192.0.2.1.
CNAME Records
CNAME records create aliases pointing one domain to another. They’re often used for www subdomains.
A CNAME for www.yourdomain.com might point to yourdomain.com, so both versions work.
Important: You can’t use CNAME records at your root domain. CNAME records can’t coexist with other record types for the same hostname.
MX Records
MX records direct email to mail servers. They include a priority value.
Lower priority numbers get tried first. If you have multiple mail servers, set priorities like 10, 20, 30.
Email issues often stem from missing or incorrect MX records. Verify the mail server hostname is correct and resolves to an IP address.
NS Records
NS records specify which nameservers are authoritative for your domain. These are critical for DNS to work at all.
Your registrar sets NS records at the domain level. Your DNS provider also publishes NS records in the zone file.
These must match. Mismatched NS records cause complete DNS failure.
TXT Records
TXT records store text information, often for verification or email authentication.
Common uses include SPF records for email authentication, domain verification for services like Google Workspace, and DKIM keys.
TXT records must be formatted exactly right. Extra spaces or quotation marks can break functionality.
When to Get Professional Help
Some DNS issues require expert assistance. Know when to call for help.
If DNS hasn’t propagated after 72 hours, something’s fundamentally wrong. This exceeds normal propagation time.
If you see DNS errors rather than just delays, like SERVFAIL or NXDOMAIN, professional diagnosis helps. These errors indicate configuration problems, not just slow propagation.
For complex setups with multiple subdomains, load balancers, or CDN integration, DNS troubleshooting gets technical quickly.
If your site handles e-commerce or business-critical functions, downtime costs money. Professional help minimizes that cost.
Our team at Fixmysite handles DNS troubleshooting daily. We can diagnose issues, fix configurations, and get your site working properly.
Whether you need help with WordPress migration that includes DNS changes or you’re troubleshooting site connection issues, we’re here to help.
For ongoing peace of mind, consider our WordPress care plans that include DNS monitoring and rapid response to technical issues.
Quick DNS Troubleshooting Checklist
When DNS issues strike, use this checklist to work through solutions systematically.
| Check | What to Verify | How to Fix |
|---|---|---|
| Local cache | Is your device showing old information? | Flush DNS cache on computer and browser |
| Nameservers | Do nameservers match hosting provider? | Update at domain registrar if incorrect |
| DNS records | Are all records present and accurate? | Add or correct records in DNS panel |
| Propagation status | How many servers show new records? | Wait if progressing, investigate if stalled |
| TTL settings | Is TTL causing slow propagation? | Lower TTL before future changes |
| ISP DNS | Is your ISP’s DNS server slow? | Temporarily switch to Google or Cloudflare DNS |
| DNSSEC | Is DNSSEC properly configured? | Verify or temporarily disable to isolate issue |
Work through this list in order. Most DNS issues resolve with the first three steps.
Document what you try and the results. This information helps if you need to contact support later.
Preventing Future DNS Issues
Smart planning prevents most DNS headaches. Here’s how to minimize problems.
Before making DNS changes, lower your TTL to 300 or 600 seconds. Wait for the old TTL period to expire globally.
Make your changes, then monitor propagation with checker tools. Once complete, raise TTL back to normal values.
Keep detailed records of your DNS settings. Screenshot your DNS panel before making changes. Document nameserver addresses and record values.
When migrating hosting or domains, coordinate timing. Make changes during low-traffic periods when temporary issues cause less disruption.
Test DNS changes in staging environments when possible. Many hosts offer staging domains for testing before affecting your live site.
If you’re unsure about DNS changes, get help before making them. Mistakes require waiting through full propagation periods to fix.
For WordPress sites specifically, DNS issues often surface during migrations. Our WordPress migration checklist covers DNS steps in detail.
Regular maintenance helps prevent issues. Our WordPress maintenance plan includes monitoring for DNS and connectivity problems.
DNS propagation issues are stressful but solvable. Most problems trace back to cache delays, incorrect settings, or misconfigured records.
Start with the simple fixes: flush local cache, verify nameservers, and check your DNS records. Use propagation checker tools to confirm changes are spreading correctly.
Give propagation time to complete naturally. The 24 to 48 hour window is normal and expected.
When issues persist beyond 72 hours or you see configuration errors, that’s when professional help becomes valuable. We’re standing by at Fixmysite support to diagnose complex DNS problems and get your site working properly.
Remember to plan ahead for future DNS changes. Lower TTL values before updates and raise them after propagation completes.
You’ve got the tools and knowledge now to troubleshoot DNS issues confidently. Take it step by step, and you’ll get through this.