Images make your WordPress website visually appealing and engaging. But when not properly optimized, these same images can slow down your site and frustrate visitors. Understanding the right file size and resolution for WordPress images helps strike the perfect balance between visual quality and site performance.
Finding this balance isn’t always straightforward. Many WordPress users struggle with oversized images that bog down their websites, while others use low-quality images that look unprofessional. We’ve created this comprehensive guide to help you navigate these challenges and implement best practices for your WordPress images.
Let’s explore the optimal image dimensions, file sizes, and resolutions to keep your WordPress site looking great while loading quickly for visitors on any device.
Understanding Image Size, Resolution, and File Size in WordPress
Before diving into specific recommendations, let’s clarify the key terms that often cause confusion when discussing WordPress images.
Image dimensions refer to the width and height of an image measured in pixels. For example, a 1200×800 pixel image is 1200 pixels wide and 800 pixels tall. WordPress creates multiple versions of your uploaded images at different dimensions to use throughout your site.
File size measures how much storage space an image takes up, typically in kilobytes (KB) or megabytes (MB). Large file sizes directly impact page load times and overall site performance. Unoptimized images can add 2-5 seconds to your page load times. (Source: WordPress.org Support)
Resolution refers to the density of pixels in an image, commonly measured in dots per inch (DPI) or pixels per inch (PPI). While high resolution (300+ DPI) is essential for print, web images require much lower resolution.
Recommended Image Dimensions for WordPress Posts and Pages
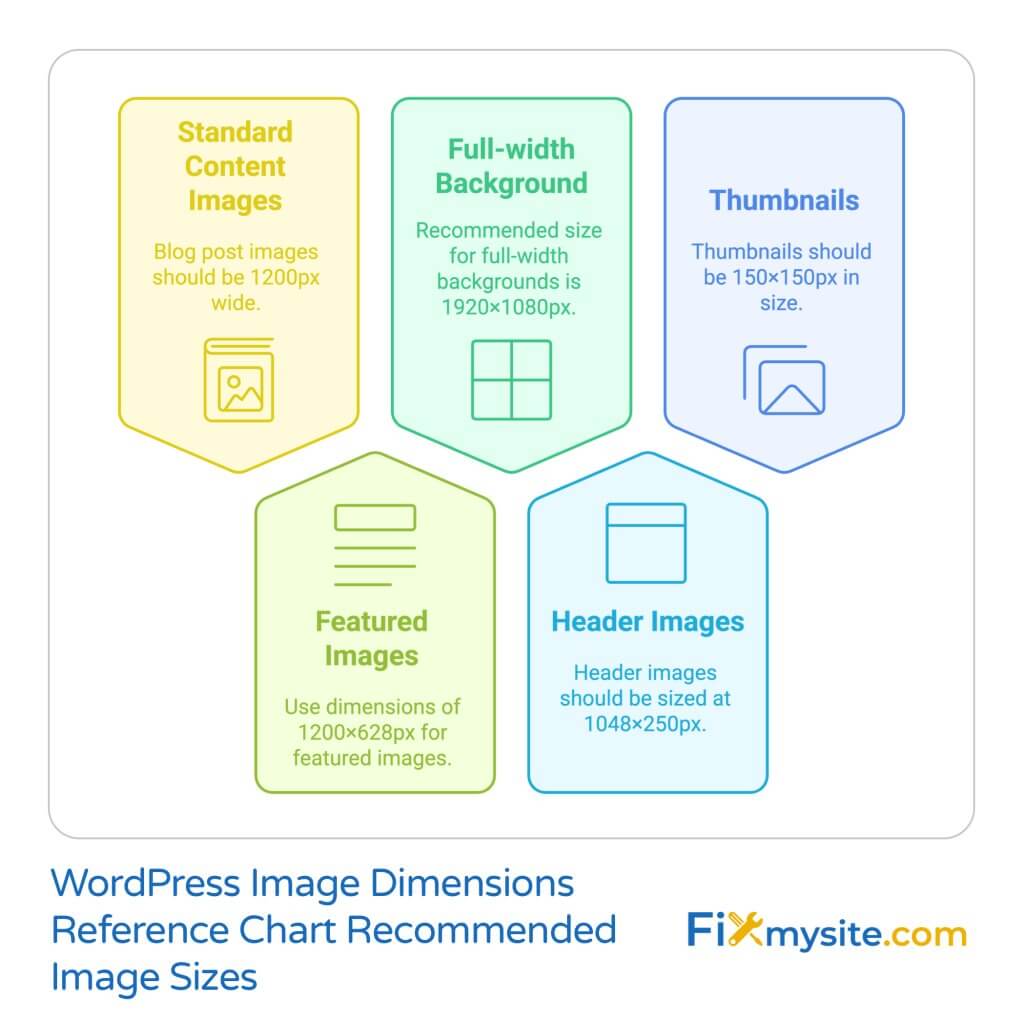
WordPress themes and layouts often dictate the ideal dimensions for images. However, certain standard sizes work well across most WordPress websites. The table below outlines the recommended dimensions for common WordPress image types.
| Image Type | Recommended Dimensions | Usage |
|---|---|---|
| Blog Post Images | 1200px width | In-content visuals |
| Featured Images | 1200×628px | Post thumbnails, social sharing |
| Full-width Background | 1920×1080px | Hero sections, backgrounds |
| Header Images | 1048×250px | Website headers |
| Thumbnails | 150×150px | Post previews, widgets |
These dimensions provide a good starting point for most WordPress sites. When you upload images to WordPress, the system automatically generates several sizes of each image. (Source: Cloudinary)
Some WordPress themes may require special image sizes for certain elements. For example, hero images might need dimensions up to 2880×1500px depending on your theme requirements. Always check your theme’s documentation for specific recommendations.
For responsive designs, the best approach is uploading images at the largest size needed and letting WordPress generate smaller versions. This ensures your images look crisp on all devices while still loading efficiently.
Optimal File Size Guidelines for WordPress Images
File size has a more direct impact on your website’s performance than dimensions or resolution. Heavy images slow down your site, which can frustrate visitors and hurt your search rankings. Here are the recommended file sizes for WordPress images.
| Image Usage | Recommended File Size | Impact on Performance |
|---|---|---|
| General Content Images | <150-200 KB | Minimal page load impact |
| Featured Images | <200 KB | Important for initial load |
| Full-width Images | <300-400 KB | Significant impact on load |
| Thumbnails | <50 KB | Critical for archive pages |
| Image Galleries | <100 KB per image | Essential for multiple images |
As a general rule, try to keep most images under 200 KB, with an absolute maximum of 300 KB for full-width or highly detailed images. Google and other search engines prioritize faster-loading sites in search results. (Source: Cloudinary)
It’s worth noting that WordPress hosting providers impose varying upload limits. Most hosts allow uploads between 4MB and 128MB, but just because you can upload larger files doesn’t mean you should. Always optimize before uploading.
Remember that mobile users may have limited data plans. Large images not only slow down their browsing experience but can also consume their data allowance. Keeping your images lightweight shows consideration for all your visitors.
Best Image Resolution for WordPress Websites
One of the most common misconceptions about web images involves resolution. While print media requires high resolution (300+ DPI), web images display at much lower resolutions.
For standard web display, 72 DPI is the recommended resolution for WordPress images. Higher DPI settings don’t improve display quality on standard screens but significantly increase file size. (Source: Cloudinary)
However, high-density displays like Apple’s Retina screens present a special case. For these displays, you may want to provide images with 2x the dimensions while keeping the 72 DPI resolution. For example, instead of 1200px width, you might use 2400px width at 72 DPI.
WordPress helps manage this complexity through its responsive image feature. When you upload a larger image, WordPress can serve appropriately sized versions to different devices automatically.
The Difference Between Resolution and Dimensions
Many people confuse resolution (DPI) with dimensions (pixels). Web browsers care about pixel dimensions, not DPI. An image that’s 1200×800 pixels will display at exactly that size, regardless of whether it’s set to 72 DPI or 300 DPI.
The main difference is file size. A 1200×800 pixel image at 300 DPI will have a much larger file size than the same image at 72 DPI, with no visible improvement on websites.
To optimize your workflow, set your image editor to 72 DPI when preparing images for WordPress. This ensures your images are web-ready from the start.
Choosing the Right Image Format for WordPress
Selecting the appropriate file format is just as important as proper sizing. Different formats have specific use cases and compression methods. Here’s a comparison of the most common formats for WordPress.
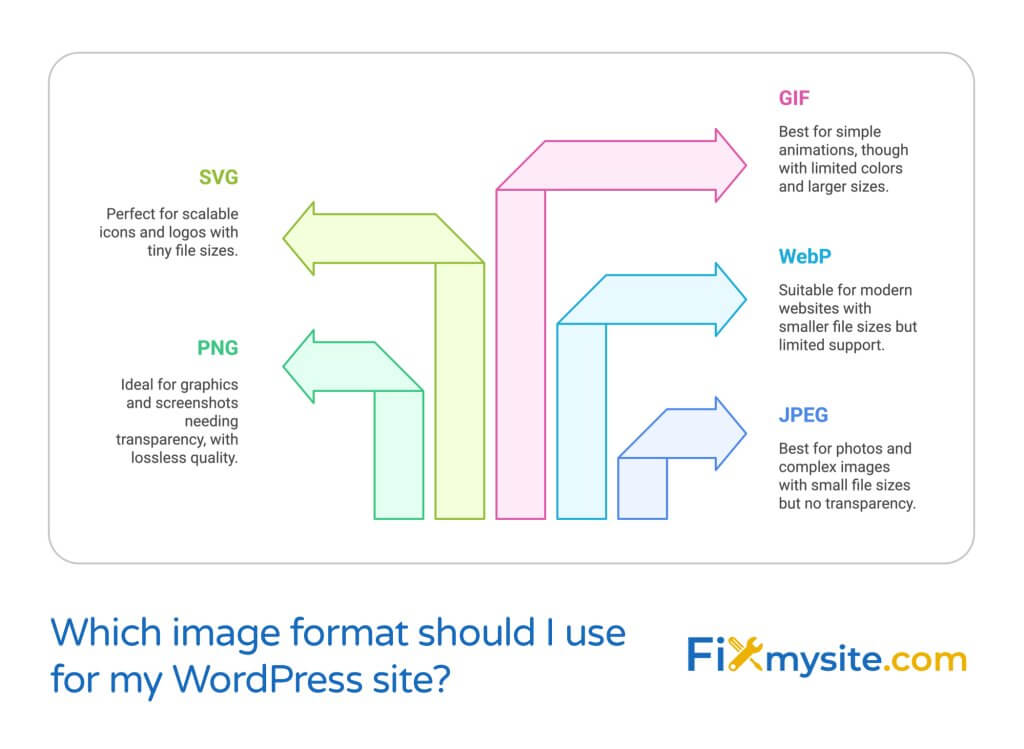
| Format | Best For | Pros | Cons |
|---|---|---|---|
| JPEG | Photos, complex images | Small file size, wide support | Lossy compression, no transparency |
| PNG | Graphics, transparency needs | Lossless, transparency support | Larger file sizes than JPEG |
| WebP | Modern websites | 30% smaller than JPEG | Not universally supported |
| SVG | Icons, logos, graphics | Scalable, tiny file size | Not suitable for photos |
| GIF | Simple animations | Animation support | Limited colors, large sizes |
JPEG is ideal for photographs and images with many colors and details. It uses lossy compression, meaning some data is permanently removed to reduce file size. (Source: Cloudinary)
PNG works best for graphics, screenshots, or images that require transparency. It uses lossless compression, preserving all image data but resulting in larger files than JPEG.
WebP is a newer format that offers superior compression. Images in WebP format are typically 30% smaller than their JPEG counterparts while maintaining similar quality. WebP also supports transparency like PNG but with smaller file sizes. (Source: Cloudinary)
For most WordPress users, a simple guideline is:
- Use JPEG for photographs and complex images
- Use PNG for graphics, screenshots, and images needing transparency
- Consider WebP if you’ve implemented a solution to serve fallback images for browsers that don’t support it
- Use SVG for logos, icons, and simple graphics that need perfect scaling
How to Optimize Images for WordPress
Now that you understand the proper dimensions, file sizes, and formats, let’s explore how to optimize your images for WordPress.
Pre-Upload Optimization
The best approach is optimizing images before uploading them to WordPress:
- Resize images to the dimensions you need
- Set resolution to 72 DPI
- Save in the appropriate format (JPEG, PNG, WebP)
- Use compression tools to reduce file size while maintaining quality
- Add descriptive filenames for better SEO
Tools like Adobe Photoshop, GIMP, or online services like TinyPNG can compress images before upload. This saves server resources and streamlines your workflow.
WordPress Image Optimization Plugins
If you prefer to automate optimization, several WordPress image optimization plugins can help. These plugins compress images, convert formats, implement lazy loading, and provide other optimization features.
Here’s how different optimization approaches affect site performance:
| Optimization Method | Before Optimization | After Optimization | Improvement |
|---|---|---|---|
| Manual compression | Image: 1.2MB, Load time: 3.5s | Image: 180KB, Load time: 1.2s | 65% faster loading |
| Plugin optimization | Page with 10 images: 8MB, Load time: 5.8s | Page with 10 images: 1.5MB, Load time: 2.1s | 64% faster loading |
| Format conversion (JPEG to WebP) | Image: 220KB, Load time: 1.4s | Image: 154KB, Load time: 1.0s | 30% smaller files |
| Responsive images | Mobile load: 2.6s | Mobile load: 1.3s | 50% faster on mobile |
The data clearly shows the performance benefits of proper image optimization. Implementing these techniques can dramatically improve your site’s loading speed.
Common WordPress Image Optimization Mistakes to Avoid
Even when trying to follow best practices, many WordPress users make these common mistakes with their images:
Uploading Images at Full Camera Resolution
Modern smartphones and cameras create images that are far larger than needed for websites. A typical smartphone photo might be 4000×3000 pixels and 5-12MB in size. Uploading these directly to WordPress creates unnecessary server load and slows down your site.
Always resize images to the maximum dimensions needed for your website before uploading. If your content area is 1200px wide, there’s no benefit to uploading a 4000px wide image.
Ignoring Image SEO Opportunities
Properly named files and complete alt text are essential for image SEO. Use descriptive filenames (like “wordpress-speed-optimization-guide.jpg” instead of “IMG_12345.jpg”) and always add relevant alt text to help search engines understand your images. (Source: Cloudinary)
Using the Wrong Format
Saving a screenshot or graphic as JPEG or a photograph as PNG typically results in files that are much larger than necessary. Always choose the right format for each image type.
Not Considering Mobile Users
Mobile visitors now make up the majority of web traffic for many sites. Heavy images can make your site painfully slow on mobile networks. Always test your site’s performance on mobile devices and optimize accordingly.
Advanced WordPress Image Optimization Techniques
For those looking to take their WordPress image optimization to the next level, consider these advanced techniques:
Implement a Content Delivery Network (CDN)
CDNs store copies of your images on servers around the world, delivering them from locations closer to your visitors. This reduces latency and speeds up image loading times. Many WordPress speed optimization strategies include CDN implementation. (Source: Cloudinary)
Enable Lazy Loading
Lazy loading delays the loading of off-screen images until users scroll down to them. This technique significantly improves initial page load times, especially for image-heavy pages. (Source: WordPress.org Support)
Use Next-Gen Image Formats
Beyond WebP, formats like AVIF offer even better compression. While browser support is still growing for these formats, implementing them with proper fallbacks can further reduce image sizes.
Implement Browser Caching
Properly configured browser caching tells visitors’ browsers to store images locally after the first visit. This means returning visitors don’t need to download images again, resulting in much faster page loads.
Consider LQIP (Low Quality Image Placeholders)
LQIP techniques display very small, blurry versions of images while the full versions load. This gives users an immediate visual representation and improves perceived loading speed.
These advanced techniques can help you create an exceptionally fast WordPress site. Combined with proper image sizing and compression, they provide the best possible experience for your visitors.
Conclusion: Balancing Image Quality and Website Performance
Finding the right balance between image quality and performance is essential for WordPress success. By following the recommended file sizes, dimensions, and resolutions in this guide, you’ll create a website that loads quickly while still looking professional.
Remember these key takeaways:
- Optimize images before uploading to WordPress
- Keep most images under 200KB with a maximum of 300KB for special cases
- Use 72 DPI resolution for all web images
- Choose the appropriate format: JPEG for photos, PNG for graphics
- Consider WebP for modern browsers
If you’re struggling with fixing a slow WordPress site, image optimization is often the quickest way to see significant performance improvements. The few minutes spent properly sizing and compressing images can save your visitors frustration and keep them engaged with your content.
Need help optimizing your WordPress site’s images or implementing advanced performance techniques? Our team at Fixmysite.com specializes in WordPress speed optimization and can help your site reach its full potential. Contact our support team today to learn more about our WordPress care packages.