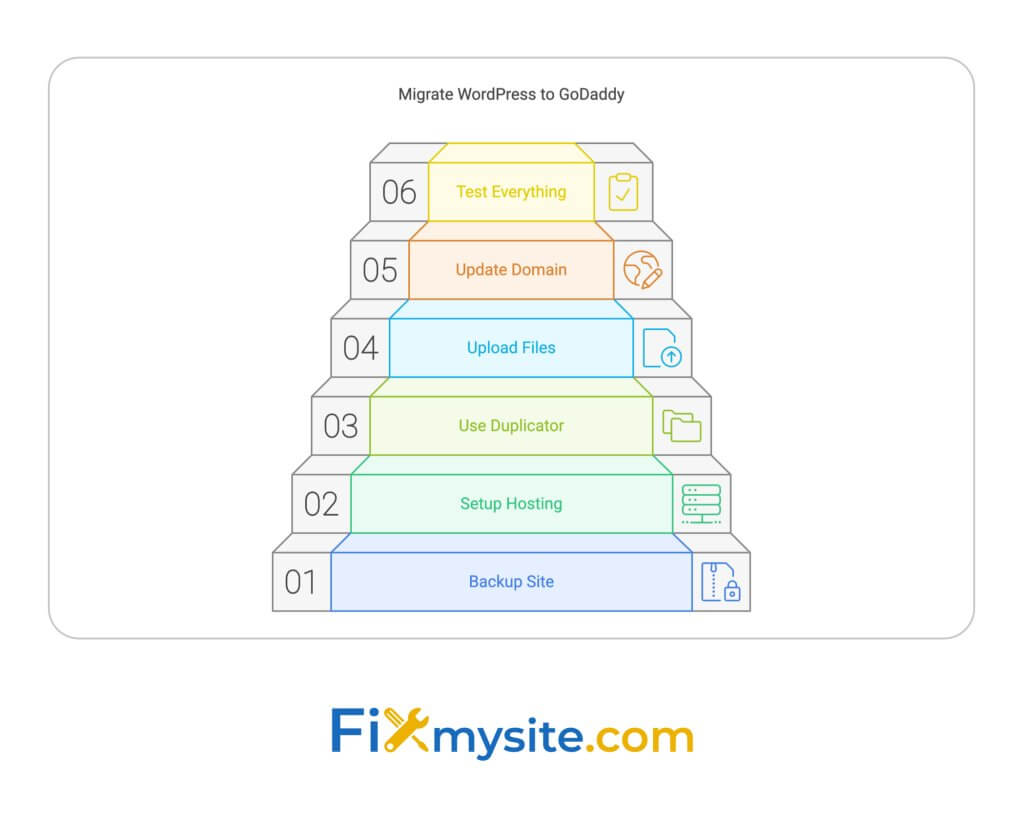
Want to move your WordPress site to GoDaddy without any downtime? Here’s a quick guide:
- Back up your current site
- Set up GoDaddy hosting
- Use Duplicator plugin to copy your site
- Upload files to GoDaddy
- Update domain settings
- Test everything
The whole process takes about 2 hours, depending on your site’s size.
Here’s what you need before starting:
- FTP software
- WordPress admin login
- Hosting control panel credentials
- Domain registrar access
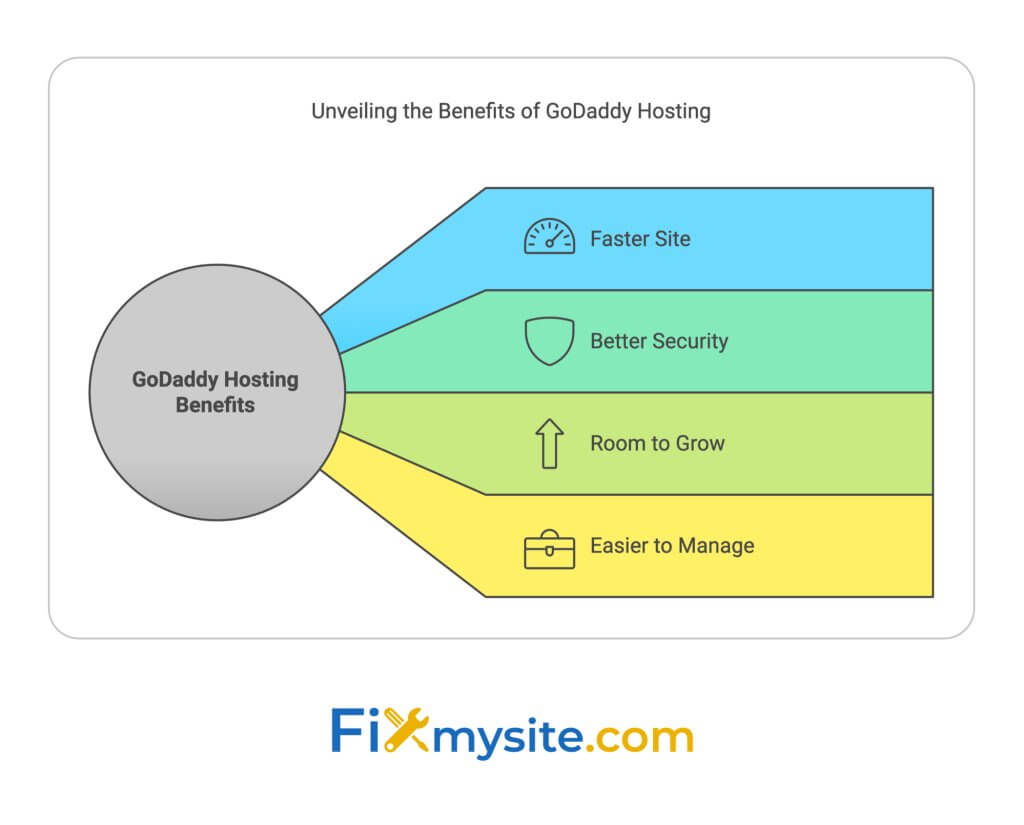
Why migrate your WordPress site to GoDaddy? You’ll get:
- Faster site speed
- Better security
- Room for growth
- Easier site management
| Step | What to Do | Time |
| 1. Backup | Use Duplicator plugin | 15-30 mins |
| 2. GoDaddy setup | Buy hosting, create database | 10-15 mins |
| 3. Move files | Upload to GoDaddy | 15-60 mins |
| 4. Update domain | Change nameservers | 5-10 mins |
| 5. Final checks | Test all pages and features | 15-30 mins |
Follow this guide to keep your site running smoothly during the move. No lost visitors, no lost revenue.
How to Migrate your WordPress Site with the Duplicator Plugin (no downtime)
What You Need Before Starting
Let’s get your WordPress site ready for its big move to GoDaddy. Here’s what you’ll need:
Tools and Access Rights
Grab these essentials:
- FTP software (like FileZilla)
- WordPress admin login
- Hosting control panel credentials (current and GoDaddy)
- Domain registrar access
Making Site Backups
Don’t skip this step! Here’s how to back up your site:
- Use a backup plugin
Go with the Duplicator plugin:
- Head to Duplicator > Packages and hit Create New.
- Name it, click Next.
- After the scan, click Build.
- Download the backup and installer.php files.
- Manual backup
Or do it yourself:
- Download all files from your site’s root directory via FTP.
- Export your database through phpMyAdmin.
“A 5-minute backup can save you hours of headaches if things go south.” – Rob Pugh, Jetpack Marketing Lead
Checking System Requirements
Make sure your setup plays nice with GoDaddy:
- PHP version
- MySQL version
- WordPress version
Check GoDaddy’s docs and update if needed.
Getting Help from Experts
Not feeling tech-savvy? At Fixmysite.com we have your back:
| Plan | Price | What You Get |
| Maintenance | $79/month | Quick fixes, WordPress updates, Daily backups |
| Security | $159/month | Security boost, Malware removal, Audit logs |
| Performance | $239/month | Speed boost, Image optimization, Smush Pro |
These plans can make your migration smoother, especially for complex sites.
Setting Up Your New Site
You’ve backed up your current site. Now, let’s set up your new home on GoDaddy. Here’s how to do it:
Starting with GoDaddy Hosting

First, buy and set up your GoDaddy hosting package:
- Go to GoDaddy.com
- Click “Hosting & SSL > Web Hosting”
- Pick a hosting package (Economy for one site, Deluxe for multiple)
- Choose your term length
- Select “Linux with cPanel control Panel”
- Consider adding security options
After buying, sign in to your GoDaddy account. Go to “My Account > Products > Web Hosting > Manage”. Pick your domain and set up your cPanel details.
“You can always upgrade later”, says Raubi Perilli, Website Strategist at GoDaddy.
Setting Up the Database
Now, create a new MySQL database for your WordPress site:
- Log into your GoDaddy cPanel
- Find “MySQL® Databases”
- Create a new database
- Create a new database user
- Add the user to the database with ALL PRIVILEGES
Pro Tip: Write down the database name, username, and password. You’ll need these for your wp-config.php file later.
Creating a Test Link
Before going live, set up a staging site. This lets you build and test your website without messing up your live site. GoDaddy makes it easy:
| Feature | Availability |
| Staging Site | In all Managed WordPress plans (except Basic) |
| Domain | GoDaddy generates it automatically |
| Persistence | Stays until you remove it |
To set up your staging site:
- Create it in your GoDaddy dashboard
- Pull your production site into staging
- Access and view your staging site
This temporary web address lets you check everything works before going public.
A staging site is your safety net. It’s where you can experiment, troubleshoot, and perfect your site before pushing changes live
Moving Your Site
You’ve got your new GoDaddy hosting set up. Now it’s time to move your WordPress site. Don’t worry – it’s not as scary as it sounds. Let’s break it down:
Setting Up the Moving Tool
We’ll use the Duplicator plugin to package up your site. Here’s how:
- Install and activate Duplicator on your current site
- Go to Duplicator > Packages and click “Create New”
- Name your package and click “Next”
- After the scan, click “Build”
You’ll end up with two files: archive.zip (your site) and installer.php.
Copying Your Current Site
You’ve already created a copy with Duplicator. Double-check by:
- Downloading the archive.zip and installer.php files
- Keeping these files safe – they’re your migration lifeline
Always create multiple backups before migration. It’s better to have extras than to lose data.
Moving to GoDaddy
Time to transfer your site:
- Use FTP to upload archive.zip and installer.php to your GoDaddy root directory
- In your browser, go to yourdomain.com/installer.php
- Follow the Duplicator installer steps:
- Accept the terms
- Enter your new database details
- Update paths if needed
- Click through to finish
This usually takes 30 minutes to 2 hours, depending on your site’s size.
Testing Your New Site
Before going live, test everything:
- Check all pages and posts
- Test forms and e-commerce functionality
- Make sure media files are showing up
| Test Area | What to Check |
| Content | Pages and posts load |
| Media | Images and videos display |
| Forms | Contact and subscription forms work |
| E-commerce | Products, cart, and checkout function |
| Links | Internal and external links are correct |
If you hit any snags, Fixmysite.com offers a Performance Plan starting at $239/month for thorough testing and optimization.
Keep your old hosting active for at least a week after migration. It’s your safety net if anything unexpected pops up.
Setting Up Your Domain
You’ve moved your WordPress site to GoDaddy. Now what? Let’s point your domain to the right place. This keeps your site running smoothly during the switch.
Test Locally First
Before going public, check your new site on your computer:
- Find your computer’s hosts file
- Add this line: your-godaddy-ip-address your-domain.com
- Save the file
Now you can see your GoDaddy site before anyone else does.
Local testing helps avoid public mistakes – write that down!
Point Your Domain to GoDaddy
Time to update the internet about your site’s new home:
- Log into GoDaddy
- Go to Domain Control Center
- Pick your domain
- Find DNS Management
- Look for NS (nameserver) records
- Copy GoDaddy’s two nameserver values
Next, update your domain registrar:
- Log in to your registrar
- Find domain management
- Look for nameserver settings
- Replace old nameservers with GoDaddy’s
| Old Nameservers | New GoDaddy Nameservers |
| ns1.oldhost.com | ns17.domaincontrol.com |
| ns2.oldhost.com | ns18.domaincontrol.com |
DNS changes can take up to 48 hours. Some visitors might see your old site, others the new one during this time.
Move Your SSL Certificate
Let’s keep your site secure:
- Pick your SSL type:
- Domain Validation (DV): Basic
- Organization Validation (OV): More trust
- Extended Validation (EV): Highest security
- Install the certificate:
- GoDaddy hosting? Use one-click SSL setup
- Otherwise, follow GoDaddy’s SSL guide
- Update WordPress:
- Go to Settings > General
- Change URLs from http:// to https://
- Update .htaccess to force HTTPS:
RewriteEngine On
RewriteCond %{HTTPS} off
RewriteRule ^(.*)$ https://%{HTTP_HOST}%{REQUEST_URI} [L,R=301]
Run through an SSL checklist for SEO-friendly WordPress SSL”, says Akshay Kothari from Notion.
Final Checks
You’ve moved your WordPress site to GoDaddy. Now it’s time to make sure everything’s working smoothly. Here’s how to do a thorough check-up:
Checking Your Content
First, give your site a full once-over:
- Visit every page on your site
- Make sure all images and videos load
- Check that all text is there and looks right
If you find broken images and hyperlinks throughout your WordPress site after changing a domain, use the Better Search Replace plugin to find and replace old URLs with new ones in your database.” – GoDaddy Help SG
This plugin can be a lifesaver if you’re seeing lots of broken links or missing images.
Testing Site Features
Next, put your site through its paces:
- Forms: Submit test entries and check if they’re saved
- E-commerce: Do a test purchase
- Search: Try out different search terms
- Comments: Leave a test comment on a blog post
- Social media: Click all those social icons
And don’t forget about any custom features your site might have. Give those a test run too.
Checking Site Speed
Last but not least, let’s see how fast your site is running on GoDaddy:
- Use speed testing tools like Pingdom or Google PageSpeed Insights
- Compare your site’s speed before and after the move
- Aim for load times under two seconds
“If your website loads in under two seconds, you’re doing well.” – Undsgn™
If your site’s dragging its feet, try optimizing your images or turning on GoDaddy’s caching features. These can give your site a nice speed boost.
Wrap-Up
You did it! You moved your WordPress site to GoDaddy without any downtime. Here’s a quick look at what we covered:
- Get ready
We started by gathering tools, making backups, and checking requirements. This prep work made everything smoother.
- Set up your new spot
We set up GoDaddy hosting, made a new database, and created a test link. This let us check everything before going live.
- Make the move
Using tools like the Duplicator plugin, we packed up your site and moved it to GoDaddy. This usually takes 30 minutes to 2 hours, depending on your site’s size.
- Set up your domain and do final checks
We updated your domain settings, moved your SSL certificate, and made sure everything was working right.
Here’s what you get from this move:
| Benefit | What it means |
| Faster site | GoDaddy’s hosting can speed up your site |
| Better security | Regular updates and support keep your site safe |
| Room to grow | Easy to upgrade as your site gets bigger |
| Easier to manage | Simple tools for keeping your site up-to-date |
“Moving your site is a chance to clean things up and use better tools for managing your media.” – Cloudinary Author
This move isn’t just about changing where your site lives. It’s a chance to make your online presence better. Use GoDaddy’s features like automatic updates and daily backups to keep things running smoothly.
Hit a snag? Don’t sweat it. GoDaddy’s support team is there to help. For trickier issues, you can also check out services like Fixmysite.com for specialized WordPress help.