

Running a WordPress website means constantly making updates, testing new features, and ensuring everything works perfectly. But what happens when something goes wrong during an update? Your live site crashes, visitors see errors, and potential sales disappear. This is where WordPress hosting with staging becomes essential.
Staging environments give you a safe, identical copy of your live website where you can test changes without any risk to your actual site. Think of it as a practice arena before the main event. You make mistakes in private and only push changes live when you know they work.
In this guide, we’ll walk you through everything you need to know about WordPress staging environments—from choosing the right hosting provider to implementing advanced workflows. Let’s get your website the protection it deserves.
What is WordPress Staging and Why is it Essential?
Staging environments are separate copies of your website used for testing changes. They provide a sandbox where you can experiment freely. Your staging site looks and functions exactly like your live site but remains hidden from visitors and search engines.
Why is this essential? Consider what happens when you update a plugin on your live site and it conflicts with your theme. Suddenly, your entire website displays errors or, worse, goes completely down. With a staging site, you would have caught this issue before it affected your actual website.
Major WordPress hosts recognize this need. Bluehost, SiteGround, and WP Engine now include one-click staging in their plans, making setup far simpler than manual methods that were once required.
Definition and Purpose of Staging Environments
A staging environment is a replica of your production (live) website. It contains the same files, database, plugins, and theme as your live site. The key difference is that it’s accessible only to you and authorized team members.
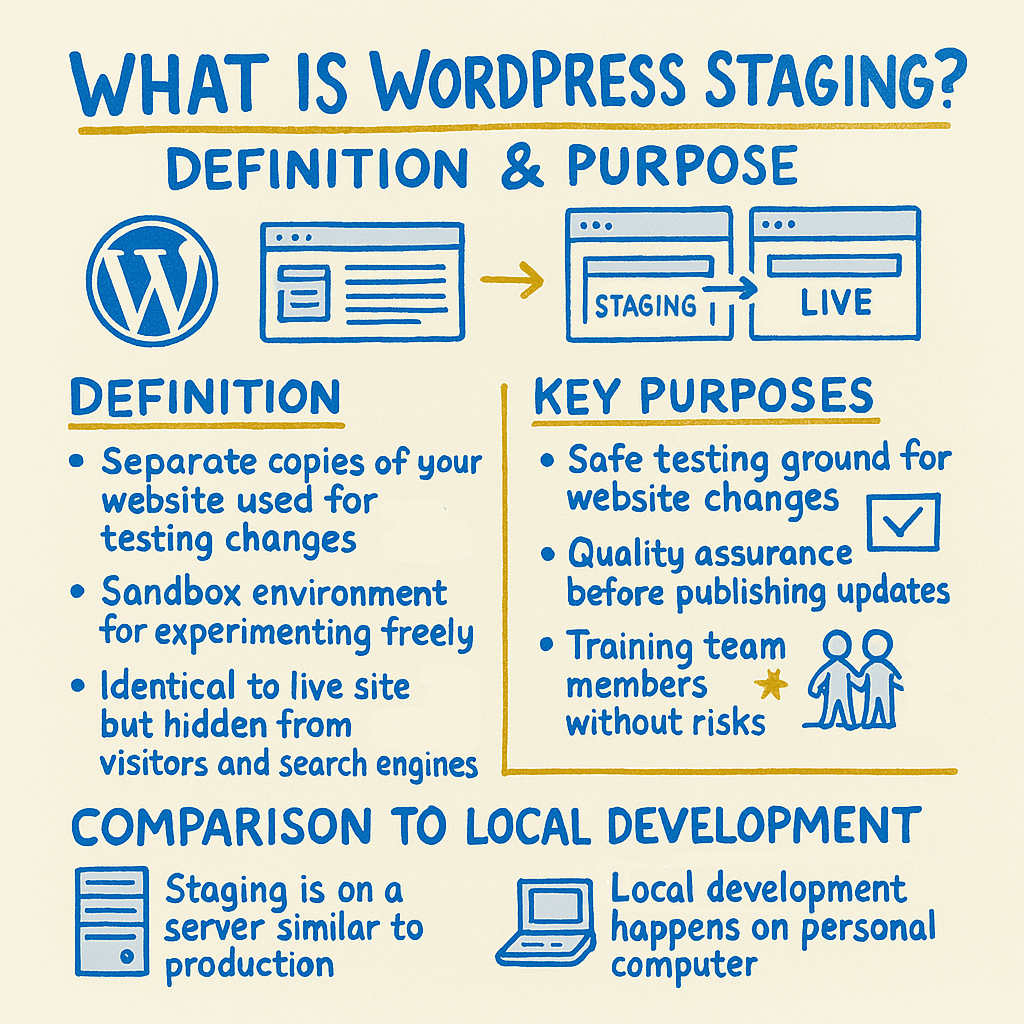
Staging sites serve several crucial purposes. They provide a safe testing ground for website changes. They allow for quality assurance before publishing updates. They help train team members on site management without risks.
The ultimate goal is simple. Catch and fix problems before they reach your live site. This proactive approach prevents downtime and maintains your professional image with visitors.
How Staging Differs from Local Development
Many developers confuse staging environments with local development. They serve different purposes. Local development happens on your personal computer. Staging sits on a server similar to your live environment.
Local development is perfect for initial building and major changes. It’s completely isolated from the internet. Staging environments, however, more accurately reflect how your site will behave when live.
Here’s what makes staging unique:
| Feature | Local Development | Staging Environment | Live Production |
|---|---|---|---|
| Server Configuration | May differ from hosting | Matches production | Production server |
| Internet Connection | Not required | Required | Required |
| Access Speed | Very fast (local) | Similar to production | Standard |
| Visibility | Your computer only | Password protected | Public |
This comparison highlights why staging provides a more realistic testing environment than local development alone. It bridges the gap between development and production, helping you catch server-specific issues.
Benefits of WordPress Hosting with Staging

Staging environments deliver multiple advantages for WordPress site owners. They protect your brand’s reputation by preventing public errors. They save time troubleshooting issues that could have been caught early. They also provide peace of mind during updates.
The benefits extend beyond just technical safety. Having a staging site improves workflow efficiency, enhances collaboration with team members, and creates opportunities for experimentation without consequences.
Risk-Free Testing Before Going Live
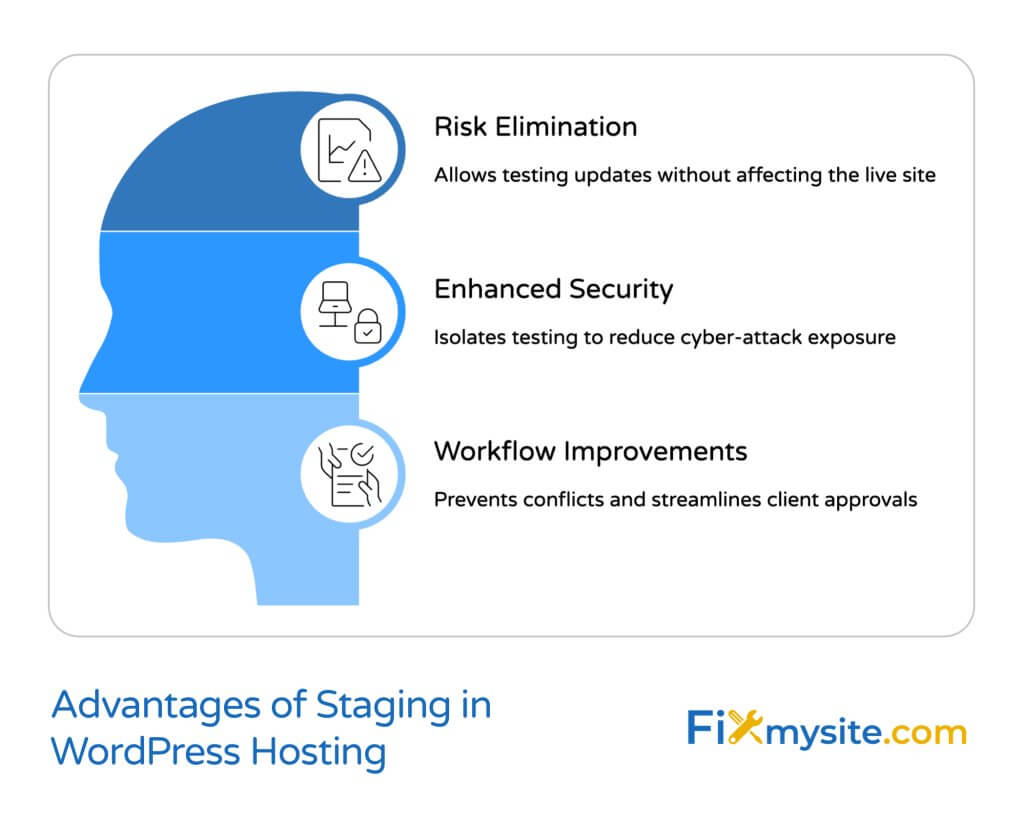
Testing changes on a staging environment eliminates risks to your live website. You can safely verify that new plugins, themes, and code modifications work as expected. This testing ground provides a safety net for all website modifications.
Staging environments allow safe testing of updates, plugins, and themes to avoid conflicts on live sites. This preventative approach protects your visitors from experiencing broken functionality during the update process.
- Core WordPress updates – Test major version changes before applying them to production
- Plugin compatibility – Check for conflicts between new and existing plugins
- Theme customizations – Verify design changes work across all pages
- Custom code – Validate that your custom functions perform correctly
- Content formatting – Ensure new content displays properly with your theme
Each test reduces potential problems. By catching issues early in the staging environment, you maintain a stable and reliable live website for your visitors.
Security Advantages of Staging Sites
Security remains a critical concern for WordPress websites. Staging environments provide significant security benefits beyond just testing. They create an additional layer of protection for your site development process.
Staging sites isolate testing from live environments, reducing exposure to cyber-attacks and credential leaks. When testing security-sensitive changes, this isolation prevents potential vulnerability exploitations on your public-facing website.
Security advantages include testing security plugin configurations, verifying firewall settings, and ensuring hardening measures work correctly. You can also practice security recovery procedures without affecting your live site.
Going Deeper
Want to strengthen your WordPress security? Discover 8 critical security measures hackers hate to protect your website from common vulnerabilities.
Preventing Plugin and Theme Conflicts
Plugin conflicts cause countless WordPress headaches. A staging environment serves as your first line of defense against these common problems. You can test compatibility before issues affect your visitors.
Staging environments allow you to identify potential conflicts between plugins, themes, and WordPress core. This preventative testing helps maintain site stability and prevents the panic of troubleshooting a broken live site.
When managing multiple plugins, each adding different functionalities, the chance for conflicts multiplies. Common conflict areas include JavaScript interactions, CSS overrides, and database queries. Staging helps identify these issues before they cause problems.
| Conflict Type | Warning Signs | Testing Approach |
|---|---|---|
| JavaScript Errors | Broken functionality, console errors | Update one plugin at a time, check browser console |
| CSS Conflicts | Visual glitches, layout problems | Inspect element, check for overriding styles |
| PHP Compatibility | White screen, 500 errors | Check error logs after each change |
| Database Conflicts | Missing data, broken queries | Test data-dependent features thoroughly |
Using this systematic approach on your staging site helps identify which specific plugin or theme update might cause issues. This targeted testing saves hours of troubleshooting time.
Streamlining Client Approvals for Agencies
For agencies and freelancers, staging sites transform the client approval process. They provide a visual preview of changes before making them live. Clients can review and approve updates with confidence.
Agencies use staging sites for client feedback to streamline the review process. This approach helps avoid misunderstandings about how changes will appear once implemented on the live site.
The approval workflow becomes more efficient. Clients see exactly what they’ll get before changes go live. This reduces revision requests and speeds up project completion. The staging site serves as a shared reference point for all stakeholders.
Popular WordPress Hosting Providers with Built-in Staging
Choosing the right hosting provider affects your staging experience. Many WordPress-focused hosts now offer integrated staging solutions. These built-in tools simplify the process of creating and managing test environments.
Not all staging implementations are equal. Some providers offer one-click solutions while others provide more advanced features. Understanding these differences helps you select the right host for your needs.
Comparative Analysis of Hosting Options
WordPress hosting providers take different approaches to staging environments. Some focus on simplicity with one-click creation. Others offer more advanced features like partial syncing or multiple staging sites.

When comparing hosts, consider how staging fits your workflow. Think about how often you’ll need to create staging sites. Consider whether you need to maintain multiple staging environments simultaneously. Evaluate if you require special features like WooCommerce compatibility.
| Hosting Provider | Staging Creation | Push to Live | Multiple Staging Sites | WooCommerce Compatible |
|---|---|---|---|---|
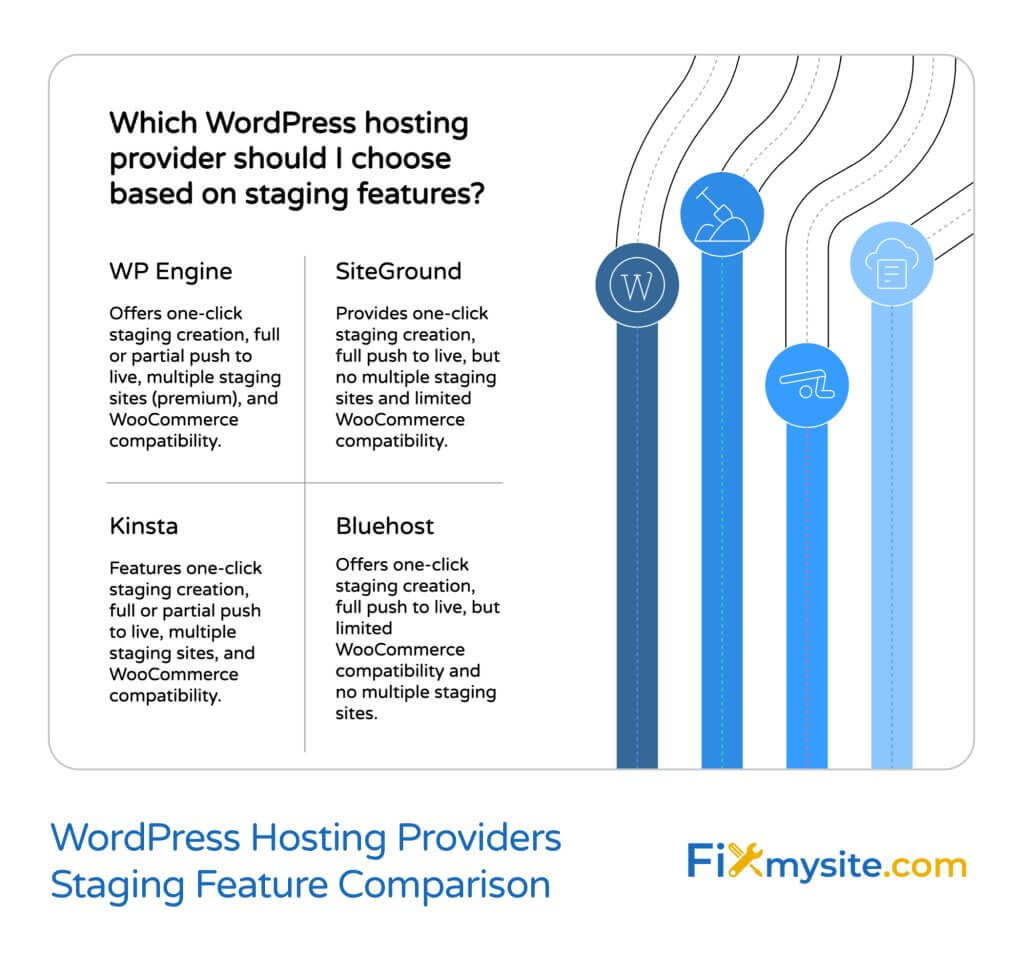
| WP Engine | One-click | Full or partial | Yes (Premium plans) | Yes |
| SiteGround | One-click | Full only | No | Yes |
| Kinsta | One-click | Full or partial | Yes | Yes |
| Bluehost | One-click | Full only | No | Limited |
This comparison highlights key differences between popular hosting providers. Your specific needs will determine which features matter most for your workflow and development process.
One-Click Staging Solutions
One-click staging solutions have transformed WordPress development workflows. They remove technical barriers that once made staging sites difficult to implement. Now, even non-technical users can create test environments.
Major WordPress hosts include one-click staging in their plans, simplifying setup compared to manual methods that were previously required. This accessibility has made staging a standard practice rather than an advanced technique. (Source: Acclaim Agency)
The simplicity of modern staging tools has changed how websites are maintained. Updates that once required careful planning and potential downtime can now be tested thoroughly before implementation. This reduces risks and improves site reliability.
Setting Up Your WordPress Staging Environment
Setting up a staging environment depends on your specific situation. Your hosting provider, technical comfort level, and website complexity all influence the best approach. We’ll explore the most common methods available.
Each setup method has advantages and limitations. Host-provided tools offer simplicity but less flexibility. Plugins provide more control but may have compatibility issues. Manual methods give complete customization but require technical skills.
Using Host-Provided Staging Tools
Host-provided staging tools offer the easiest path to creating test environments. They integrate directly with your hosting control panel. The process typically requires just a few clicks.
The exact steps vary by host. Here’s a general process that applies to most providers:
- Log in to your hosting control panel
- Navigate to the WordPress or staging section
- Select your website domain
- Click the “Create Staging Site” button
- Wait while the system copies your site (may take several minutes)
- Access your new staging site using the provided URL
After creation, your staging site operates independently from your live site. Changes to one won’t affect the other until you specifically push updates from staging to production.
WordPress Plugins for Creating Staging Sites
WordPress plugins offer an alternative when your host doesn’t provide staging tools. These plugins work across many hosting environments. They give you more control over the staging process.
Several WordPress plugins can create and manage staging sites effectively. These tools vary in features and complexity, with some focusing on simplicity while others offer advanced synchronization capabilities.
Popular staging plugins include WP Staging, Duplicator Pro, and BlogVault. Each has unique strengths. Some excel at creating staging environments, while others focus on the deployment process. Choose based on your specific needs.
| Plugin Name | Free Version Available | Database Merging | Selective Push | Best For |
|---|---|---|---|---|
| WP Staging | Yes (Limited) | Pro version only | Yes (Pro) | Simple staging needs |
| Duplicator Pro | Yes (Limited) | Yes | Yes | Migration + Staging |
| BlogVault | No | Yes | Yes | Managed solutions |
| WP Stagecoach | No | Yes | Yes | Ease of use |
Each plugin approaches staging differently. Research their specific features to find the one that best matches your workflow requirements and technical abilities.
Manual Staging Site Creation Options
Manual staging creation gives you complete control over your test environment. It requires more technical knowledge but offers maximum flexibility. This approach works with any hosting provider.
The manual process involves several technical steps:
- Create a subdomain or subdirectory for your staging site
- Set up a new database for the staging environment
- Copy all files from your live site to the staging location
- Export and import your database
- Update configuration files with new database details
- Adjust site URLs in the database
- Set up password protection for privacy
Manual creation requires comfort with file management, databases, and WordPress configuration. If you’re not technically confident, consider using a plugin or host-provided solution instead.
Best Practices for Working with Staging Sites
Following best practices ensures your staging workflow runs smoothly. These guidelines help prevent common problems. They maximize the benefits of your test environment while minimizing potential issues.
Effective staging workflows require discipline. Establish clear processes for testing, deployment, and maintenance. Document your procedures so team members can follow consistent practices.
Managing and Syncing Content Between Staging and Live
Content synchronization presents one of the biggest challenges with staging environments. As your live site continues to receive updates, your staging environment can quickly become outdated. Managing this divergence requires planning.
Staging sites help prevent disruptions during updates by providing a separate environment for testing. However, keeping content in sync between environments requires careful consideration and established processes.
Best practices for content synchronization include:
- Schedule regular refreshes – Update your staging site from production on a consistent schedule
- Document content changes – Keep records of new content added to the live site during testing periods
- Use selective sync when available – Push only code and configuration changes, not content
- Plan deployment windows – Schedule updates during lower traffic periods
These practices help maintain alignment between environments while minimizing content loss or duplication during the deployment process.
Database Considerations for Staging Environments
Database management requires special attention in staging workflows. Your database contains both content and configuration. Handling it correctly prevents data loss when moving between environments.
The database stores critical information like user accounts, posts, pages, products, and settings. When pushing changes between environments, you need to decide which elements should be updated and which should remain untouched.
Expert Tip
Is your WordPress site running slowly? Learn how to implement 5 stress-free steps to boost your site speed through database optimization for better performance.
Consider these database practices for staging sites:
| Database Element | Staging to Live Recommendation | Potential Issues |
|---|---|---|
| User Accounts | Do not push | Overwriting customer accounts |
| Orders/Transactions | Do not push | Loss of sales data |
| Plugin Settings | Selectively push | Environment-specific configurations |
| Content Updates | Selectively push | Overwriting newer content |
Using these guidelines helps prevent common database-related problems when synchronizing between environments. Always back up both sites before major synchronization operations.
Testing and Quality Assurance on Staging Sites
Effective testing on staging sites requires a structured approach. Random clicking around isn’t enough. Create test plans that cover critical site functions and user journeys.
Proper quality assurance includes checking both functionality and appearance. Test across multiple devices and browsers. Verify that all forms, checkout processes, and interactive elements work correctly.
When testing major changes, consider this checklist:
- Cross-browser testing – Check functionality in Chrome, Firefox, Safari, and Edge
- Mobile responsiveness – Verify layouts on phones and tablets
- Critical user paths – Test important conversion flows like signups or purchases
- Performance impact – Measure load times before and after changes
- Integration functionality – Verify connections to external services still work
Document test results before pushing to production. This documentation provides a reference if issues arise after deployment and helps track the impact of changes over time.
Troubleshooting Common Staging Issues
Even well-planned staging environments can encounter problems. Understanding common issues helps you resolve them quickly. Most staging problems fall into predictable categories with established solutions.
Troubleshooting staging issues often requires investigating discrepancies between environments. Differences in server configurations, database structures, or file permissions can cause unexpected behavior.
Resolving Database Conflicts
Database conflicts commonly occur during the staging process. These issues typically happen when pushing changes between environments. They can result in lost data or broken functionality.
Common database conflict scenarios include duplicate entries, missing tables, or conflicting plugin data. These problems often manifest as error messages or missing content after deployment.
| Database Issue | Symptoms | Solution |
|---|---|---|
| Table prefix mismatch | Missing content, broken site | Update wp-config.php with correct prefix |
| Serialized data issues | Widget failures, broken settings | Use proper migration tools with search-replace |
| Duplicate content | Multiple copies of posts/pages | Clean database before importing, use unique IDs |
| Incomplete transfers | Missing tables or data | Verify complete export/import, check for errors |
These solutions address the most common database issues encountered with staging environments. Always back up both databases before attempting fixes to prevent data loss.
Handling URL and Path Differences
URL and path differences cause many staging site problems. WordPress stores absolute URLs in the database. When moving between environments with different URLs, these references can break.
Issues with URLs commonly affect images, internal links, and resource paths. They can result in broken media, navigation problems, or missing style elements on your staging or newly pushed live site.
SiteGround users sometimes encounter specific issues with their staging sites, including URL-related problems that require technical workarounds. Understanding these limitations helps develop effective staging workflows. (Source: Escape Creative)
To prevent URL-related issues:
- Use a proper database search and replace tool when migrating
- Update hardcoded URLs in theme and plugin files
- Check permalink settings after migration
- Clear cache after URL changes
These practices help maintain proper references when moving between different environments with distinct URLs.
Managing Plugin Inconsistencies Between Environments
Plugin inconsistencies often create problems between staging and live environments. Different plugin versions, activation states, or settings can cause unexpected behavior after deployment.
These inconsistencies typically happen when plugins are updated in one environment but not the other. They can also occur when plugin settings are environment-specific or when plugins behave differently based on server configurations.
To manage plugin consistency:
- Document active plugins in both environments
- Match plugin versions before major testing
- Note which plugin settings should be environment-specific
- Disable development-only plugins before pushing to production
Following these guidelines helps prevent plugin-related surprises when moving between environments. It ensures that your staging tests accurately reflect how changes will behave in production.
Advanced Staging Workflows for WordPress Professionals
Professional WordPress developers often implement more sophisticated staging workflows. These advanced approaches provide greater flexibility and control. They’re particularly valuable for complex sites and team environments.
Advanced workflows typically involve multiple environments and automated processes. They draw inspiration from software development practices adapted to WordPress contexts.
Multi-environment Development Pipelines
Multi-environment pipelines extend beyond simple staging. They create a complete development flow with dedicated environments for each phase. This structured approach improves quality control and reduces deployment risks.
A typical multi-environment pipeline includes:
| Environment | Purpose | Access Level | Update Frequency |
|---|---|---|---|
| Development | Active building/coding | Developers only | Continuous |
| Testing/QA | Structured testing | Developers and testers | After dev milestones |
| Staging | Pre-deployment verification | Team and clients | Before production releases |
| Production | Live website | Public | Scheduled releases |
This pipeline approach creates clear separation between development stages. It provides structured points for review and approval before changes reach the public site.
Automated Testing on Staging Environments
Automated testing elevates staging workflows to professional levels. Instead of relying solely on manual checks, automated tests systematically verify functionality. This approach catches issues humans might miss.
Types of automated testing for WordPress staging sites include:
- Visual regression testing – Detects unintended visual changes
- Functional testing – Verifies features work as expected
- Performance testing – Measures impact on load times and server resources
- Security scanning – Identifies potential vulnerabilities
Implementing automated testing requires initial setup but saves time and improves quality in the long run. It’s particularly valuable for sites with frequent updates or complex functionality.

Conclusion: Implementing Your WordPress Staging Strategy
WordPress hosting with staging provides essential protection for your website. It creates a safety buffer between your ideas and your live site. This approach prevents problems before they affect your visitors and business.
The optimal staging solution depends on your specific needs. Consider your technical comfort level, update frequency, and website complexity. Choose the approach that balances convenience with the capabilities you require.
Website speed remains critical for user experience and search rankings. Properly implemented staging environments help you optimize performance without risking your live site’s stability. Research shows that implementing proper optimization techniques can significantly improve your site’s loading times and overall performance.
Need Expert WordPress Support?
Struggling with WordPress issues or want help setting up a proper staging workflow? Our team at Fixmysite.com can handle everything from small tasks to complete site optimizations. Get professional WordPress support today.
Remember that staging is not just a technical tool—it’s a mindset. Embracing testing and verification as standard practices leads to a more stable, reliable website. This proactive approach saves time, prevents stress, and delivers a better experience for your visitors.
Start implementing staging in your WordPress workflow today. Your website—and your peace of mind—will thank you.