

Have you ever tried uploading a high-quality image or video to your WordPress site only to be met with an error message about the file being too large? It’s incredibly frustrating when your creative process gets interrupted by technical limitations. These upload restrictions can bring your workflow to a complete halt, especially when you’re working with larger media files for your website.
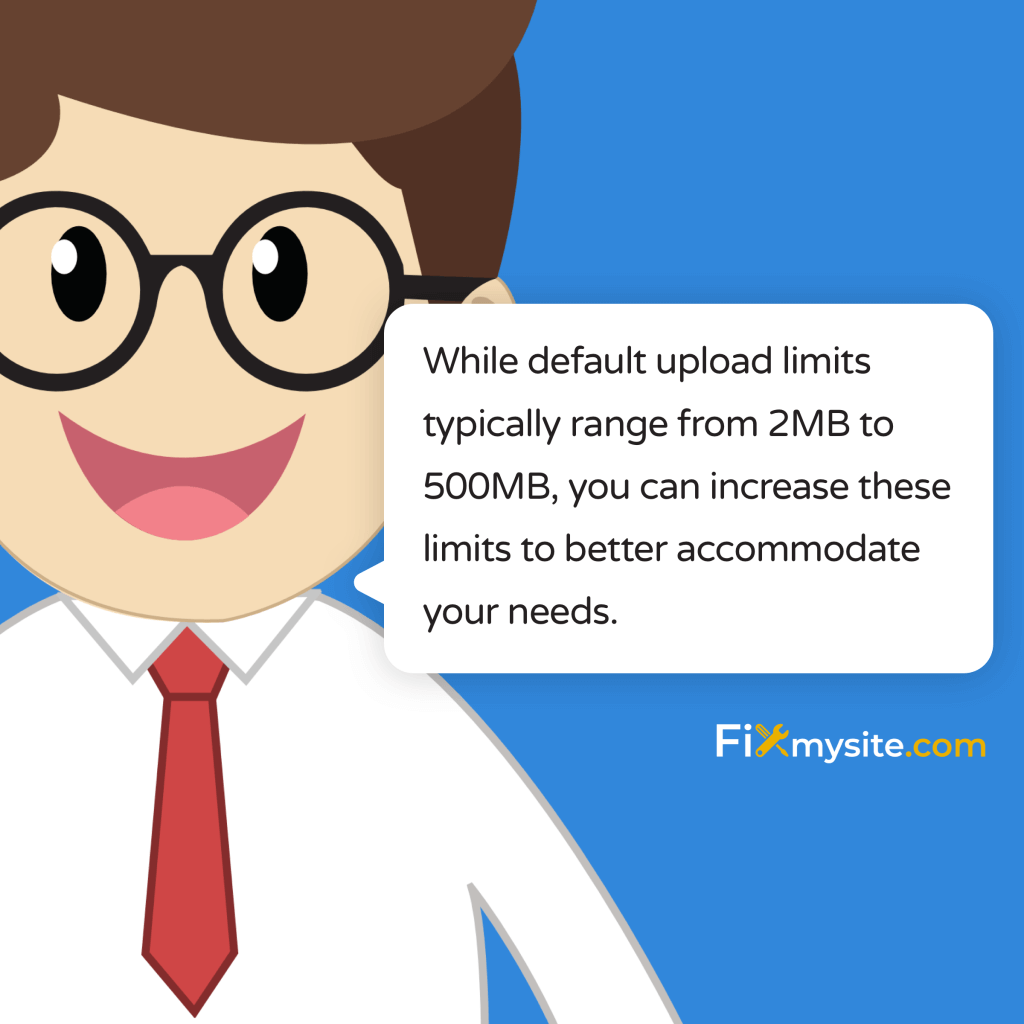
The good news is that you don’t have to settle for the default upload limit. WordPress file upload size restrictions can be adjusted with a few strategic changes. While default upload limits typically range from 2MB to 500MB depending on your hosting provider, you can increase these limits to better accommodate your needs. (Source: WPBeginner)
In this guide, we’ll walk you through multiple methods to increase your WordPress upload size limit, starting with the easiest approaches and progressing to more technical solutions. Whether you’re comfortable editing server files or prefer using plugins, we’ve got you covered. Let’s solve this common WordPress challenge together.
How to Check Your Current Upload Limit
Before making any changes, it’s important to know your current upload limit. This helps you understand if your adjustments are working correctly. There are several easy ways to check your WordPress upload size limit.
The simplest way is to go to your WordPress dashboard and navigate to Media → Add New. WordPress typically displays the maximum upload size right above the upload area. This gives you an instant reference point for what you’re working with.
Another reliable method is to check your PHP information page. This provides more detailed insights into all your PHP settings, including upload limits. Let’s look at how to set up this helpful resource.
Creating a PHP Info File
Creating a PHP info file gives you complete visibility into your server configuration. This small file will display all your current PHP settings, including the crucial upload limit parameters.
To create a PHP info file:
- Open a text editor on your computer
- Create a new file with this single line of code: <?php phpinfo(); ?>
- Save the file as “phpinfo.php”
- Upload it to your WordPress site’s root directory using FTP
- Access it by visiting yourdomain.com/phpinfo.php
Once the page loads, search for “upload_max_filesize” and “post_max_size” to see your current limits. After checking, remember to delete this file since it contains sensitive server information that shouldn’t be publicly accessible.
| PHP Setting | What It Controls | Typical Default Value | Recommended Value |
|---|---|---|---|
| upload_max_filesize | Maximum size of uploaded files | 2M-8M | 64M-256M |
| post_max_size | Maximum size of POST data | 8M | Same or larger than upload_max_filesize |
| memory_limit | Maximum memory for PHP scripts | 128M-256M | 256M-512M |
| max_execution_time | Maximum time scripts can run | 30 seconds | 120-300 seconds |
The values in this table show typical settings you’ll encounter across different hosting environments. Your specific configuration might vary based on your hosting provider and plan type.
Understanding WordPress Upload Limits
WordPress file upload limits aren’t arbitrary restrictions. They serve important purposes related to server resource management and security. Understanding why these limits exist helps you make informed decisions about adjusting them.
Upload limits are primarily determined by your hosting provider’s server configuration. They’re set to protect server resources and prevent potential abuse. Large file uploads can consume significant server memory and processing power, which might impact your website’s performance and other sites on shared hosting.
The default upload limit varies significantly depending on your hosting provider. For example, WP Engine sets default limits of 50MB for single site installations and just 1MB for Multisite networks. (Source: WP Engine)
It’s important to understand that WordPress itself doesn’t impose these limits. The restrictions come from your server’s PHP configuration, which is controlled by your hosting environment. This is why the methods for increasing upload limits focus on server settings rather than WordPress settings.
Critical PHP Settings Affecting Upload Size
Several PHP settings work together to control your maximum upload size. You’ll need to modify all of these settings to successfully increase your upload limit:
| Setting Name | Description | Relationship to Upload Size |
|---|---|---|
| upload_max_filesize | Maximum size of individual files | Directly limits file size |
| post_max_size | Maximum size of POST data | Must be equal or larger than upload_max_filesize |
| memory_limit | Maximum PHP memory allocation | Must be larger than post_max_size |
| max_execution_time | Maximum script execution duration | Affects time allowed for upload processing |
| max_input_time | Maximum time for parsing input data | Affects time allowed for file transfer |
Understanding the relationship between these settings is crucial. If you increase only upload_max_filesize but not post_max_size, your uploads will still fail. These settings need to be adjusted together in a specific hierarchy.


Method 1: Editing PHP Configuration
The most direct and effective way to increase your WordPress upload limit is by modifying your PHP configuration settings. This method gives you complete control and works across all hosting environments that allow PHP configuration changes.
Remember that server-level adjustments always supersede any WordPress settings. While other methods might seem easier, editing your PHP configuration provides the most reliable solution for permanently increasing your upload limits. (Source: Liquid Web)
Let’s explore the different approaches to edit your PHP configuration based on your hosting setup.
Using cPanel to Modify PHP Settings
If your hosting provider offers cPanel access, this is one of the easiest ways to modify PHP settings without directly editing configuration files.
- Log in to your hosting cPanel account
- Look for “PHP Configuration” or “Select PHP Version”
- Find the “Options” or “Switch to PHP Options” section
- Locate and update the following values:
- upload_max_filesize (set to desired value, e.g., 256M)
- post_max_size (set to same or larger value)
- memory_limit (set to larger value than post_max_size)
- max_execution_time (increase to 300 or higher)
- Save your changes
- Return to WordPress and test a file upload
This approach is user-friendly as it provides a graphical interface for making changes without editing files directly. Most cPanel interfaces will apply these changes immediately, though some may require a server restart.
Editing php.ini File Directly
For more advanced users or those without cPanel access, directly editing the php.ini file offers complete control over PHP settings. This method requires FTP or SSH access to your server.
First, check if a php.ini file already exists in your WordPress root directory. If not, you’ll need to create one:
- Connect to your server via FTP or SSH
- Navigate to your WordPress root directory
- Create or edit the php.ini file with the following lines:
upload_max_filesize = 256M
post_max_size = 256M
memory_limit = 512M
max_execution_time = 300
max_input_time = 300
After saving the file, you may need to restart your web server for the changes to take effect. Many hosting providers handle this automatically, but check with your host if you’re unsure.
If this method doesn’t work, it might be because your hosting provider has configured PHP to ignore local php.ini files. In that case, try the next method.
Creating a Custom user.ini File
Some hosting environments, especially those running PHP-FPM, use a different configuration file called .user.ini instead of php.ini. This method works similarly to the php.ini approach:
- Connect to your server via FTP or SSH
- Navigate to your WordPress root directory
- Create a file named .user.ini with the same configuration lines as the php.ini example above
- Upload the file to your server
Changes made through .user.ini files typically take up to 5 minutes to apply, as they’re cached by the server. Be patient when testing after making these changes.
Method 2: Modifying .htaccess File
If you’re unable to change PHP configuration through cPanel or direct file editing, modifying your .htaccess file is another effective approach. This method works well on Apache servers, which most WordPress hosts use.
The .htaccess file controls how your server behaves and can override certain PHP settings. Adding specific directives to this file can increase your upload limit without accessing PHP configuration files. (Source: SiteGround)
Backup First – Very Important!
Before making any changes to your .htaccess file, it’s critical to create a backup. Incorrect modifications can cause a 500 Internal Server Error, making your site inaccessible. A backup ensures you can quickly restore your site if something goes wrong.
.htaccess Code Modifications
Follow these steps to safely modify your .htaccess file:
- Connect to your website using FTP or your hosting file manager
- Locate the .htaccess file in your WordPress root directory
- Download a backup copy to your local computer
- Edit the file and add the following code at the bottom:
# Increase upload file size limits
php_value upload_max_filesize 256M
php_value post_max_size 256M
php_value memory_limit 512M
php_value max_execution_time 300
php_value max_input_time 300- Save the file and upload it back to your server
- Test your website to ensure it loads correctly
- Check if your upload limit has increased
If you encounter a 500 Internal Server Error after making these changes, immediately restore your backup .htaccess file. This error occurs when your server isn’t configured to allow these PHP values to be set in .htaccess files.
| Hosting Environment | .htaccess Support | Common Issues | Alternative |
|---|---|---|---|
| Apache Servers | Fully supported | None | N/A |
| Nginx Servers | Not supported | Code has no effect | Use php.ini method |
| Shared Hosting | Limited support | 500 errors | Use plugin or contact host |
| VPS/Dedicated | Fully supported | Rarely any issues | Server php.ini |
This table shows how different hosting environments handle .htaccess modifications. As you can see, this method works best on Apache servers with proper PHP module configurations.
Method 3: Using WordPress Plugins
If you’re not comfortable editing server files, WordPress plugins offer a more user-friendly approach to increasing upload limits. While plugins can’t override server-level restrictions, they can help you maximize your allowed upload size within those constraints.
The “Increase Maximum Upload File Size” plugin allows you to adjust these settings through a simple interface at Media > Increase Upload Limit. This provides a less technical approach for WordPress users who prefer to avoid server configuration. (Source: WordPress.com)

Popular Upload Limit Plugins Comparison
Let’s compare some of the most effective plugins for adjusting upload limits in WordPress:
| Plugin Name | Key Features | User-Friendly | Technical Limitations |
|---|---|---|---|
| WP Maximum Upload File Size | Simple interface, real-time limit display | Very High | Cannot exceed server limits |
| Increase Maximum Upload File Size | One-click adjustment, shows current limits | High | Works only on certain hosting setups |
| Increase Upload Max Filesize | Automatic limit detection, detailed instructions | Medium | Requires manual verification |
| Advanced File Upload Limits | Custom limits per user role, detailed reporting | Low | More complex configuration |
Each plugin offers different approaches to the same problem. The WP Maximum Upload File Size plugin stands out for its simplicity and user-friendly interface, making it ideal for beginners. (Source: WordPress.org)
Installing and Configuring Upload Limit Plugins
Let’s walk through the process of using the WP Maximum Upload File Size plugin:
- Go to Plugins > Add New in your WordPress dashboard
- Search for “WP Maximum Upload File Size”
- Click “Install Now” and then “Activate”
- Navigate to Settings > WP Maximum Upload File Size
- You’ll see your current upload limit and options to increase it
- Select your desired limit from the dropdown menu
- Click “Save Changes”
- Test by trying to upload a larger file
Keep in mind that plugins can only work within the confines of your server settings. If you’ve selected an upload limit that exceeds your server’s maximum allowed value, the plugin will default to the highest available limit your server allows.
Plugin Limitations
While plugins offer convenience, they have important limitations to understand:
- They cannot override hard server limits set by your hosting provider
- They typically work by adding the same code to .htaccess or using WordPress filters
- On more restricted hosting environments, they may have no effect
- They might conflict with security plugins or caching solutions
Plugins are best used on hosting environments that allow PHP settings to be modified through .htaccess or similar methods. If your hosting provider has strict security policies, plugins might not work effectively.
Method 4: Contacting Your Hosting Provider
When other methods don’t work, reaching out to your hosting provider is often the most reliable solution. Many hosts impose strict limits for security and resource management reasons, but they’re usually willing to increase limits upon request.
For instance, WP Engine allows customers to increase upload limits up to 256MB by simply submitting a support ticket. This provider-assisted approach ensures the changes are properly implemented without causing server issues. (Source: WP Staging)
This method is particularly important for managed WordPress hosting services, where you typically don’t have direct access to server configuration files.
Hosting-Specific Guidelines
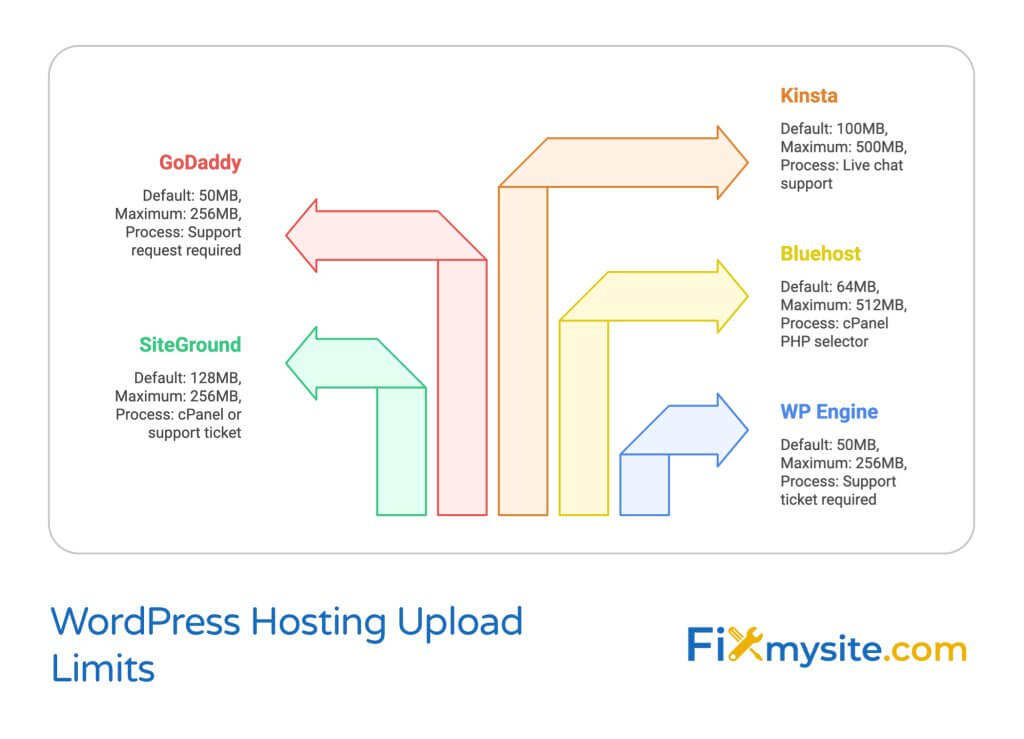
Different hosting providers have their own processes for handling upload limit increase requests. Here’s a comparison of approaches from major WordPress hosting companies:
| Hosting Provider | Default Limit | Maximum Possible | Request Process |
|---|---|---|---|
| WP Engine | 50MB (1MB on Multisite) | 256MB | Support ticket request |
| SiteGround | 128MB | 256MB | cPanel or support ticket |
| Bluehost | 64MB | 512MB | cPanel PHP selector |
| GoDaddy | 50MB | 256MB | Support request required |
| Kinsta | 100MB | 500MB | Live chat support |
This table highlights how hosting providers handle upload limit adjustments. The variation in default and maximum values shows why host-specific solutions are often necessary.
What to Include in Your Support Request
When contacting your hosting provider, include these details to speed up the process:
- Your current upload limit and desired increase amount
- Purpose of the increase (uploading videos, high-res images, etc.)
- Your WordPress site URL
- Description of methods you’ve already tried
- Any error messages you’ve encountered
Being specific about your needs helps support teams process your request more efficiently. Most hosting providers can implement these changes quickly, often within hours of your request.
Troubleshooting Common Upload Issues
Even after attempting to increase your upload limit, you might encounter some issues. Let’s troubleshoot common problems and their solutions.
500 Internal Server Error
If you receive a 500 Internal Server Error after modifying .htaccess, it typically means your server doesn’t allow PHP values to be changed through .htaccess directives. This is a common issue with .htaccess modifications that can make your site temporarily unavailable. (Source: WPBeginner)
To fix this:
- Access your server via FTP
- Restore the backup .htaccess file you created
- Try a different method, such as php.ini modification or contacting your host
Maximum Execution Time Errors
If you’re able to upload larger files but they fail during processing, you might need to increase your max_execution_time setting. This determines how long PHP scripts can run before timing out. Large file uploads, especially for images that need processing, require more execution time.
Add this to your php.ini or .htaccess file:
php_value max_execution_time 300This extends the script execution time to 300 seconds (5 minutes), which is usually sufficient for most uploads.
Multisite Network Special Considerations
WordPress Multisite networks have more restrictive default upload limits. On WP Engine, Multisite networks have a default limit of just 1MB, compared to 50MB for single-site installations. This significant difference requires special attention for Multisite administrators.
| Issue | Cause | Solution |
|---|---|---|
| Changes not affecting Multisite | Network-level settings override site settings | Apply changes at network level |
| Different limits per site | Default Multisite restrictions | Edit ms-settings.php file |
| Plugin doesn’t work on Multisite | Plugin not network-compatible | Network activate or use server methods |
| Super Admin vs. Site Admin permissions | Privilege separation | Changes require Network Admin access |
This table highlights specific issues Multisite network administrators might face when adjusting upload limits. The solutions typically require network-level access and configuration.
Best Practices for File Uploads in WordPress
While increasing your upload limit solves immediate problems, implementing best practices for file management helps maintain optimal site performance. Let’s explore some smart approaches to handling large files in WordPress.
Image Optimization Before Upload
Even with increased upload limits, it’s still best to optimize your images before uploading them. Large image files slow down your website and consume valuable storage space. Consider these optimization practices:
- Resize images to the actual dimensions needed on your site
- Use appropriate file formats (JPEG for photos, PNG for graphics with transparency)
- Compress images using tools like ImageOptim, TinyPNG, or Photoshop’s “Save for Web”
- Consider using WordPress image optimization plugins for automated compression
- Remove unnecessary metadata from image files
These practices ensure your website remains fast and responsive, even when working with numerous media files. Optimizing images before upload is particularly important for maintaining WooCommerce site speed where product images can quickly accumulate.
When to Use External Storage Options
Sometimes, the best solution isn’t increasing your upload limit but using external storage services. This approach is particularly valuable when dealing with very large files or numerous media assets.
Consider external storage when:
- You regularly need to upload files larger than 50MB
- You’re working with video content
- Your media library is growing rapidly
- You’re concerned about hosting storage limits or backup sizes
Services like Amazon S3, Google Drive, or dedicated video platforms like YouTube and Vimeo offer better solutions for large media storage and delivery. WordPress plugins are available to integrate these services with your site, giving you the benefits of external storage while maintaining a seamless user experience.
Security Considerations When Increasing Upload Limits
Increasing upload limits does introduce some security considerations. Larger file uploads could potentially be exploited by malicious users to attack your site. To mitigate these risks:
- Only increase limits to what you actually need, not arbitrarily high values
- Consider restricting upload capabilities to trusted user roles
- Use security plugins like Wordfence to scan uploaded files
- Regularly backup your site before making configuration changes
- Monitor your site for unusual activity after increasing limits
With proper security measures in place, increased upload limits can be implemented safely while providing the functionality you need.

Conclusion: Choosing the Right Method for Your Site
Increasing your WordPress maximum upload file size doesn’t have to be intimidating. We’ve explored multiple approaches, from simple plugin solutions to more advanced server configurations. The best method for your site depends on your technical comfort level and hosting environment.
For beginners or those on managed hosting, the plugin method or contacting your hosting provider offers the simplest path forward. For more technical users with server access, direct configuration file edits provide the most reliable solution.
Remember that server limits always supersede WordPress settings, so if one method doesn’t work, try another approach or contact your hosting provider for assistance. The most important thing is finding a solution that works with your specific hosting environment.
If you’re still facing challenges with file uploads or other WordPress issues, our WordPress support team is ready to help resolve these technical hurdles. We provide fast, reliable fixes for all your WordPress challenges, letting you focus on creating great content instead of troubleshooting technical issues.
Have you tried increasing your WordPress upload limits? Which method worked best for you? Share your experience in the comments below!